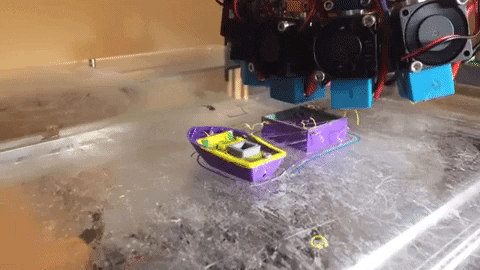
The 3D printing community is simply stirring with excitement over toolchanging printers, but these machines are still the exception rather than the norm. Here’s an exceptional exception: [Paul Paukstelis] built a five-color printer with a novel head-changing solution.
[Paul’s] 3D printer is a hat-tip to anyone who’s spent time in the wetlab. For starters, the printer is born from the remains of a former liquid handling system, a mighty surplus score. When it comes to headchanging, [Paul] combined some honest inspiration from E3D’s toolchanging videos with some design features borrowed from the microscope in his lab. The result is that the printer’s five-tool head-changer mechanically behaves very similarly to the nose piece in a compound light microscope.
Because the printer evolved from old lab equipment, [Paul] dubs his printer into a lineage that he calls the “Reclaimed Rapid-Prototyper,” or the RecRap. Best of all, he’s kindly posted up the CAD files on the Thingiverse such that you too can take a deep look into this head-changing solution.
We love seeing these tools get a second life, and we think there’s plenty of potential for new offspring in this lineage of discarded lab equipment.


Always love to see diffrent soulutions for toolchange/ multi extruder setups!
Hats of for the mechanical construction but this is not a very practical way to do multi-material printing, IMO.
All that extra weight of the extruders and motors has to be carried, that adds to the moving mass of the system seriously limiting the printing speed (before the machine would vibrate itself apart). It also puts significant extra wear and tear on the x axis. People are trying to reduce the moving masses using small, direct drive extruders and/or bowden extruders that move the motor away from the hot-end – and here we add several complete extruders to the printing head …
How many materials does a typical print need? I would say 2 cover pretty much 95% of cases – main material + cheap support/flexible overprint. If you have 3 extruders you would likely cover 99.9% of all possible cases. So why to carry 5 complete extruders?
Achieving multicolor prints is done better by painting the result than by printing multiple materials.
Another issue is the resulting messiness of the prints – oozing plastic from the unused extruders (they have to be on and primed otherwise a tool change would take a long time), stringing, etc. Also different materials may not fuse well together.
Much of what you say reminds me of this https://www.diabasemachines.com/home
except their toolhead only moves in the Z direction.
Its a neat solution if you need multi-material – each head is raised up out of the build volume so only the active head is able to strike parts which is the bane of other multi headed printers. And this setup should be easy to calibrate each head individually in software at the start of a print. As long as the return position is repeatable at least.
You are right the mass of the head does matter. Make the frame and drive stiff enough and it can work fast. But slowing the acceleration of the print head down so it will print perfectly is not the end of the world. And may well be quicker than changing spool and doing many prints in parts that need a mix of material properties.
I personally find changing spools to be the most time consuming thing (as in consuming of my time). So having 5 spools ready to go covering the range of dissolving, flexible etc even if it makes the print take a little longer seems like a win to me. Nobody babysits their printer after getting it set up and working right.. You at best watch the first layer or two to check adhesion and pop in from time to time on a long print.
Stringing will happen, and is part of any lift off on a 3d print anyway. But can be reduced by larger retractions and other slicing tricks.
To get filaments that don’t stick bonded together well requires printing mechanical joints – by having heads of the top material into deliberate voids in the bottom you can create good solid joins and gain the benifits of both plastics. Its effort in design, may take some iterations to really get the relative sizes right. But if you are printing that way for mechanical properties odds are its well worth it. Giving a better result than glue or bolts in many situations.
In short I think I may just have to build something along this lines, as to me this seems the best option for repeatablity and ease of construction. Trying to plug and play new heads from a rack is another neat option and keeps the head weight down. But its most complex and could more easily go wrong. The traditional multiple nozzle all on the same block/plane is a real pain to calibrate as every nozzle has to be so perfectly aligned manually. No calibration or software can really fix it. you have to set each and every extruder’s nozzle to be perfectly level with each other and hope the bed is flat enough.
Mass isn’t a huge issue for this printer. Or at least the added mass. If you take a look at the Thingiverse pictures, the X-carriage itself is already a huge chunk of aluminum. The thing that lets this work OK (no, its not a “great” 3D printer) is that it uses big closed-loop DC servos for X and Y. They can handle the weight, though the gear boxes on them have terrible backlash.
Well backlash can be worked around without major trouble. Though I’ve not seen a DC motor in use for something like this in what feels like forever – powerful steppers are so cheap now (at least compared to years ago when I first started looking to build things).
I’d have thought the belts would also suffer if you try to run it fast. But Fast isn’t everything anyway. Better a reliable convenient printer than one that knocks out a part 20% faster. – If you are using a printer in mass production you are doing it wrong.
You’re right about the mass. I made a similar design based on a remix of http://www.thingiverse.com/thing:666592
I abandoned it because it was just too heavy even though it was smaller and bowden based. That was on a delta however. I thought it might work on a cartesian but I never tried that.
Wow that thing is huge. Would not fit on my printer at all. And the change to a different extruder seems way too violent to be able to survive very long
I don’t know. It doesn’t look to me like it is going to do very well in an ocean. Also, when it dies and you split it up to make a heaven and an earth they are going to have to be very small places.
All that capability, wasted on a tugboat…
The world needs tugboats, Mark ;-)
Is it just the background, or does that print look like a terrible mess?
Agree with others that this adds a lot of weight to the extruder that the x axis now has to move around. Frame and motor mods help, and slowing the print speed…
Something I like about this, more than the opportunity for multi-material, is this could allow for different nozzle diameters on the same print. You would have to modify the slicer (or do some gcode surgery) to get a slice that actually works for different nozzles, but it could be great for large prints where you want really fine detail on just some of the layers but want the high throughput of a larger nozzle everywhere else.
This is straightforward in recent versions of Cura (prevents gcode surgery).