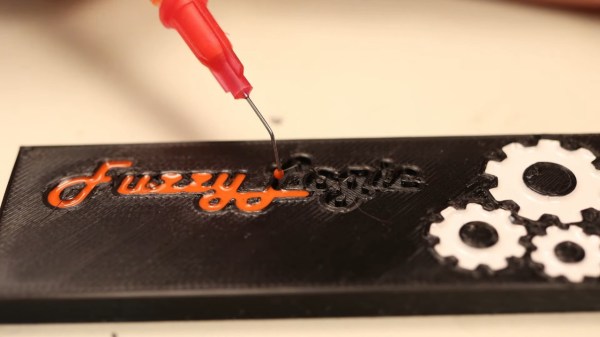
It’s not enough to 3D-print a part – there’s a myriad of things you can do from there! [FuzzyLogic] shows us his approach of adding inlay labels, icons and text to a 3D print, by extruding them into the print and filling the resulting cavity with nail polish! This makes for colorful and useful prints, as opposed to dull single-color parts we typically end up with.
The devil’s in the details, and [FuzzyLogic] has got the details down to a technique. Nail polish has to be diluted with acetone so that it flows well, and a particular combination of syringe and needle will be your friend here. Of course, don’t forget to factor surface tension in – even with well-diluted nail polish, you cannot make the grooves too thin. A bit more acetone on a q-tip helps in case of any happy little accidents, and a coat of clear acrylic spray paint seals the lettering firmly in place. The five-minute video tells you all about these things and a quite few more, like the basics of extruding text and icons in a typical CAD package, and has a bit of bonus footage to those watching until the end.
Adding markings to our prints is a lovely finishing touch! If you’re looking for more of that, here’s a custom tool-changing printer with a pen attachment making beautiful custom enclosures for the Pocket Operator.
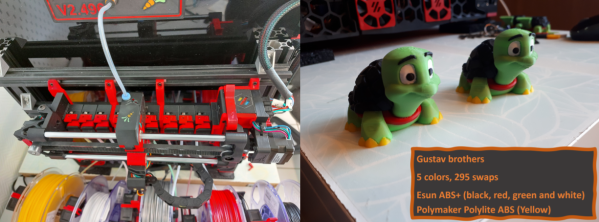
As long as 3D printers have been around, it seems as though many of us have dreamed about nozzle-sharing solutions for multicolor 3D prints. Just because Prusa’s MMU has had the spotlight for some time doesn’t mean that there’s no space to design something original. If you’re craving something new to feast your eyes upon, look no further than the EnragedRabbitProject by [EtteGit]. Built for Voron 3D printers, it’s a scalable filament changing solution designed from the ground up that expands to accommodate up to 9 filaments.
EnragedRabbitProject is broken into four main components. First comes the Enraged Rabbit Carrot Feeder (ERCF), the system that handles filament selection, retraction, and loading. Next, comes the Carrot Patch (ERCP), a spool holder/buffer combo that’s needed per spool. For those unfamiliar with filament changers, unspooling filament is easy, but rewinding it back onto the spool is hard. And since the nozzle will retract a significant length of filament when it switches between filaments, it’s important to manage all this extra loose filament to prevent tangles. A filament buffer is the solution; it’s a clever mechanical addition to the spool holder that will manage the extra filament that gets unwound during these filament changes. Beyond these two systems is the King’s Seat (ERKS) a Voron-2 setup that purges extra filament into beads instead of purge blocks, and finally, the filament sensor, which detects filament presence for filament changes.
It’s sometimes hard to appreciate the reliability of these sorts of CNC systems. On that note, keep in mind that the prints on the project’s landing page are the results of hundreds if not thousands of filament swaps — truly an astonishing feat. Beyond reliability is the project’s presentation. [EtteGit] has kindly posted STEP and STL files for all mechanical components, the Klipper configuration files, and a bill-of-materials that will scale according to the number of filaments you’re installing.
We’re thrilled to see folks continue to innovate on the concept of what it means to be a multi-color or multi-material 3D printer. For other takes on multi-filament setups, have a look at [Paul Paukstelis’] microscope-inspired head changer, and [MihaiDesigns’] removable tool head concept.
We’re impressed to see the continued flow of new and interesting ways to utilize 3D printing despite its years in the hacker limelight. At the 2020 Hackaday Remoticon [Billie Ruben] came to us from across the sea to demonstrate how to use 3D printing and fabric, or other flexible materials, to fabricate new and interesting creations. Check out her workshop below, and read on for more detail about what you’ll find.
The workshop is divided into two parts, a hands-on portion where participants execute a fabric print at home on their own printer, and a lecture while the printers whirr away describing ways this technique can be used to produce strong, flexible structures.
The technique described in the hands on portion can be clumsily summarized as “print a few layers, add the flexible material, then resume the printing process”. Of course the actual explanation and discussion of how to know when to insert the material, configure your slicer, and select material is significantly more complex! For the entire process make sure to follow along with [Billie]’s clear instructions in the video.
The lecture portion of the workshop was a whirlwind tour of the ways which embedded materials can be used to enhance your prints. The most glamourous examples might be printing scales, spikes, and other accoutrement for cosplay, but beyond that it has a variety of other uses both practical and fashionable. Embedded fabric can add composite strength to large structural elements, durable flexibility to a living hinge, or a substrate for new kinds of jewelry. [Billie] has deep experience in this realm and she brings it to bear in a comprehensive exposition of the possibilities. We’re looking forward to seeing a flurry of new composite prints!
If you’ve seen both a fused filament fabrication (FFF) printer and a wire welder, you may have noticed that they work on a similar basic principle. Feedstock is supplied in filament form — aka wire — and melted to deposit on the work piece in order to build up either welds in the case of the welder, or 3D objects in the case of the printer. Of course, there are a number of difficulties that prevent you from simply substituting metal wire for your thermoplastic filament. But, it turns out these difficulties can be overcome with some serious effort. [Dominik Meffert] has done exactly this with his wire 3D printer project.
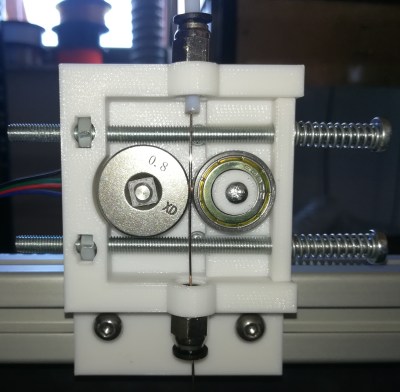
For his filament, [Dominik] chose standard welding wire, and has also experimented with stainless steel and flux-cored wires. Initially, he used a normal toothed gear as the mechanism in the stepper-driven cold end of his Bowden-tube extrusion mechanism, but found a standard wire feeder wheel from a welder worked better. This pinch-drive feeds the wire through a Bowden tube to the hot end.
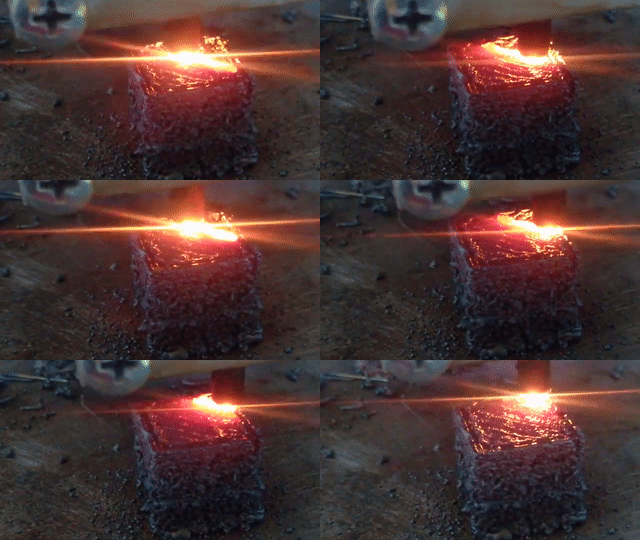
In thermoplastic 3D printers, the material is melted in a chamber inside the hotend, then extruded through a nozzle to be deposited. Instead of trying to duplicate this arrangement for the metal wire, [Dominik] used a modified microwave oven transformer (MOT) to generate the low-voltage/high-amperage required to heat the wire restively. The heating is controlled through a phase-fired rectifier power controller that modulates the power on the input of the transformer. Conveniently, this controller is connected to the cooling fan output of the 3D printer board, allowing any standard slicer software to generate g-code for the metal printer.
To allow the wire to heat and melt, there must be a complete circuit from the transformer secondary. A standard welding nozzle matching the wire diameter is used as the electrode on the hot end, while a metal build plate serves as the other electrode. As you can imagine, getting the build plate — and the first layer — right is quite tricky, even more so than with plastic printers. In this case, added complications involve the fact that the printed object must maintain good electrical continuity with the plate, must not end up solidly welded down, and the fact that the 1450 °C molten steel tends to warp the plate.
Considering all the issues that have to be solved to make this all work, we are very impressed with [Dominik’s] progress so far! Similar issues were solved years ago for the case of thermoplastic printers by a group of highly-motivated experimenters, and it’s great to see a similar thing starting to happen with metal printing, especially using simple, readily-available materials.
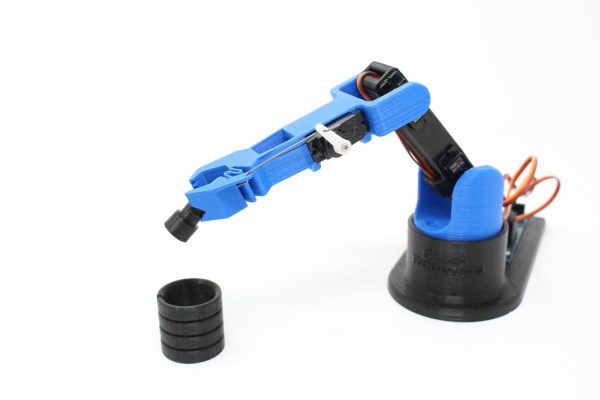
Learning through play is effective for humans of all ages, and since 2016 [slantconcepts] has been designing STEM kits that help teach kids to build their future overlords. They are launching version 3 of their LittleArm robotic arm, and the progression from version 1 is an interesting study in simplification and parts count reduction without sacrificing functionality.
In all of the LittleArm versions the main mechanical components are 3D printed, and driven by 3 servos for motion plus one additional servo to run the gripper. These kits are specifically intended to be built and disassembled repeatedly, and classrooms are a great place for small screws to easily disappear, so reducing the number of screws was a big goal for v3. The gripper/forearm shows the most dramatic improvement from the previous versions, being simplified from 8 separate components to a single 3D printed part by using a compliant mechanism — that squiggly pattern that allows the gripper to flex into place. The gripper tips also feature a simple “cutout” that allow it more easily grasp horizontal objects.
An Arduino Nano based expansion board is used to control the arm, with a HC-06 Bluetooth module to allow it to be controlled via a smart phone app. Various sensors can also be added to expand the kit’s capabilities. Unfortunately the mechanical design is not open source, but it can still be a source of inspiration for your own design projects.
Well, this is it. The end of the decade. In a few days the 2010s will be behind us, and a lot of very smug people will start making jokes on social media about how we’re back in the “Roaring 20s” again. Only this time around there’s a lot more plastic, and drastically less bathtub gin. It’s still unclear as to how much jazz will be involved.
Around this time we always say the same thing, but once again it bears repeating: it’s been a fantastic year for Hackaday. Of course, we had our usual honor of featuring literally thousands of incredible creations from the hacking and making community. But beyond that, we also bore witness to some fascinating tech trends, moments that could legitimately be called historic, and a fair number of blunders which won’t soon be forgotten. In fact, this year we’ve covered a wider breadth of topics than ever before, and judging by the record setting numbers we’ve seen in response, it seems you’ve been just as excited to read it as we were to write it.
To close out the year, let’s take a look at a few of the most popular and interesting stories of 2019. It’s been a wild ride, and we can’t wait to do it all over again in 2020.
Hackaday Editors Mike Szczys and Elliot Williams opine on the coolest hacks we saw this week. This episode is heavy with 3D printing as Prusa released a new, smaller printer, printed gearboxes continue to impress us with their power and design, hoverboards are turned into tanks, and researchers suggest you pour used coffee grounds into your prints. Don’t throw out those “toy” computers, they may be hiding vintage processors. And we have a pair of fantastic articles that cover the rise and fall of forest fire watchtowers, and raise the question of where all those wind turbine blades will go when we’re done with them.
Take a look at the links below if you want to follow along, and as always tell us what you think about this episode in the comments!
Take a look at the links below if you want to follow along, and as always, tell us what you think about this episode in the comments!