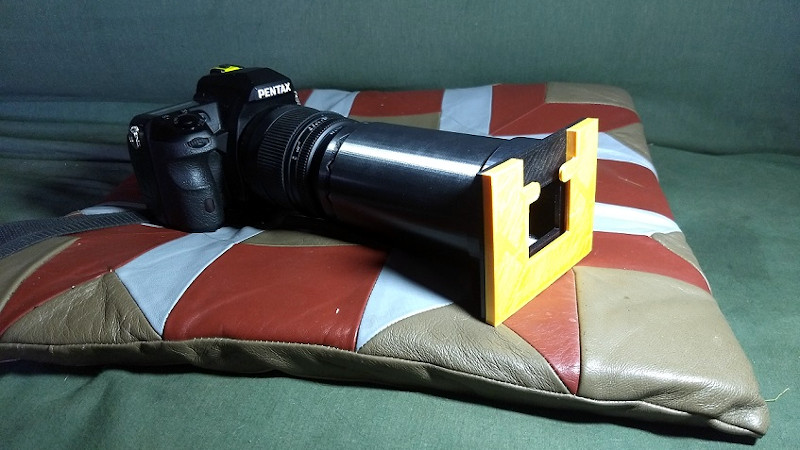
If you’ve got old family photos on slides there’s an excellent chance you’ve considered digitizing them at one point or another, but perhaps didn’t know the best way of going about it. In that case, this 3D printed adapter designed by [Rostislav Persion] that lets you photograph slides with a standard DSLR may be exactly what you were waiting for.
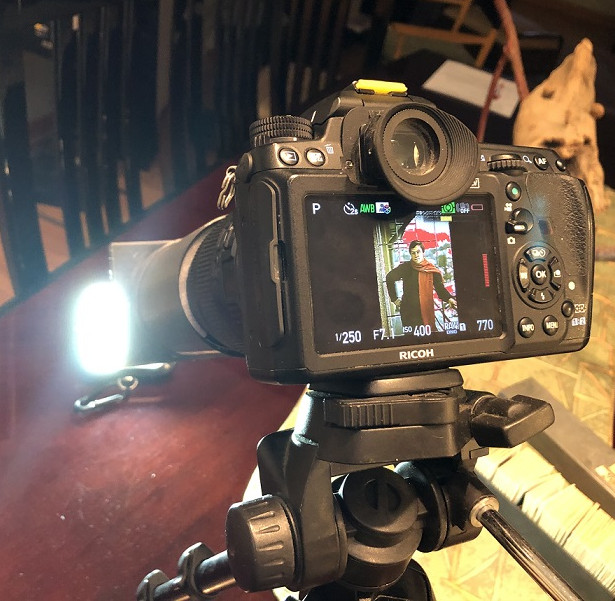 The idea is simple enough, you place the slide inside the adapter, get your focus right, and snap a picture. But of course, you’ve also got to provide some illumination. In this case, the camera is mounted on a tripod and pointed at an appropriate light source. Once you’ve experimented a bit and got the image backlit the way you want it, you can lock everything in place and easily power through a stack of vintage family memories in no time.
For such a straightforward concept, we really appreciate the little details in the execution. For example, rather than just sliding a 3D printed cylinder over the DSLR’s lens, [Rostislav] came up with a foam-padded “shim” that’s strong enough to hold the adapter on without marring anything. The two-part slide spacer that features a bit of springiness to hold everything tight is also a very nice touch.
An approach like this should work nicely for the amount of slides most families are likely to have, but if you’re in a position where you need to digitize thousands of images, some automation would certainly help things along.


>easily power through a stack of vintage family memories in no time<
That's fine when the number of slides is limited. In previous life I ran a photography business and had a portfolio of some 20k slides, and that is often small compared to others who spent a lfetime accumulating images. Digitizing my images was a longstanding item on my Real Soon Now list. That task resolved itself when my home was lost in one of the California wildfires last year. A reminder about off site storage…
I digitised my parent’s 50 years worth of slides for their golden wedding anniversary. I found the colours on cheap film were deteriorating to the point I had to convert them to monochrome to make any sense of them; the ones on more expensive film (mostly Fujifilm) were ok. Don’t leave it too long…
I’ve seen some bad Eastman Film restored to proper color, it’s within GIMP or any photo program. But if the blues are gone, that’s the blues. Still, early color was red-green only.
Can’t just we mount the dslr to the nose of a Kodak Carousel
https://hackaday.io/project/158667-kodak-slide-projector-scanner
Trust me, as an owner of a film scanner, digitization is an amazing timesink even if the recording process is fast. Just the reloading, cropping, and basic exposure compensation (not even counting dust spotting) are going to take up more time than the raw scan. And that’s mostly to figure out which images are actually the good ones. Also the narrower dynamic range of a camera sensor is probably going to create the need to re-digitize some slides at a different exposure. Beyond a couple dozen images it scales like crap.
Neat, but wonder if it could clip to the lens hood mount instead of a foam mount.
Would be interesting to see how it compares for quality to batch scanning them on a flatbed. This is obviously much faster.
Did something similar to what you are suggesting one year ago (actually clipping on the mountings for the lens hood), and… forgot to upload it until now :) ( https://www.thingiverse.com/thing:5019976 )
Quality-wise: I am using what I can afford considering a good lens* (EF-S 60mm macro) and an 18MP EOS 550D… and the images are _very_ crisp, far better than what my flatbed scanner could do. The scanner suffers from the slide not being planar and in contact with the glass (and – when it is in contact – often you see nasty color fringes), leading to more blurred images. Probably a dedicated slides scanner would beat it hands down, but… €€€.
Dynamic range wise, I am trading off vertical resolution and using dual-ISO (thanks Magic Lantern) to capture an underexposed and overexposed image in one shot (yes, I could do two shots and merge later… but I can’t be bothered).
Time-wise: no brainer. But I kinda of agree with @Steven Clark… postprocessing takes far longer than scanning.
* I tried to cheat and 3d-print an extension tube to use a non-macro lens… AVOID!
I see a vertical picture in the setup but the sensor in the DSLR is horizontal. You are not getting the full resolution conversion. Photos can be rotated later. The distance is wrong, zoom on the horizontal slide and fill the screen. A broken LCD TV will make a good back light. Even if the TV only stays on for minutes it’s a great source of daylight quality even light.
Slide projection was the only format that didn’t care about vertical or landscape orientation, everything else does. Lets just have big square video screens like slide shows did, then all the slit-o-vision pictures and videos won’t look as bad?
The LCD backlight is far from “daylight” quality since it’s optimized for the RGB filters in the panel. It actually has a poor color rendering index.
The result will depend on whether the backlight primaries match the color pigments match the camera sensor filters.