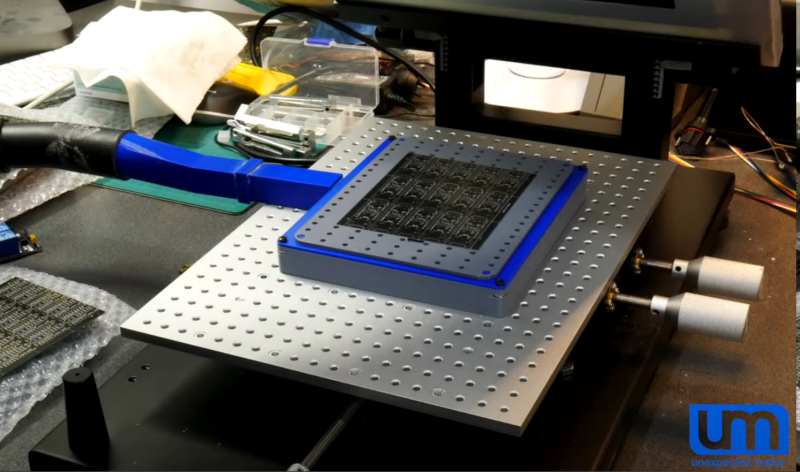
Working with solder paste stencils can be a real faff, they rarely sit flat and move around when you so much as breath on them. [Unexpected Maker] airs his frustrations, and comes up with a simple solution, he simply makes a 3D-printed jig to align the PCB panel and applies his shop vacuum cleaner and hey presto!
If you’re ever been tempted to switch from frameless to framed solder stencils, then you’ll notice they can be rather awkward to work with. The usual online vendors have plenty of listings for stencil frame holders, but they do all seem to us, exactly the same, and more suited to stencilling T-shirts, than working with tiny PCB footprints.
The problem with unframed stencils is one of clamping and registration to the PCB, which framed stencils fix, when used with a jig that can dial in the rotation and translation errors.
But problem with those is, unless you have a perfectly flat support region all round the PCB, the weight of the frame tends to make the stencil bow up over the PCB, causing parts of it to lift away from the solder lands. This results in paste not being pushed into the places you want it, and instead it sticks to the stencil apertures and comes away when you lift it up. Most irritating.
You can try offset it by taping spare PCBs of the same thickness all around, but this is not always terribly successful in this scribe’s extensive experience doing this job by hand. [Unexpected Maker] solves this bowing issue by making a 3D printed jig that bolts to the stencil holder, takes a custom top plate with holes in, which in turns allows a vacuum to be applied from below. This sucks the PCB down to the jig, keeping it flat (in case it is also warped) and also pulls the stencil plate directly down to the PCB, making it also lie perfectly flat.
The second benefit of this setup is that you can now use frameless stencils on the same jig, as the vacuum is strong enough to keep it in place, but not so strong you can’t make minor alignment adjustments prior to pasting.
This simple idea helps make a common PCB prototyping task, suck a whole lot less.
Thanks [Foaly] for this sucky tip!


Love it!
Cannot be automated?
You mean like robotic solder paste extrusion?
Personally I don’t find solder stencils particularly hard to work with.
One can follow a few simple rules when working with them:
1. Put the board against a corner, typically an L bracket of the same thickness.
2. Surround the other two ends of the boards with off cut PCB pieces of the same thickness. (so that the stencil doesn’t get to flex.)
3. Align and affix the stencil to the aforementioned L bracket.
4. Plan out where paste will get used and pre-apply some paste in low density areas if needed. (or one can just use more paste to start with, but this has other downsides.)
5. Smear the paste out over the stencil only once. Using as wide of a putty knife as possible. (getting the correct angle is more or less down to experience and the consistency of the paste.)
Though, there is other ways to make the process even easier or more magical. But then one needs the proper tools for the job. And personally don’t find framed stencils as an advantage in the slightest unless one has the proper machine to use them in.
And avoid vacuum, it doesn’t end well as far as solder paste spreading goes. It typically just sucks the paste away if the board has vias in the “wrong” places. Likewise if the stencil is a bit bent, then when the vacuum pressure is released, the stencil will lift and the pressure left will suck in the paste under the stencil, smearing it severely in the process… I have spent a good while using a vacuum table for this specific thing, and wouldn’t do it ever again now that I have better solutions on hand.
This paste tastes terrible, I’m switching back to Elmer’s…
cool idea with the suction to hold it in place! i recently tried to solve similar issue with holding/aligning frameless stencils – i made a script which takes gerber or kicad PCB file and spits out printable 3d model of the holder: https://hyperglitch.com/articles/stencilframer
Nice work! I have been manually modeling them in Fusion for a while. I meant to to make something like this, but haven’t gotten around to it.
For times when I didn’t plan ahead, or am only doing one of a board, I got some big and small L-shaped PCBs for holding the stencil with masking and double sticky tape.