We’ve seen a number of projects over the years that let you create custom enclosures using OpenSCAD, and for good reason. The parametric CAD tool is ideal for generating 3D models based on user-adjustable variables, and if you leverage its integrated Customizer, producing a bespoke box is as easy as moving some sliders around. The resulting files get sent off to the 3D printer, and you’re set. But what if you’re looking for a custom enclosure that’s not so…plastic?
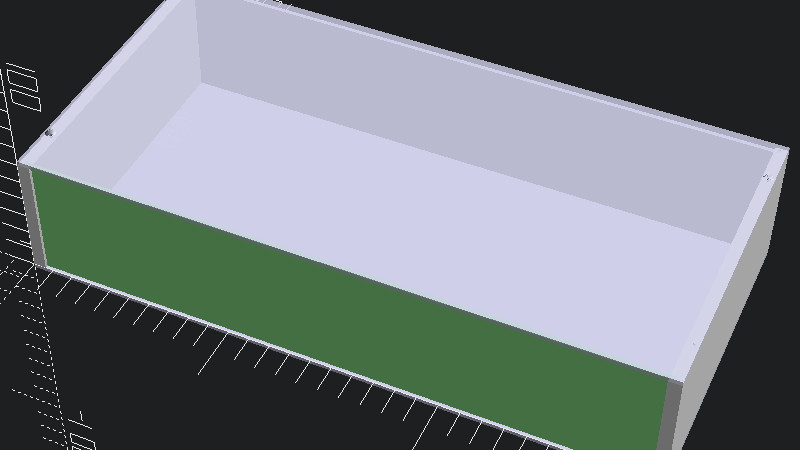
In that case, AlClosure by [0xPIT] might be the answer. Rather than generating STL files intended for your 3D printer, the code is written to help you design an enclosure made from aluminum sheets. The top and bottom panels are intended to be cut from 1.5 mm – 2.5 mm sheets, while the sides are made from thicker 5 mm – 8 mm stock to accept a machined pocket that holds the front and rear inserts.
 Since it’s OpenSCAD, much of the design is governed by variables which you can tweak. Obviously the outside dimensions of the enclosure can be changed in a flash, but it’s just as easy to modify the thickness of the aluminum sheet being used, or the size of the screw holes. [0xPIT] has also done a great job of documenting the code itself, so you’ll know exactly what you’re modifying.
Obviously, you’ll need the ability to cut and machine aluminum to actually utilize this project. The code itself is really just a way to conceptualize the design and get your dimensions figured out ahead of time. But as we were recently reminded by the keynote presentation [Jeremy Fielding] gave at the 2021 Remoticon, this sort of early prototyping can often save you a lot of headaches down the line.


OpenSCAD FTW!
I used it to plan the deck at the back of the house. If only cutting and screwing the decking was as easy as a for… loop.
The desk I’m currently sitting at was modeled in OpenSCAD before I cut the first piece of wood. It’s certainly not for everyone, but if you’ve got a programmer’s mindset, it’s a breeze to turn ideas into 3D models you can play around with on the screen.
He he! Same here (plus I also modeled a roof over the deck)
OpenSCAD rocks, especially if want to compare different design ideas!
i’m surprised so many other people use it this way. i did it for my kids’ wooden bunkbed. i felt kind of foolish doing it because i’m not sure it was better than just scribbling on paper like i usually do. it’s not like an intricate piece of carpentry or anything. openscad was just so easy and at-hand, so i modeled the components separately and then test-fit it on the screen. probably my first carpentry project where i worked from a cut list without intermixing with any assembly.
I’ve gotten pretty spoiled, myself, using OpenSCAD. I knew it would take me a whole day, probably, to model a storage shelving unit custom fit to my SUV, so I just scratched it on paper instead, and went to town cutting wood. Got the basic frame of it right, but then I started to run into “wait, these sticks don’t add up to the right length. So I went back to my office and fired up, OpenSCAD. I was able to salvage most of the pieces I had already cut, and this time, it came out without any problems.
I model each piece as a separate piece of wood as a module. But there’s a gotcha involved in OpenSCAD: if you have two pieces occupying the same space, it won’t object in any way. For example, you cannot tell the difference between two pieces that butt together exactly, and two pieces that overlap each other by 18mm. So I make each piece (each module) with every dimension .1mm smaller than the actual size, so that pieces intended to be in contact show 0.2mm gaps between each other, when assembled into a complete object. So I know if it looks right in the drawing (including 0.2mm gaps between each piece), it will work in real life, and by just cutting the right number of each module, I can be confident of the results. And it worked!
So IOW, there are scads of things you can design with OpenSCAD!
For (allowance) { screw down decking; }
Been there, done that, released it as public domain:
https://www.thingiverse.com/thing:4573987
Cool, you should have sent it in.
Meh.
But, did you get a t-shirt?
A key difference seems to be that this here does not need bending, just cutting and milling, plus there are no visible screws from the front and back in this model.
If I had a mill, I wouldn’t be folding. :)
“If I had a hammer, I’d hammer in the morning, I’d hammer in the evening, all over this land!”
That’s a heck of a project box, made from 6mm aluminum. I’ve never been able to bend that quite as sharply as I see in the render, though.
The sides that 6mm don’t get bent, the sides that are 2mm are bent…
Oh, I see. I thought the rear panel was also 6mm.
No, nothing at all is bent. All nice rectangles of sheet metal.
The slots in the sides enable 1. screw-less appearance from front and back and 2. no bends :)
There’s no bending involved. All just clean cuts, milling of 4 slots and some drilling + threading.
This looks like a great tool for any one-off chassis or housing but you need to step up for any type of small scale production.
I’ve used https://www.protocase.com/ for years and they manufacture all of our home brewery controller housings except for the custom brewery housings we still punch out in house. Protocase has an excellent online design tool and a series of starter housing shapes that are easy to work with. They also have a large library of drop in place shapes, a full selection of fasteners to choose from and many material and finish options.