Last time we talked about how Marlin has several bed leveling mechanisms including unified bed leveling or UBL. UBL tries to be all things to all people and has provisions to create dense meshes that model your bed and provides ways for you to adjust and edit those meshes.
We talked about how to get your printer ready for UBL last time, but not how to use it while printing. For that, you’ll need to create at least one mesh and activate it in your startup code. You will also want to correctly set your Z height to make everything work well.
Phases
Nearly all the UBL mechanisms are in the G29 command. Unless you are totally starting from scratch, you’ll want to load a mesh from a “slot” in EEPROM:
G29 L2
That means slot 2’s mesh is now in memory and you’ll work with it. If you don’t save it, any changes you make will be lost. This doesn’t necessarily activate leveling, by the way. It just loads the mesh. If you are starting from scratch, you don’t need to load anything.
Setting up the mesh requires the use of phase commands to G29 which use the letter P and a number:
- P0 – Zero the mesh and turn off the leveling system.
- P1 – Automatically probe as much as possible. Normally, this wipes out the existing mesh unless you use the C option. If you realize you don’t want to probe dozens or hundreds of points, you can stop by holding the controller button down for a few seconds.
- P2- Manually probe any points not filled in. The printer will prompt you on the display screen to proceed. You can manually touch the bed with the nozzle or use the B argument to measure a shim like a piece of paper the first time and then use that height to manually measure all the points. You can abort, again, by holding down the controller button.
- P3 – Fill unpopulated areas of the mesh. You can specify a value with C or omit it and the printer will try to guess the right value from surrounding data. It is surprisingly good at this. However, if you have multiple rows or columns of points unspecified, this command will only do the “first” set of points so you can possibly refine them and guess better for the rest of the points. What that means is that if you are just trying to get the grid filled, you may need to issue P3 multiple times.
- P4 – Fine tune mesh points. This makes the printer prompt you on the screen to measure specific points. Usually, you’ll provide an X and Y coordinate along with a repeat count (often 1).
- P5 – GIve statistics on the mesh including mean and standard deviation. Include a C if you want to shift the mesh so that the average value is considered zero.
- P6 – Shift the mesh. Provide a value with C to move the entire mesh up or down. This might be useful if you were, say, printing PLA and wanted the print to move up a few hundred microns to prevent overadhesion.
That seems confusing, but the general idea is you will start with P1 and then use either P2 or P3 (or both) until all the points are set. The rest are used for special purposes or for fine-tuning things. Just don’t forget to store the mesh and remember where you put it:
G29 S1
I suggest you save your first P1 result in a slot that you never change and then store the results after P2 and P3 somewhere else. That way if you mess things up, you can go back to the baseline and start over without having to redo many probes.
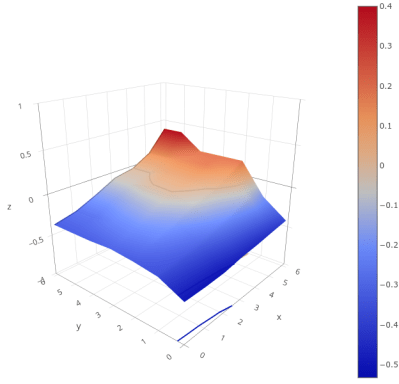
Visualize Your Bed Heights
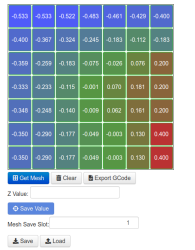
So how do you know what UBL is doing? You can ask for a topography report (T) and get some data:
G29 T
You can add V1 to get a little more verbosity and T1 will output data suitable for a spreadsheet or other software to read.
Here’s an example report:
 Bed Topography Report:

     (  0,210)                                      (210,210)
         0       1       2       3       4       5       6
  6 | -0.533  -0.533  -0.522  -0.483  -0.461  -0.429  -0.400
    |
  5 | -0.400  -0.367  -0.324  -0.245  -0.183  -0.112  -0.183
    |
  4 | -0.359  -0.259  -0.183  -0.075  -0.026  +0.076  +0.200
    |
  3 | -0.333  -0.233  -0.115  -0.001  +0.070  +0.181  +0.200
    |
  2 | -0.348  -0.248  -0.140  -0.009  +0.062  +0.161  +0.200
    |
  1 | -0.350  -0.290  -0.177  -0.049  -0.003  +0.130  +0.400
    |
  0 | -0.350 [-0.290] -0.177  -0.049  -0.003  +0.130  +0.400
         0       1       2       3       4       5       6
     (  0,  0)                                      (210,  0)
The P5 command, by the way, reports the standard deviation of this set as about 0.24. That means that about 68% of the data is plus or minus 0.24 mm of the mean value. Then 95% of the readings are within 0.48 mm (again, plus or minus). As you can see, I have one corner that needs a little work — the total variation is about 1 mm from the highest point to the lowest.

Z Height
Even if we know the shape of the bed, there are other factors at play. In particular, the actual height of the nozzle is crucial. You must set the Z offset so that the difference between the probe and the nozzle is just right.
Everyone has their own way to set up UBL, but my advice is to start with turned off. Then print a small ring or disk in the center of the bed. It doesn’t have to be very thick and should be small enough that the bed will be flat under it. For example, a 5 mm high cylinder with a 20 mm diameter. You can quickly see if the plastic is sticking to the bed or not. If it is too squishy or not sticking, adjust the Z offset until it is. Then do the mesh measurements.
However, the offset doesn’t change the shape of the bed, so you can set the offset last or you can adjust the height of the mesh, too. All legitimate solutions, but I prefer to set the height first.
Start Up
Your startup code has a few things to do. You need to load the desired mesh and turn on leveling. By default, a home command will turn it off, but you can change that if you rebuild Marlin. Your bed probably won’t change shape, but it might shift a little. You can use G29 J to make a 3 point measurement and skew the mesh based on that measurement. You also need to activate leveling with G29 A, if it isn’t always enabled.
You should also set a fade height, which you can do once in EEPROM if you like. This is usually 10 mm and the correction applied due to the mesh gets less and less on each layer until you hit that height. After that, there is no Z correction applied. Usually, by that point, your print is fine and it saves time and wear on your Z axis, too.
A Plan
So if you wanted to experiment with UBL, here’s a plan:
- Recompile Marlin to enable UBL and resist the urge to start with too many points. You might want to get familiar first and then expand the number of points. A 7×7 grid is good for many printers. You might also want to set it so that auto-leveling is restored to its previous state after a HOME.
- Level your bed in the usual way as best you can. The less correction required, the better UBL will work.
- Do not turn on auto-leveling yet. Get a nice cylinder to print in the center of the bed first by adjusting the Z offset.
- Heat up the bed to your normal temperature and do a G29 P1. Save the results in, say, slot 2 (G29 S2).
- Do a G29 T and see if any points are not measured. You should understand why they were not measured. For example, if the Z probe is to the left of you print nozzle, you should not have unprobed points on the left-side of the bed. If you do, your setup in Marlin is wrong and you need to recompile.
- You can do a G29 P2 to fill in the rest of the spots, but for a first attempt, try G29 P3 instead.
- Do a G29 T again and repeat the P2 or P3 commands until you have a full mesh.
- Save the mesh in slot 1 (G29 S1)
- Set your startup code to load slot 1 (G29 L1) and activate (G29 A). You might want to do a G29 J after the load and, preferably, after your bed is hot.
- Print a test object. You might want to start with a small centered object again just to validate you haven’t screwed anything up. A bed flatness pattern is useful. Marlin has a “mesh validation” command that will draw a pattern like that (G26) and you could use that, too. However, any bed flatness test print will be fine to start.
- If you notice some points are too high or low, you can try editing them. If you get too far off, you can always revert back to the saved copy in slot 2 and start over. Inductive sensors sometimes, for example, give odd results near the edge when they are partially off the metal bed.
Tips

Notice that I always try to do any probing with a hot bed. Heat makes things expand, so probing the bed cold probably isn’t as accurate as you’d like.
If you need a quick bed verification print, there are plenty on sites like Thingiverse, including mine. You can scale the X and Y size to fit your bed instead of recreating it. Just don’t scale the Z axis proportionately.
If you use Octoprint, you can view and edit meshes there with a plugin. There’s also a plugin to visualize the mesh or you can do like I did above and use a website for that purpose.
That’s a Wrap!
So are you using UBL? If not, why not? Sure, if you have a great bed, you could just make it parallel to the X axis and be done. But if you use beds that are not perfectly flat, you won’t be able to just move the corners to get everything perfect.
The UBL system is sort of a “virtual bed surface” and that means you can adjust it easily without mechanical issues. If you want PETG to not stick so hard, you can just shift the mesh up a bit. If a part of a model is very tiny and needs extra squish into the bed, you could do that, too.
Of course, bed leveling is nothing new. But if you are not using UBL, you might want to consider upgrading. Just the ability to tweak the mesh and store multiple bed leveling setups is worth the effort.


Thanks for the non-constructive comment. Glad you got your posting karma for the day.
Move on to…. what?
Klipper
What would you suggest?
Nice as Klipper/Mainsail and similar alternatives are I don’t think it’s fair to dismiss Octoprint out of hand, especially considering it’s wide user base and the huge number of available plugins. What is it about it that seems to rub so many people the wrong way?
i too cringed when i read marlin, though i imagine marlin has improved a bunch since i last tried to hack on it 8 years ago.
but i agree with fiddlingjunky, what would you recommend? i can’t recommend anything and in fact still use an archaic build of marlin on my printer. it works well enough despite my obvious distaste.
Marlin is still miles above the other available options. RRF/DUET system doesn’t standardize pin placements nearly enough, and their configuration is garbage. Klipper needs another microprocessor (typically a Pi) to run, and it’s nearly impossible to actually get ahold of a Pi right now. At least their configuration is human-readable, though harder to jump into than Marlin.
Marlin still runs 98% of the printers out there, with only a few die-hards opting for Klipper/RRF/Duet. Given Marlin’s constant improvement over the years, with Klipper-inspired direct stepping, support for many machine geometries, and wonderfully documented configuration files (including amazing preprocessor directives that remove all the cryptic compile-time errors!), it’s just simply the right choice for many machines. It supports everything from 8 bit controllers, all the way up to 32 bit multi-hundred mhz monsters like the STMF4. It can be as slim as you need it, or as bulky. And given how long it’s been around – they maintain example configurations for most popular printers – not just like…what…6 or so that the Duet/RRF guys do?
Marlin and Octoprint are fine. Nothing of the other ecosystems are strong enough to justify jumping _every_ machine over to them. I’m glad they exist, because they serve very strong cores for specific purposes – but the Marlin team doesn’t deserve the attitude from the peanut gallery.
That doesn’t even say anything for the what…nearly a decade of work that Gina has put into OctoPrint, to make a web-based printer control that allows essentially infinite extensibility and that thousands of plugins rely on to serve up and manage people’s printers on a large scale basis.
Klipper has been rock solid for me since I moved over. sure, needs a pi to run but at least you get to reuse your ancient mcus as peripherals boards. I have my very first Ramos board doing fans, ambient temp and humidity sensors etc. It’s great. There’s nothing wrong with octoprint at all. Gets heaps of love from its maintainer, the plugins are rad and it’s super mature. Fluidd/mainsail are slick and light weight but lack the huge plugin library.
What a useless comment. On top of being unpleasant you don’t even name what you consider a better alternative.
Your thoughts here are the equivalent of a failed print skipping layers. Incomplete and a waste that requires a better second attempt.
Very useful, thanks a lot
Why is the front left corner of your verification print not lined up square?