Crimp connectors provide an easy and convenient way to connect electronics while still allowing for them to be removed and swapped without having to reach for a soldering iron and desoldering wick. While browsing one’s favorite cheap shopping site, you may get the impression that all one has to do to join the world of crimp-awesome is order a $20 crimp tool and some assorted ‘JST’ and ‘DuPont’ (a Mini-PV clone) connectors to go with it. After all, it’s just a bit of metal that’s squeezed around some stripped wire. How complicated could this be?
The harsh truth is that, as ridiculous as the price tag on official JST and Mini-PV crimping tools may seem at hundreds of dollars each, they offer precise, repeatable crimps and reliable long-term stability. The same is true for genuine JST, Mini-PV and Molex connectors. The price tag for ‘saving a buck’ may end up being a lot higher than the money originally saved.
A Cautionary Tale
Back in December of 2007, air conditioning units installed at motels and apartments began to catch on fire, seemingly by themselves. All of these AC units were manufactured by a single Texan company: Goodman Co. After multiple of reports of units catching on fire, it was deduced that it must have been faulty power cords from a new supplier: Tower.
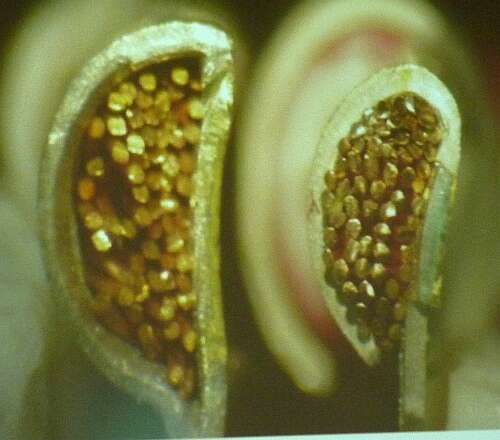
After a recall of units with Tower-supplied power cords, the following legal battle and investigation tried to pin down the cause of the fires. Using units which had not caught on fire yet, the cause was tracked down to the flag connectors that were crimped on the stranded wires of the power cord. Due to insufficient pressure applied during crimping, spaces were left within the flag connector that increased the contact resistance.
Drawing of large amounts of current, this would thus lead to rapid heat development and ultimately fire. The Tower factory used not the specified AMP crimping machines, but improperly configured knock-off machines that created improper crimps. Here the decision by Tower to save a few bucks ultimately lost them a lot of revenue, and endangered life and property.
The essential element of a good crimp is that of plastic deformation: the natural plasticity property of the materials in question and whether this plasticity is fully used to get a solid contact, but not (destructively) exceeded or – as in this case – barely used.
Caveat Emptor
What the earlier example makes clear is that you have to be very cautious about exactly what you are buying: not just the tools, but also the components. One great example here is that of knock-off connectors, which one may amiably refer to as ‘DuPont Syndrome’, after a cheap clone of a much better connector, that became better known than the original.
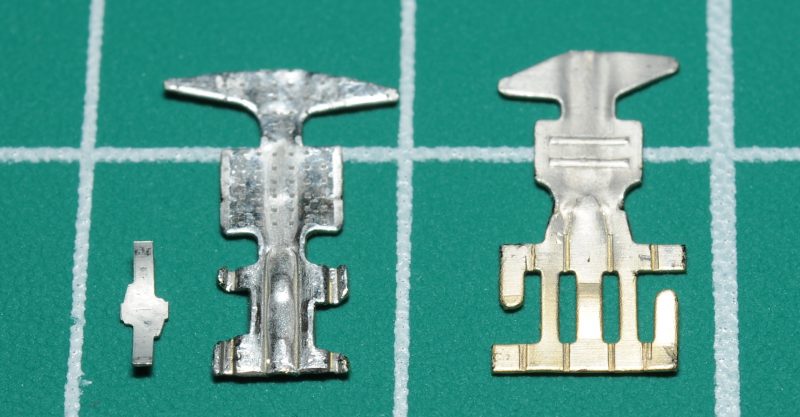
According to Matt Millman, Berg Electronics introduced their Mini-PV connector in the 1950s. This is a connector that might be mistaken for a ‘DuPont’ connector, but is in fact a much better connector, with a bi-metal design including a BeCu leaf spring that is still produced by Amphenol today, including for the US military and other branches of the US government.
Berg Electronics was purchased by DuPont Corporation in 1972, making it a division of the latter. This might explain why when during the 1990s cheaper, Mini-PV-inspired clone connectors began to appear (including those manufactured by Harwin with the M20), it became known as ‘the DuPont connector’, even though it is mechanically different from the Mini-PV connector.
Since then, clone manufacturers have not only began to produce their own version of ‘the DuPont’ connector, but also of JST’s offerings, including their XH, PH and other ranges. Tolerances, materials used and other specifications like coatings are hereby anyone’s guess, especially when purchased from anonymous sellers on the aforementioned cheap shopping sites.
The problem with using dissimilar metals in the connectors is that of galvanic corrosion. While this is rarely an issue in the short term, the use of differently plated connectors on a PCB and the wiring harness is likely to lead to a build-up of failures after a number of months to years, depending on the environmental conditions. Without knowing the exact specifications of the connectors and wiring used in a project, this becomes a significant risk and should absolutely be avoided when long-term reliability is important.
Squeeze Metal Not Budgets
Much like with saving a few bucks on cheap knock-off connectors, it is essential to be aware of the issues with cheap crimping tools, which come primarily in sub-par crimping results and occasionally faulty crimps that may go undetected by the untrained eye. As a case in point let’s take a look at a better-than-most crimping tool for ‘JST’ and ‘DuPont’ – which yours truly also recently obtained – and which Matt Millman reviewed and compared: the ‘Preciva PR-3254’:
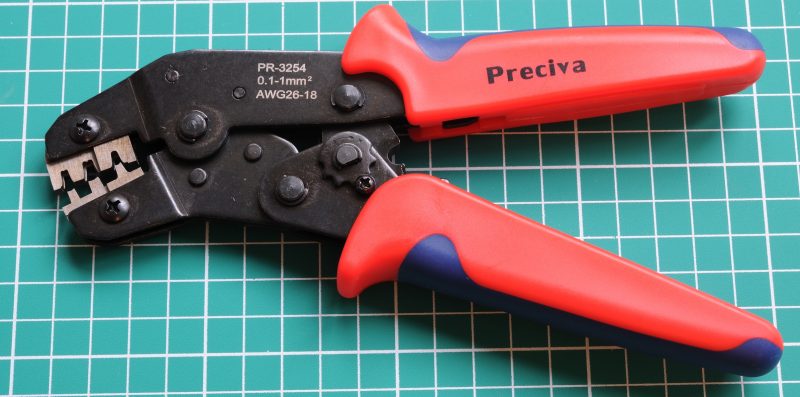
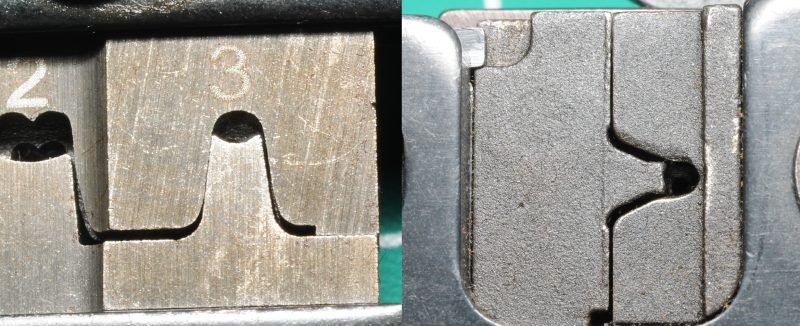
As the owner of a genuine Berg/DuPont Mini-PV crimping tool, Matt was able to do a side by side comparison of both tools, as well as their crimping results. The most important detail that Matt noted is that the PR-3254 has the correct die shape, as the top of the section for ‘DuPont’ has to be an ‘O’ shape, rather than a ‘B’ shape, which is the correct shape for a JST crimping tool.
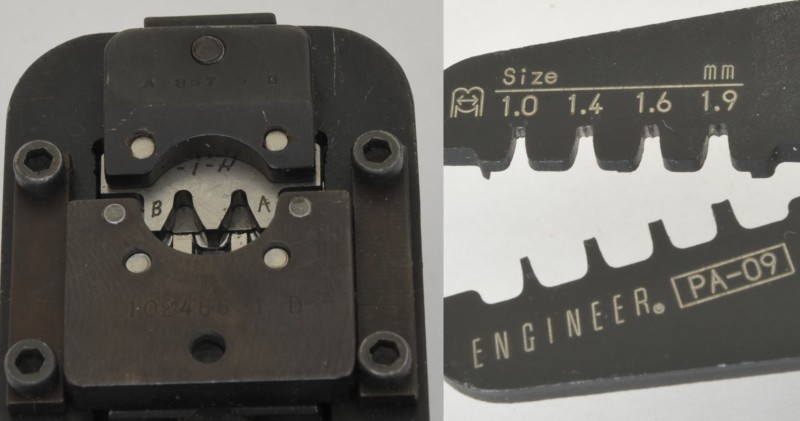
Unfortunately it’s not entirely the right shape when you look closer. The problem appears when the jaws close, the resulting space is more of an oval than the circle of the DuPont crimping tool:
While the resulting crimp is acceptable, it does crush the insulation when using AWG 24 (0.205 mm2) wire, and with AWG 28 (0.0810 mm2) wire the insulation is crimped fine, but the force on the wire itself was insufficient. This could lead to increased contact resistance and other issues.
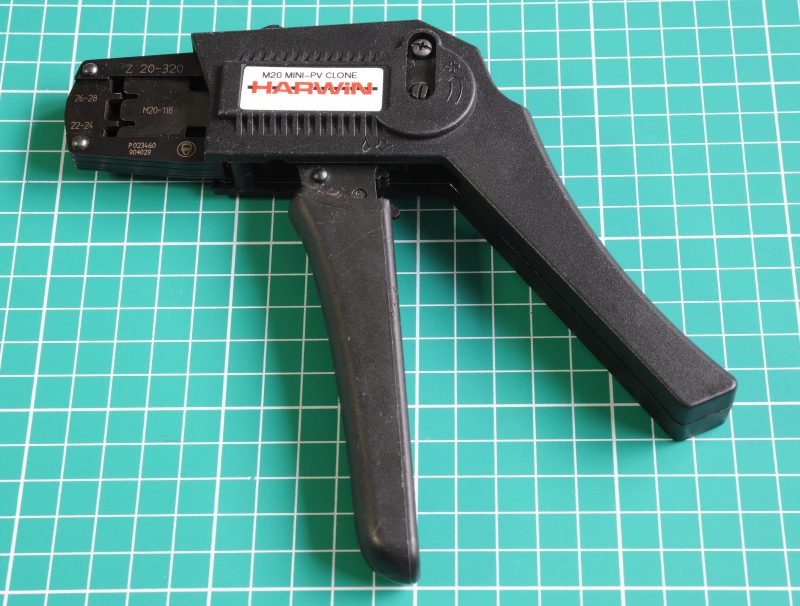
When reviewing another budget crimping tool (IWISS SN-025) that claims to be targeting ‘DuPont’ connectors, Matt found it to be somewhat better than the PR-3254, but as usual should not be used for any critical applications. Unless one is interested in becoming another entry in the list of irresponsible manufacturers alongside the likes of Tower, it might be a good idea to pony up the cash for something like the official Harwin M20 Z20-320 crimping tool for a mere $460 new.
Features offered by these tools include such niceties as a wire stop so that you cannot insert the to-be-crimped-connector too far, as well as various guides inside the dies that help to stabilize the connector before and while it is being crimped. This has as immense benefit that each crimp is likely to be as close as perfect as possible, whereas with manual (non-ratcheted) tools and budget crimping tools there is a certain level of skill required to get even acceptable results.
The Bottom Squeeze
Perhaps the most important take-away from all of this is that before even getting into the nitty-gritty of crimp connectors and associated tooling, it is essential to understand the basics. Both to avoid getting saddled with components and tools which are not up to the task they were purchased for, but also to prevent worse. Even if it’s ‘just’ a hobby project, having some confidence in the medium- and long-term reliability of one’s crimps is very desirable.
Although crimping connectors should and can be quick and nearly effortless, having poor quality components and/or tools is sure to waste the time of anyone involved. When it comes to picking either, it all comes down to a conscious choice: get Harwin M20 Mini-PV clones, or gamble on what a random seller on AliExpress had in stock that day? Is an IWISS or Preciva tool the right choice because it’s ‘just for some tinkering’, or might a faulty crimp lead to potentially very ugly consequences?
Naturally the easy answer is to just splurge on e.g. the official Harwin, JST, and Molex parts and tools, but even if one finds the crimping tools used on EBay or so, that is still a lot of money to invest in what is likely to be ‘just a hobby’, and where failure is non-critical. As long as one is aware of the limitations of the parts and tools used, there probably is no real bad choice, other than perhaps using a disgustingly cheap crimping tool that positively mauls the connector and/or wire.
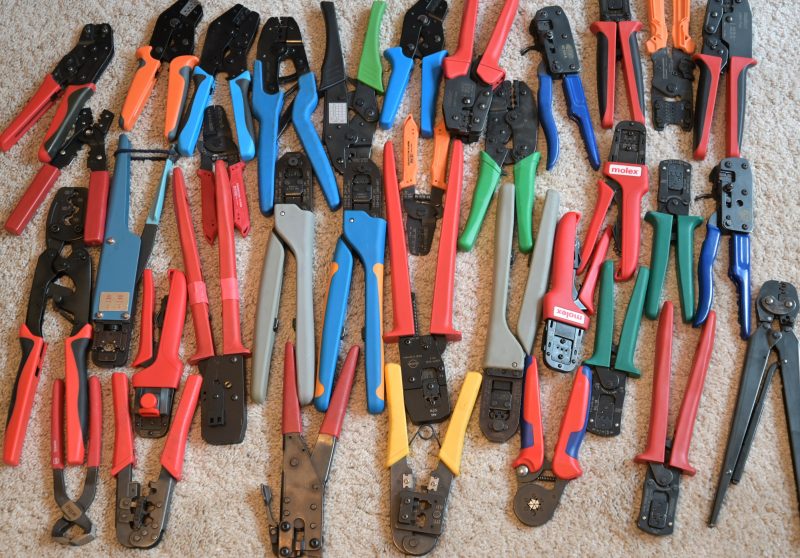
[Heading image: A whole bunch of crimping tools. (Credit: Matt Millman)]


Some crimps failed using a PA engineering tool when I did a bunch of connectors for a cnc controller. Kinda embarrassed since it was for my brother who has the real DuPont crimp tools. Retired GM engineer who has a entire drawer full of genuine crimpers. He laughed and said he’ll drop off some extra crimp tooling so next time I do it right. He even gave me a real Anderson PowerPole crimp tool and a bag of connectors. Told me to use these for high current stuff.
+1 on Anderson PowerPole
“Drawing of large amounts of current, this would thus lead to rapid heat development and ultimately fire. The Tower factory used not the specified AMP crimping machines, but improperly configured knock-off machines that created improper crimps.”
Sounds like two problems.
1-Not official machines.
2-Not properly set up.
It’s likely problem two would be solved with a switch to official machines. Odds are, with a little tweaking, the knockoff ones could have produced good crimps, and the official ones would come calibrated.
However, if management is going to cheap out on something like this, they are likely going to cut corners other places – like good engineers. It probably wasn’t set up correctly because of a lack of knowledge how to or a desire to. So a common root cause is management that is too cheap to do the job correctly overall.
Crimp dies wear and deform over time, and need periodic adjustment and recalibration. Just using the official tool is no guarantee — you also have to be using it according to instructions, which includes the maintenance and calibration schedule.
I would argue that a knockoff tool, in expert hands, can often produce crimps that’re just as good as the official tool. But that expertise (and the metrology equipment to verify performance) also doesn’t come cheap. There truly are no shortcuts to quality.
3 – No one did a pull test to see if the crimp was sufficient.
What has been said here also applies in large part to crimping tools for RJ11 & 45 jacks (& the similar to RJ11 but smaller used for telephone handsets) and to punch down tools such as 66, 110, & Bix. (& to coax terminal crimpers) While these connections are extremely unlikely to cause a fire, poor tools can make poor connections, resulting in a mechanical communications failure at a critical time. Not only do good tools produce better connections, they tend to be easier to use, more connections per hour, are more comfortable in the hand and, sometimes, safer.
Such a rule tends to apply also to such things as ceramic tile tools, and socket sets. ($10 socket form the big box store would not stay on the hot water heater element, but the $30 professional socket made removal child’s play)
Aphorism: The pain of a cheap tool lasts long after the pleasure of the savings has been forgotten.
I highly recommend the truePUCK keystone punch down stand, it is bowl shaped so you can hold it in your hand without fear of jamming the punch down tool into your palm or the drywall.
That sounds a lot better than the “two small screwdrivers and a flashlight” method.
I can testify that it is foolish to buy cheap punch-down tools. I had thought “gee, I’m only doing one connector, why pay for the expensive tool?” I ended up wasting at least an hour doing the job 2-3 times. Previously I had only used “real” punch-down tools. I was surprised by how bad this tool was. The only good news is that my network still works, but that’s only because I know what the outcome was _supposed_ to look like and carefully inspected my work. I returned the tool-shaped-object to the retail store without guilt.
punchdown tools… i have a little ethernet toolbox that sits on top of my cat5e spool. it has my rj45 crimp tool and a bag of plugs, some strain reliefs, and a few punchdown surface mount terminal boxes (jacks). i loaned it to my dad before i got around to using it myself and when it came back to me, he had added an envelope he had drawn a cable connection diagram on the back of, and a cheap small flat blade screwdriver he had taken a file to…he had made it thinner and then cut a slit in the middle.
still use that punchdown tool. i’ll admit, it’s pretty crappy. but it works well enough and i have used it maybe 8 times in the last 15 years and i’m totally 100% satisfied with it. heh.
i spend a lot more money on tools than my dad does, but for things i hardly ever use i don’t mind “good enough.” apple, tree, falling within a certain radius…
Yeah no, not going to spend a perverse amount of money for proprietary crimp tools when doing non critical hobby stuff. If you don’t need to worry about shelling out 400$ for a pair of glorified pliers, then I have a business proposition and a PayPal link just for you.
Your insurance company searches the internet on a regular basis and they just cancelled your fire insurance.
Yes because crimping connections for digital logic level signals will totally cause a fire! Not everyone who uses crimp connectors is running amps of current through them. Also ridiculous to claim that an insurance company could legally void a contract just based on a comment post they assume a specific person made online. That’d be an easy lawsuit to win for wrongful contract termination.
Why cancel the insurance, when they could keep the money coming and refuse a payout later :)
That’s a little overkill; like, just because my coincell powered blinking LED is a huge fire hazard due to poor soldering doesn’t mean it’s any worse than _insert_appliance_name_here_ from China.
Once again an argument against clear names in the internet. Luckily no insurance company will be able to identify “X”. :)
yeah this is my feeling as well. i’d like to have nice crimp tools. for ethernet rj45, i even paid a decent amount (but less than $100) and got a tool that has served me well. but for other uses, i’ve had a hard time pairing tools to connectors and i’m not gonna have a pile of different crimpers sitting around, definitely not a pile of expensive ones. so the few times i have needed to crimp something for one reason or another, i have always used the wrong tool for the job. and if i want it to actually work, the trick i’ve come up with is i solder it after crimping. (lol)
and the reason i get away with it is i hardly ever do high current. and for RC airplane motor connectors, i always solder.
really, the crimpers i have i use a lot more often for the handy screw-shears built into them. and the main crimping task i do is putting the end caps on bicycle brake cables, which i use electrician dikes for
if i was actually like a hvac repair guy, doing maybe dozens of crimps a week, i’d bother to have the right tool and the right connectors. i’d care if it works right the first time and if it can carry current and survive vibration. there’s definitely a place for excellence…just not on my workbench! (cringe)
Having bought several of the tools in the first image, the thousands and thousands of dollars worth of tools in that photo is quite a bit more than people realize. Some of those tools are literally over a grand each.
Can confirm, have bought JST, Molex, and others. Some used only for a single project, where client specified connector part & mfr. The prices on these are related to the small number sold. The interchangeable die ones tend to be a lot less costly, but still in the $350 and up range.
Most annoying are the Molex clones of the JST connectors. JST doesn’t supply mechanical models of their connectors, prompting our MEs to ask if we could use the Molex parts instead. I checked; Molex does not supply a hand crimper for the terminals…production tooling only ($$$$$).
I concur in the hobby front – if you’re doing just a few then crimp it with whatever is handy and if failure isn’t an option give it a full and complete inspection.
But having used the real crimp tools for thousands of crimps on production robots, I gotta say they do a quality job and generally are quicker than a generic crumpet (the molex wire fences are just fantastic!). There is definitely a line where I would move up to the real stuff, especially when I can pass the cost onto the customer.
Good, fast, cheap… pick two. I’ve spent 35 years working for three companies where the time and cost of making a connection was irrelevant. We had the tools, the parts, the specs and the inspections for the work because they’ll close the place if something breaks and someone dies. In my home shop where I’m building one off, low power stuff where I’m the only one who gets hurts if it fails, I’ll accept the responsibility for cutting my corners off to save a few bucks. I’ll buy the 300 dollar crimper if that’s how I make a living, not if I use it twice a year.
Still pretty questionable decision buying single purpose proprietary tool which can become garbage in less then decade and in some cases even less then year, over tunable modular repairable tools.
As well I would questing crimping connection itself with (wide adoption of aluminum, x2 mechanical failure point for connectors) over tool-less such as spring pressure connectors(aka WAGO style) and self-compression connectors.
And final nail in coffin with wide adoption of ultra cheap robotic manipulator ultrasound/x-ray/laser/ERW welded connector can become real thing in small scale manufacturing, at home and even in “portable” variation.
>wide adoption of ultra cheap robotic manipulator ultrasound/x-ray/laser/ERW welded connector can become real thing in small scale manufacturing, at home and even in “portable” variation.
got any links? This is of great interest to me and my previous employers.
Man… You’re literally ask me to bring you internet.:D
What exactly do you want?
Here goes everything from 50-$200 cheap 2 – 3 Axis 3D-printer/CNC/laser cutter which used or modified for welding to more expensive 200-$1000 5-7 Axis DIY or used industrial articulated robot which too can weld.
I’ve used ‘real’ crimp tooling on the job, provided by a previous employer. But at home I use low volumes of primarily 0.1″ Molex style female plug connectors or spade / ring terminals. I crimp these with one-step-above-garbage crimpers or various types of pliers – then I solder them. I know that’s considered a no-no, but I’ve never had a failure.
I recently rebuilt the charging part of my Suzuki GSXR (which is 20 years old). With time the original circuit corroded enough to make the plastic socket of the alternator to melt, and the whole circuit to heat a lot. It’s a known problem.
I bought a crimping tool (which I believe is a clone of the Preciva) on AE labelled as “SN-48B” for 20€, and lots of connectors. A friend of mine (who is an approved electrical engineer), had a look and said me that the built quality is good: he compared with a professional tool which is very similar.
The connection quality is really good visually, the resistance is really low, and an inspection with a thermal camera showed that the cable behaved far away better than the genuine (yet old) one, which is good because the generator on this bike is known to be far away too powerful.
After that I also replaced the genuine regulator with a MOSFET one : the original one rejects all the unneeded power to the bike chassis (ground) which of courses generates a lot of heat on the whole charge circuit.
One year since I repaired my bike, and everything is still ok (low resistance, no hot point on the wiring).
I may leave a feedback here in 20 years to report if the repair survived, if:
– I will be able to find unleaded fuel to ride my bike :)
– I will not crash myself / destroy my bike on the race track
– HackADay is still there ;)
I think the tool I bought is good, it may not survive a hard work, but I crimp only once a month so it’s fine for my use ;)
Sometimes “rejecting the unneeded power to ground” is done, because the alternator coils act much more like current sources than like voltage sources. In short circuit the current is strongly limited by the coil inductance, but without load the voltage can rise excessively.
Years ago we swapped the engine on a Vespa and the new one was designed for use with a regulator. It produced voltage up to 75V at medium rpm. The regulator then was of a shunt thyristor type.
The old one used 3 coils with series connected loads, which were shorted out when switched off.
So you have to take some care (or use a proven design) when you change the concept of such a motorbike charging regulator to avoid damage by overvoltage.
Hackaday is a treasure for such comments ! In real life it’s difficult to meet people with all the competences required for hacking / making things: so thanks for your comment :)
In practice I choosen a clone of the well known MOSFET regulator: SHINDENGEN FH020AA
As you adviced: I carefull checked the whole charge circuit with a thermal camera. With the original regulator the cables heats more than with the MOSFET one (some more degrees), while the voltage is ok (I like to see things, so I added a voltmeter to my dashboard).
For hobby electronics / small signal stuff you can be as shonky as you like – but for anything carrying power, the result of a faulty crimp is heat and potentially fire. Remember that spate of 3D printer fires due to cheap bed heater connectors?
You don’t need to spend $400 but just going $10 up the range from the cheapest nasty pressed-steel crimper to a fairly-ok ratcheting type can make a huge difference.
Also being willing to invest another $30 in another set of OK crimpers with the correct jaw profile for whatever you’re crimping next rather than just smooshing every crimp you come across in your one and only crimper.
For big stuff there’s very cheap hydraulic or hammer-down crimpers that do a decent job, certainly a much better and firmer job than “squish it in a vice” that a lot of folks seem to think is fine.
And, ultimately, give your crimps a tug – if you don’t trust it enough to tug it, it’s not crimped right.
“if you don’t trust it enough to tug it, it’s not crimped right.”
So what you’re saying is, the strength of a connection depends on how I feel about it.
I hope you won’t be offended by my laughter.
No. If you feel good about them, you do not need to hesitate to test them (tug them). If you feel bad about them, don’t use them :)
Yes. Again, their trustworthiness appears to depend on how I feel about them. And as someone else in the comments pointed out, if you tug on them hard enough for the test to be meaningful, you are damaging them.
Agreed – do a few test crimps and if you can pull the wire out without breaking any strand then the crimp isn’t good.
Wire should break before crimp parts is my test.
I solder a lot of my hobby stuff (there are disadvantages to this beyond inconvenience). I usually botch things up if I’m using the wrong tools to crimp something. Anyone who buys my motorcycle is going to find a big surprise when they need wire cutters to disconnect my harness. Oh well, at last it is water proof the way I built it.
I do like using those screw down euroblocks for stuff. And I did shell out a fair bit of money for some good tools for punch down blocks when I did my house’s network closet. So there are exceptions I’m willing to make if it doesn’t break the bank.
Yeah, HaD is really just a shill for Big Crimp. The linked article, with a detailed breakdown of the differences between the tooling and outcomes of official and knockoff crimpers, is just propaganda! Engineers are a scam, wake up sheeple!
>Is an IWISS or Preciva tool the right choice because it’s ‘just for some tinkering’, or might a faulty crimp lead to potentially very ugly consequences?
As it so happens I’ve got a bunch of new low-cost crimping tools incoming and half a drawer full of unsuitable ones waiting to welcome them in their ranks.
The frustrating point is that even the EDM machined dies are not guaranteed to be the proper shape and tolerances, as manufacturers seem to stack the blanks to get higher throughput, and the surface finish suggests they’re also skipping repeated passes to refine the surface quality. They’re also not honed afterwards.
My takeaways form reading original manufacturer-provided guides on proper crimping:
* pull tests are the primary means to ensure good crimp quality
* visual inspection of insulation crimp and conductor crimp to establish a qualitative idea
* conductor crimp shape is more important than insulation crimp
* they don’t tell you how to identify a proper die. Sometimes there are hints how to identify a worn-out die set, but no first-order information is given
* do epoxy potting and cross-sections if you’re feeling fancy, but beware of copper smearing around. The outer shape might already give sufficient clues, e.g. by measuring the conductor crimp dimensions with calipers
I have yet to find a low-cost “for DuPont” tool that produces insulation crimps that allow the contacts to actually insert fully into the Mini-PV housings. Out of frustration, I’ve moved to re-crimping the insulation crimp by sticking the wire through a ferrule crimping tool to bring it into shape (sad!).
Eventually, this might become a hobby I didn’t know I wanted, or perhaps one I know I don’t want :D
“I have yet to find a low-cost “for DuPont” tool that produces insulation crimps that allow the contacts to actually insert fully into the Mini-PV housings.”
I’ve suffered this for ages as well… changing the “crimping force” via the adjusting wheel made a big difference. This stopped my connectors from getting warped/deformed. It’s a bit of a hassle, since I’ve got to remember to adjust it depending on connectors I’m using (JSTs like more force, DuPont connectors like less).
Crimping in general: Frustrated that the final solution to bad crimps is still “spend $500 on another crimper”…
Yet there is hope, at least perhaps when wire EDM becomes something like laser cutters which are available in some fablabs. I can see how an open source library of die shapes would help – those SN-style crimping tools might be good enough. I’ve only got one that is misshapen and has shims to correct the die positions, the other ones are to spec, waiting for their original dies to be tossed and replaced with new ones.
Yes, we’re entering toolmaker territory here, but I find that infinitely more exciting and inspiring than buying 5 cheap tools from which I toss 3 and combine dies to get one working set.
Well you can potentially weld with laser cutter with some tuning, and wire EDM quite common thing in some DIY community and COTS component exist and available in any large web-market if can’t find in aliexress try alibaba, ebay, banggood or even openbazaar ( for example I seen some manufactures sell most of their IC here.) https://yewtu.be/watch?v=rpHYBz7ToII
BTW openbazaar dead and seem forked here https://github.com/mobazha/openbazaar-desktop/releases and they seem mostly interested in mobile client https://github.com/mobazha/mobazha
So now not so sure it’s as active as few years ago.
Whenever possible, I prefer contact on a strip & reel and use a K- or G-press (or similar)
The crimp height settings are generally validated, with pull tests performed at the start of each job to ensure the terminations are to spec.
IPC provides images of both good and bad parts for proper training.
And yes, we have used epoxy potting to review parts, in particular, when we have defects and need to do a proper study for a CAPA.
Quality hand tool are great for low-volume production, and we normally order what the contact supplier recommends.
I’ve had fantastic luck with the Molex 63811-1000 “service tool” crimpers. They’re two-step so you do the insulation crimp separately, but they have a ton of nests so you can always pick the one that fits just right.
Non-ratcheting, so you gotta rely on your wrist dynamometer to know where you are along the stress-strain curve and stop applying force at the right moment, but that’s not a hard knack to pick up. Get a hundred extra terminals and a fish-scale to test pull-out force, practice smashing the things until you nail it, and repeat that motion until it’s rote.
a good worker never blames there tools
if you understand the underlying principles it is always easy to
find a way to achive adequate results,and test and prove your work before it goes into service,now that bieng said,if you are getting payed big bukks and there is a thousand to do,then get
the tool . I have also screwed up enough jobs learning to know
what works and does not, and it realy counts ,I crimp it,solder it
after,slather silicone grease on it,and then shrink tubeing over the whole thing.
last but not least is the tug test,give, every,single,last,crimp, a tug.
all the good tools and parts will not let you see the bit of insulation stuck on the back side of the wire and it WILL be loose
after you crimp it.
I guess gauge R&R has it all wrong then.
>a good worker never blames there tools
There are tools which are fundamentally unsuitable for the job. For example, you just can’t undo the chewed-up insulation crimp where a die has bitten into the terminal (Matt Millman has some pretty examples of that). Sure, you can start by disassembling the tool to crimp with the insulation side only, but that’s a hack job that stays a hack job.
Crimped terminations are also used for materials that are terrible to wet with solder (aluminium, stainless steel, thermocouple contacts).
The major irritation here is perhaps that details matter, and tools that do 80% of the job ultimately don’t deliver 80% of the performance, but far less, and it might only become apparent later on. You’ll need repeatability, and the tug test, good in its own right, should also be destructive to know the right die is chosen and the alignment is good and proper.
I’ve been taking longer to get acceptable crimps with budget tools than the hours I spent crimping those fiddly Molex PicoBlade contacts. Manufacturer-designed or -sanctioned tools usually also provide a wire stop and a contact fixture so the end of the insulation is located at the proper depth, which is a hit-and-miss with budget tools. Here I can see some room for improvement to make those cheap tools do better given the die geometry is right. Then perhaps we can get more repeatability out of them.
So yes, I’ll blame the tool, but I’ll also try to improve it once I’ve understood the root cause of its poor performance.
that should be “Sure, you can start by disassembling the tool to crimp with the conductor side only”
There are two butts to kick here. The OEMs that charge WAY too much for the approved tooling. The point is to lock you into their connectors after you invested so much in the tooling. Also, blame the clone tool manufacturer, how hard is it to get one genuine die and copy it correctly. The clone tool would be fine as long as the die matched. I don’t think there would be much if any cost difference to create the proper shape vs the improper shape.
I also don’t get the far east infatuation with 2:1 aspect ratio crimping cross-sections, but I got arguments both in favor and countering the “lack of expertise” hypothesis.
Perhaps the most obvious would be attempts to work around IP rights.
From left field: check out the 2018 US10090627 patent application detailing in-line ultrasonic non-destructive testing. It’s guaranteed that good things won’t come to affordable tools. Worse yet, the cheaper alternatives may become the de-facto standard and spoil the market for good solutions limited to a single manufacturer.
As far as “improper engineering” is concerned, I keep wondering why those dies that have 3 or 4 positions don’t use the negative space – the features in between crimping locations, to offer 5 or 7 crimp shapes in one tool. This could be done at zero added recurrent cost and provide more options to accommodate insulation and conductor diameter combinations, yet it’s not being done. Definitely filing that under “lack of imagination / lack of caring”.
Consider that from the perspective of a cheap crimp manufacturers, they don’t need to make an exact functioning replica to sell the tool; it just needs to look close enough.
Once you have it, you’ll find that it sort of works (after a lot of cursing, and wasted many contacts), and that it will cost way more to send it back for a refund than the tool is worth.
You’ve just rewrote the original aphorism to suit your bias.
The original, in French states: “Mauves ovriers ne trovera ja bon hostill.” Correctly translated, it means, “A bad workman will never find a good tool.”
And here, you have someone telling you, “This is the right tool for the job, this is why these other tools are not correct and can produce poor results.”
Yet you can’t see past your own face and insist it is the person using the poor tool who is wrong. Why?
How about this: I challenge you to do the job with *only* your soft, meaty hands. If a good worker never blames the tools, then surely you don’t actually need *any* tools to do the job. After all, you can just find a way to achieve adequate results through your understanding of underlying principles. And don’t go and try building tools for yourself first. That would imply that you have the wrong tools at hand (hah).
Hammer and punch to ‘crimp’ any and all new (to me) connector styles.
Yes it’s isn’t pretty, or cost effective for repeated jobs, but a couple of punches and chisels, along with a steel block with a few different grooves and I’m ‘close enough’. Yes assembling the final set of x wires into the connector is aggravating.
Takes a little practice…hack every day.
Another, somewhat more understandable and less convoluted explanation, is the later derivation – “Tools do matter, and the ability to pick good ones often sets the very best workmen apart from their peers”.
Toodle pip
Impressed to read a sentence written centuries ago “Mauves ovriers ne trovera ja bon hostill” (~XIII century) (“Mauvais ouvrier ne trouve jamais bon outil” in contemporary French).
I doubt that they had crimping tool at that time or any such technical / precise tools, so I guess that at that time bad tools were really bad.
The really point is that “cheap” does not always means “totally bad”. Some cheap tools will meet your needs, and I think that the most important thing is too know your needs and to act accordingly. You have time and competences to qualify the result of your job and you cannot kill someone ? You may try a cheap tool. If you are not able to check your job because of lack of time or competence, believe a well known manufacturer and pay it for it’s tool.
For crimping “home” things I check both resistance and double check heat under heavy load (repaired the charge circuit of my bike). On the opposite side, in my company, I used pricey tools because it’s worth compared to the price of the machines and the risks a bad connection would imply.
I hope to be a good maker at home, and a good worker at work :)
Unless it’s the tool’s fault, and sometimes it really is!
A good worker also does not use junk tools. hey also know that if you don’t follow the right procedure the best tool in the world won’t help. Also you don’t ever want to crimp and solder. A good crimp will not be improved by solder at all and since most crimps are done a stranded wire, the solder will wick up the wire and create a stress riser making the wire more likely to break. The heat can also affect the springing pressure of the crimped terminal. I see this done all the time and I cringe every time I see it. Solder it or crimp it, never both. You may have had luck with it but you probably did not do work under high mechanical and thermal stress either.
I highly recommend you look up the NASA standards for crimped wiring connectors (it is on the internet for free and is also the standard for military connections), it will tell you definitively to never ever solder a crimped connection. As a military electronics tech I did attend a school on high reliability aerospace connection and soldering held by NASA. BTW in most cases NASA and the military expect the wire to break before it pulls out of a crimp connection. That is a good thing to shoot for.
Here is a good NASA document on crimping. https://nepp.nasa.gov/files/27631/NSTD87394A.pdf
Soldering crimp connectors is a recipe for disaster, you are manufacturing nasty stress points and the wire will just snap right off. Been there done that. Get the right tool. If it is worth doing at all, it is worth doing right.
“a good worker never blames there tools”
I’ve heard that over and over. Here’s the corollary: “You can’t do good work without good tools”
Buy the best tools you can afford, you’ll only have to buy them once.
The saying started when it was up to the worker to fabricate their own tools and was therefore directly responsible for how well they worked. It does not apply when a worker is handed a tool they had no part in making or selecting and are told to make it work or else.
only slightly related, but this feels like a thread that will attract some opinions.
i’ve got a project with a handful of boards that need to move some low voltage DC power amongst themselves. i’ve been putting screw terminals on and then just shoving some bare wire in and cranking down. that doesn’t leave me with a great feeling.
barrel jacks would feel a bit nicer, certainly they’d be polarized.
any opinions on polarized connectors for delivering power to boards, preferably with some sort of retention clip? availability of some premade cables would be nice.
XT30 looks sort of appealing, but i haven’t seen PCB-mount connectors with data sheets, and i’m just a bit uncertain about it.
Consider outsourcing the cable production and look into JST VH with 6 contacts (3+3, 10A rated contacts)?
You might want to consider using the XT30 pigtailed off the board with some wire. It is nicer to the board to not have to withstand the mating/de-mating force. Otherwise something with a low insertion force and a locking mechanism would be nice, like a PC motherboard power connector. I don’t like anything that forces the 800lb gorilla to exert force on a circuit board. Look for some Amphenol/Tyco catalogs, I’m sure you can find a connector that does the job for you.
Halfway between a connector system and bare wires is putting some ferrules on your wire ends. The industrial automation people seem to love it
I do like the ferule if there’s a screw down involves. That’s sorted many a crap 3D printer. Some of which had solder on the stranded cable but that’s an unrelated nightmare.
I have use XT60 PCB Connectors for this and they work great. Amazon sells them (or used to anyways) and Kicad has the footprint already. Space wasn’t really an issue for me and I had them on hand. If you are doing real low power it may be overkill… but if you already have some and have the board space… why not?
Your house is filled with high current wires screwed onto light switches and outlets. This termination technology is fully endorsed by all the safety standards. Screw terminals with bare wires are just fine.
Thanks for the response, but having just fixed up an aluminum/copper junction in my house that was charred, I’m… less enthusiastic about this analogy than you might expect. :)
But if we’re appealing to household wiring, what about just bringing power in through mounting holes with pads around them, and affixing the wire to the board with a machine screw/nut through the hole? Compressing the PCB doesn’t seem ideal, but it would let me bend the wire around the screw, which would make me feel better.
P.S. I’ll note that I’m probably overthinking all of this a bit, but I do appreciate all of the opinions this produced.
“aluminum/copper junction”
ewww. Found your problem!
Terrible idea. The reason there was a problem with the aluminum wire is it expands and contracts too much with temperature – the circuit board is far worse. Which is why you have never seen anyone bolting anything to a board as you describe. I’ve seen Big Clive tear down some true garbage that is fundamentally dangerous and never seen anyone try that.
Solder a brass nut to the board and trap the wire between the nut and a brass screw head – leave the epoxy and fiberglass out of it. Better yet – solder a barrier strip to the board so that anything coming loose won’t get loose.
Metzs 31330102 with crimped ferrules is what I use, should be good to 20A, polarized, and ferrules are easy to crimp reliably.
Don’t love manually installed barrel connectors, because:
1. The plugs are a pain to wire
2. They come in different pin diameters and no standard for voltage/pin size
3. Not latching
4. Not strain reliefed
BUT — they are the standard for wall wart to project power connectors, and they do the job (90% of the time)
For power connection I prefer Molex Mini-fit latching connectors. I worked on a vending machine project once, and these were used throughout the machine.
I like Anderson PowerPole connectors for this application, they have wire-to-board connectors. But, as far as I know there aren’t premade cables.
Ferrules in screw terminals are pretty good, too. I’d do that if you don’t need to unhook them very often. And they’re pretty easy and quick to crimp.
This article is spot on. I working in the telecom industry as well as the military and I can tell you for sure that there is a marked difference when using the tool recommended by the manufacturer of the connector. They are much more consistent and repeatable. When working inside Bell central offices our crimpers for coax connectors even left an imprint in the sleeve to let QC inspectors know if the dies were worn and the tool properly adjusted. If they were correct, the imprint would be readable. If the dies were worn they would not be. If the crimper was set wrong (too tight) it would smear the imprint. They left a diameter number and a traceability number for the die so if we had a test failure we could locate and remove the tool from service. I crimped thousands of coaxial connectors and they very rarely had a problem. We also had very specialized stripping tools which for coax would run into the thousands of dollars. Yeah, the good tools are pretty expensive but so is that FPV drone you are wiring up. I once worked a job where an installer crimped hundreds of RJ-45s and the die had one pin that was bent and was causing test failures on every single connector. It took days to test and fix them all. After that each tool was required to make a test crimp at the start of every day and pass before work started. Not saying you always have to go this route but if it is life safety or could cause a big financial loss better know what you are using.
A good quick test is to look up the pullout spec for the connector you are using and see if your connector is getting those results. It is a fairly easy test to do with a fish scale or something like it. Simply pull until the wire comes out while watch the force. Another thing to look for is severed strands near the crimp. That is usually the fault of cheap connectors with rough or sharp edges but can also be a sign of over crimping.
My favorite crimping tool difference was the mil spec DB connector pin crimp tool. It did a four way indent on a solid barrel. Those things were night and day different from the off the shelf folding pin crimps which almost never work right. If you are doing any kind of pin based connectors like DB series or Cannon you definitely need these.
Likewise in telecom! All our coax cables were pre-terminated in the cable shop, then sleeved with bubble-wrap and braided socks for installation (typically a 12-pack 735 coax in a single outer jacket). During a particularly hectic installation season of OC-48 muxes, we were beset with a rash of DS3 coax failures in the field.
Turns out one of the cable-shop techs didn’t get the memo about crimper testing and recertification, and had been using one set for about triple their rated life. Who knew the rated life meant something?!
So a couple of us field techs, including yours truly, got trained by the cable shop, and then grilled by the customer’s quality auditors, until they were satisfied that we could go into the field and reterminate all the failed jobs. We didn’t even bother testing to see which ends were failed; they had all been done with a faulty crimper, they were all suspect, they were all getting replaced.
As for the quad-indent (actually octo-indent, since there are two levels of quad), that’s an M22520 style crimper. There are knockoffs, but go for the Daniels brand if you can. Their stuff is specified for aerospace use, so even the units that aren’t sold with the certificate are still extremely high quality.
Are you serious?
If you didn’t find exact dies for your casual crimping tool you already have (yes, you don’t need new crimper for new pins, just dies only, it is a question of only two screws), order few dies pairs (only dies) for similar wires/pins on Aliexpress, at least one larger, and one smaller one. Then grind/file/mill smaller female and larger male parts to make a die pair to exactly fit pins and wires you want to crimp. “O” shape, “B” shape – whatever, just make one you need. You could even mill few crimper dies blanks from, say, broken lathe cutter tails for free to have an ability to quickly make the crimper jaws from that blanks as you will meet some new pins. That’s how hackers solve a problem with a baseless insaneness of prices for “brand” crimping tools. Not by buying slightly cheaper, but still insane expensive “other brand” crimping tools. You will get stable, precise and repeatable crimps for few bucks, just like with “brand” tool. You could even add insulation stops and other bells and whistles you want.
You get what you pay for. I’ve started out with hardware store junk that just didn’t work properly. I then invested in some higher level consumer crimp tools that did a serviceable job for non critical hobby stuff. I’ve crimped for 3D printers and CNC and haven’t had any problems. I used a velleman branded ferrule wire end crimp tool which is one of the cheapest but gives usable results for about 35-40 euros. I also found youtube videos which talk about a japanese made tool for about 50-60 euros, PA-09. It has the B shaped die though, but is a lot better than most cheaper tools. With a few hours of practice I got reasonable results. Used it on stepper motors for 3D printer and CNC, even with a lot of vibration and humid conditions the connectors held up fine. While not 400-500 euro tools, for a hobbyist it’s serviceable. Going any cheaper than 30-50 euros you’ll end up never using the tool because it’s just very frustrating to use. I used Chinese connectors too and worked for me. YMMV.
This is Hack-a-Day not ISO-9000-Business-Practices-A-Day
Most people here are not going to spend hundreds of dollars on a specialist tool to crimp one particular type of connector.
For the rest of us, the Iwiss IWS-2420 does an acceptable (yes incorrect, but still acceptable) job on all those common small connectors we use and costs less than $40.
Pseudo-edit: Make that IWS-2820
Or you can buy premade wire assemblies on ebay with professional crimps, super cheap! If you contact the vendor they will do custom work. Why mess around when you can get it done right for cheap.
It’s a hobby, and everyone enjoys it in their own way. For me personally, this kind of messing around is the point ;)
My hobby is only doing things once so I do them right the first time and then move on to new things. I am happy to pay extra if it means I can move on. You know what they say about people who do the same thing over and over. My hobby does most assuredly not include debugging sketchy wiring, my time is too valuable.
OMG.. Just imagining where I would be if I had bought a custom made harness or even just a pre-crimped connector on a piece of wire instead of all the crimps I have made. BROKE!
I like Maya Posch’s writing, but found this article a bit gate-keepey as well. Like, if you’re afraid a bad crimp in your DIY’ed 220V wiring might set your flat ablaze, maybe don’t do mains voltage in the first place? I’m confident in my abilities–I even teach some of this stuff at university–but I still avoid mains-voltage stuff simply because there are enough low-voltage projects that I can distract myself with ^^
I am really happy with the generic JST XH-compatible crimp tool that I use. It produces great crimps, and it’s so much easier than soldering or, may the flying spaghetti monster have mercy, using those dropshipping pre-crimped wires that use this transcendentally thin AWG >9000 stranded wire that breaks if you look at it wrong.
I mean, and even thenm crimps are not the only thing that exists, Wago are a thing, there are many ways to do really reliable wiring with cheap tools, ferrules and spade connectors are installed by electricians with cheaper tools, and give reliable house cabling.
That is right. ALL of the crimped connectors are designed to create a captive customer base. You sell them the multi-thousand-dollar crimper, and you can charge what you want for the connectors. Why would they even think about low-volume customers?
If you are talking about micro connectors then crimps actually are the only thing that exists,
for my two cents on the subject first I would say thanks for the article! I think that AFTER you learn what a proper crimp does and looks like, and which terminals are ok for which materials, you can often use various tools to get proper crimps, AFTER! As always the devil is in the details, there aren’t many, but they can be critical and you need to look at them before you are done and move on. It’s not rocket science, but in training newbies it often takes showing them how easily their crimp connection comes apart before they get that they actually have to look for a few details and understand what they are seeing. After that realization you can tell if your cheap tool will do the job or you need to borrow or buy a better one for the project. Then there are issues with terminals themselves as mentioned in the article, the ones built to lower standards or inferior materials (found at many local “big box” stores) where since they arent springy bronze or in size tolerance, the act of putting them on makes them loose enough to fall off (or burn up!) immediately or in time from vibration etc.
I just looked in my local phone book and there are multiple places that will either rent out crimping tools, or do custom wire harnesses. You may think your requirements are unique but chances are, someone in your town is already making the thing you want. Contract electronic assembly is happening everywhere.
When I made my 3D printer (a long story in it of it self that started like 10 years ago with cheap stepper motors that I found in some ad), I used the cheap crimping pliers to do all my DuPont and other connectors. Crimping was hours long fight to do at least have it look like it’s done properly (even when it wasn’t). It worked, but I hated to do anything with the cabling afterwards.
Some time after that my friend was selling all his stuff (soldering iron, tons of components, tools, organizers, etc..) so I bought them for like 300 EUR. I did some projects with it but then forgot about the whole content because life stuff got in the way.
About a year ago I was contemplating buying proper tools but still found them too expensive to justify them for my hobby that I do not have much time to spend on. Then I discovered that among the tools I had was a ratcheting crimping tool for DuPont style connectors. I was ecstatic! With that tool I made new crimps in seconds and they stayed on the cables with no problem.
I was figuratively banging my head against the wall. If I had invested in proper tools from the start, I would have saved a lot of time along the way, which I could use on the hobby itself.
As for the 3D printer, my original objective was to get a printer for a reasonable price (back then printers were still like 1000 EUR, with some of them going down), in the end I spent far more on the printer then I would have if I had bought Ender 3 printer, but I learned a lot about construction and working of a 3D printer.
Yah. Similar experience here if by “proper tool” you mean a ratcheting iWiss or equivalent. I went from needle-nose pliers to really crappy non-ratcheting tool (which I could do better than with the pliers) to an iWiss. This article seems to be saying we need to go out and by the name-brand Dupont tool. That’s a whole different level of cost!
And whats about the ones from Knipex in Wuppertal (Germany)? They are normaly the quality standard.
If you can find the model number, I’d be happy to buy one.
I mostly use ferrules with a Knipex plier. They are amazing. I can’t find any DuPont crimpers from them.
Was going to comment this exactly, I only use Knipex ferrules with the brand name tool, I have examined cross section of crimps done this way, they look absolutely perfect. Then, all goes into a Metz screw terminal connector series 3118 or so, for high current applications (10-20A max).
The tool isn’t the only part involved. I bought a box of Belden 1855 coaxial cable, and what were supposed to be high-quality BNC connectors specifically for Belden 1855 cable, and the crimper made specifically for this. None of this from China; I did not cheap out on this because I had to make a lot of cables for a well-funded project. I bought all three from a reputable audio/visual distributor.
Here’s the problem: the center conductor crimp works fine every time, but the ferrule for clamping the shield onto the connector through the cable outer jacket is never tight enough, and I’ve had some connectors pull off because of this. The problem I have, is that this could be a problem with the connector’s outer diameter, the ferrule’s inner diameter, the wire’s insulation thickness or other characteristics, or the crimping die. But of course, neither Belden, nor the connector maker, nor the crimper maker publishes any drawings that would be useful in determining which component (or components) is garbage.
Just as important is tool wear, and manufacturers tend to keep tools running as long as possible. A good crimp tool will continue producing cosmetically good crimps even after the crimps become loose and unsafe. The answer to this issue in a production environment is pull testing a regular sample but pull testing is a destructive test. Even wire crimps that pass pull test should not be used in production because the connection has been stressed.
For someone crimping wires at home, the right answer is to do a wiggle test. You do this by holding the terminal in one hand and then pull the wire back and forth about 45 degrees with the other while watching for movement in the crimp area. Any visual side to side movement would be a failure.
reductio ad absurdum,ho hum,and guess wha?
you have already lost your challange,as I have stripped many a wire with my teeth,AND crimped conectors with them too,
so Danno boy,all you gota do is come and watch,it aint nasa,and i
haint insured,but i do promise that i can and will back up what i claim
just cause every company from Otis on down,has developed proprietary tooling and procedures has absolutely no bearing on
securing the conduction of electricity,especialy for a hacker
Talking about expensive tools, somewhere around I have a vintage AMP brand D-Sub pin interter-remover tool that a retired telco employee gave me in the late 1980’s. He told me it cost around $300 back when it was the new thing and his boss would have a shitfit whenever anyone lost one. IIRC at the time he gave it to me they could be bought for a few dollars, exactly the same tool.
The little half-red, half-white separable thingy? I think I have one in my toolbox! Now, I just buy the solder cup sub-D connectors and solder/heat shrink the connections. But I do remember the crimp/poke in versions from the days at Data General, when it seemed like we were always making RS-232 cables :-)
I work on old cars. Whatever you say, crimping is the devil’s work.
Once moisture gets into the cable end, it WILL tarnish the copper. Some decades later, it will fail.
So I always tin, crimp and solder. For you gainsayers regarding the wire snapping, well add some strain relief.
For my job, I have used the professional tools too, but in learning how to use them have mashed up some (quite expensive in some cases) pins. There seems to be little if anything in instruction as to how to use them effectively or properly. So I don’t blame the tools, I blame the manufacturers of the tools.
I work on old cars too and copper oxide is conductive.
Don’t crimp and solder. One or the other. Then add silicone grease and heatshrink or wrap with self-curing rubber tape. Works for me to keep moisture out. I have also used silicone sealant, followed by heatshrink, which I have been told will corrode the connection due to release of acetic acid, but that hasn’t happened to any of my connections, and they stayed waterproof.
Even if i have the right plier. Now I can not get the contacts. JST XH and PH series are out of stock everywhere.
Hi folks,
We just came through a similar issue at the company I am working for (fortunately it is not life critical, but it spread over the world pretty well.). We managed to mess up quite a lot of Superseal 1.5 crimps due to the same reason: knock-off crimp applicators, wrong machine/applicator settings.
The applicators were manufactured by a Czech company called KrimpSystems, and they supplied a specification from which it was not straightforward to understand which crimp height shall we for a specific cable. Of course when the applicators were commissioned the supplier company and our engineers interpreted it wrong.
After we discovered this hitchup I asked quote for the official Tyco/TE applicators and they have marginal price difference…
In the old days, if I made a crimp I’d also add solder after the fact – fills in holes for a better connection, coats copper wire to reduce corrosion.
Later on, I learned about “solder creep”. But nobody explained how solder creep works when solder is applied AFTER the crimp, and my crimps (on personal hobby stuff) weren’t subject to mechanical movement.
So I probably wouldn’t apply solder to a crimp today, but I’m not worried about old crimps.
I’m sure someone here will set me straight. I don’t know why it’s supposed to be a bad thing to solder crimped connectors. Yes, I know the experts say not do do it. But they also told me that press-fit Eurocard DIN connectors were more reliable than soldered ones. But back in the 90s I had to work on a lot of systems that used these, and had a lot of intermittently hanging systems. Going back and soldering the pressed-in connectors seemed to always clear up the intermittent problems, and I never got one back that had been soldered. So although I don’t routinely solder crimped connectors, I’m not above soldering the ones that are getting warm.
If you want to something cringeworthy, watch a few YouTube videos of HVAC technicians crimping terminals (searching YouTube for “HVAC burned wire” without the quotes should yield examples). Their tool of choice seems to be a pair of those stamped steel electrician’s crimping pliers (e.g. Klein model 1000 or 1010) that also strip and cut wire. Sometimes you’ll see them use something beefier like Klein model 1005SEN crimpers. I only remember seeing one HVAC YouTuber using ratcheting crimpers, but he oriented the terminal in the dies wrong. If you watch enough HVAC videos, you’ll even see technicians using lineman’s and needle-nose pliers to crimp terminals.
Often they are having to replace a terminal because the last guy’s (and perhaps sometimes the factory’s) poor crimp caused the wire to burn in two. These are often wires in condensing units that connect to the contactor and carry 15 amps or more to the compressor. If these connections weren’t housed in metal compartments, I have little doubt there would be an epidemic of fires originating from HVAC equipment.
None of these technicians seem to have a clue what kind of fire hazard they are potentially creating. Making good crimps in the field is challenging, especially if you’re using the wrong tool and are unaware of the potential hazard involved. I think most HVAC technicians would be better off connecting factory-crimped pigtails using wire nuts or Wago Lever Nuts.
On crimpers I have wondered how you would do with say a $14 HF ratchet crimper but with real dies in it. Is it the tool or the die?
Speaking of JST connectors, has anyone found a supplier for male housing/contacts (not a header, an inline connector) that will mate with a female JST PH connector? Sparkfun sells cable assemblies with such connectors, but they don’t have any additional info on the connector.
For those M20 Hawin connectors and knockoffs (Hansen Hobbies is a good place to get those I’m 99% sure they are genuine Harwin M20) The Hozan P-706 or it’s IWISS clone the 1440L is the best thing I have found. Use the 1.8mm round die on the insulation and the 1.4mm “double D” die on the conductor.
Hold the wire in the terminal with your thumbnail and lightly precrimp the insulation so the terminal can still me moved on the wire, line yo the end of the insulation halfway between the insulation and conductor crimps and then crimp the insulation so that the wings hug the wire (don’t bear down on 22 AWG). Then crimp the conductor in the 1.4mm die, you can just bear down fully on this because the die is the correct height for 22-26 AWG wire. The crimp wings should be lined up with the face of the tool on the opposite side of the wire in order for a proper bell mouth to be formed where the strands enter the crimp.
A pull out test showed no noticeable difference between the HT-95 and a properly crimped terminal with a Hozan P-706, in either case the wire breaks before the strands pull out.
Some M20 knockoffs have smaller crimp wings and don’t crimp as well as a real M20, I’d recommend buying from Mouser Digikey or Hansen Hobbies.
Hey there! I noticed you have the P-706, I’ve got the P-707 and I can’t make heads or tails of the directions to figure out what diameter to use for the conductor crimp on the M20 Hawin connectors. You got any suggestions? I can’t find any dupon/harwin/etc in their “1wirelist” which is the new URL instead of the one in the manual.
Can you offer any assistance? Hopefully you still read around here. Appreciate ya
For JST check out gam-gec.com