Swapped Dash Module Gives Ford Maverick An Upgrade

Ford is looking to make their new Maverick compact truck stand out, and so far, it seems to be working. Not only is it exceptionally cheap for a brand-new hybrid, truck or otherwise, but Ford actively encourages owners to modify their new ride. From standardized mounting points throughout the cabin intended for 3D printed upgrades, to an auxiliary 12 VDC line run to the bed specifically for powering user supplied hardware.

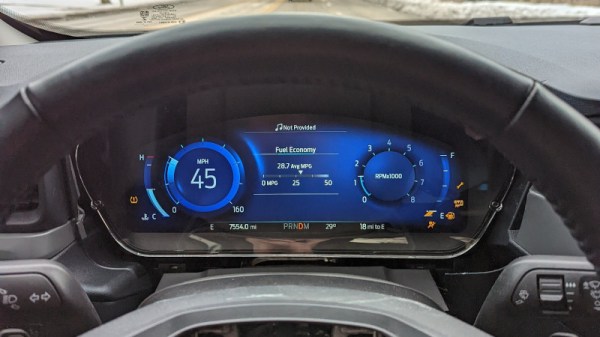
But we doubt even the most imaginative of Blue Oval engineers could have predicted that somebody would rip out the whole dash module and replace it with one from a higher-end Ford this early in the game. While many people can’t even find one of these trucks on the lot, [Tyvemattis] on the Maverick Truck Club forum has detailed his efforts to replace the relatively uninspired stock dash module of his truck with an all-digital version pulled from a 2020 Ford Escape Titanium.

Ford’s rendering of the original Maverick dash module.

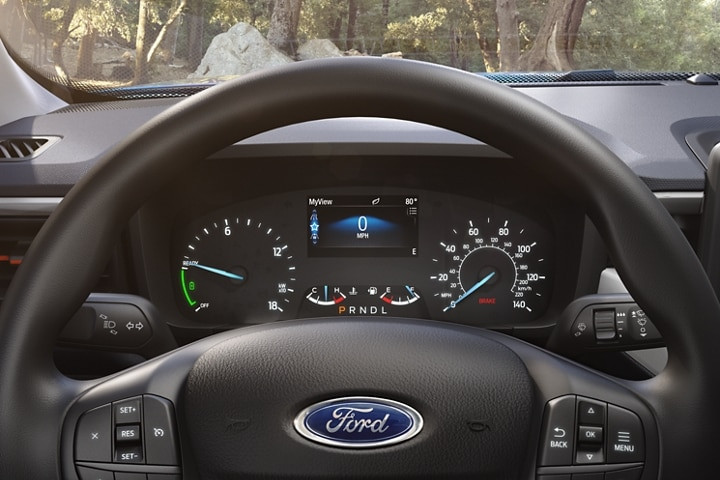
Now we say “effort”, but as it turns out, the swap went off nearly without a hitch. The new digital module not only appears to be the identical size and shape as the original, but they both use the same connectors. Presumably this is because both vehicles are based on Ford’s scalable C2 platform, and likely means more components from this family of vehicles such as the Lincoln Corsair or new Bronco could be installed into the Maverick.

So what’s the downside? According to [Tyvemattis], the computer is throwing error messages as the Maverick doesn’t have a lot of the hardware that the dash is trying to communicate with. He also can’t change the vehicle’s driving mode, and the cruise control can only be enabled when the truck is stopped. But probably the most annoying issue is that the fuel gauge is off by 50%, so when the tank is full, it shows you’ve only got half a tank. At least one other user on the forum believes this could be alleviated by modifying the fuel sensor wiring, so it will be interesting to see how difficult a fix it ends up being.

We first ran across the DIY-friendly Maverick back in October of last year, and we’re encouraged to already see owners answering Ford’s challenge by tinkering with the vehicle. Here’s hoping this is the start of a new chapter in the long and storied history of car hacking.

Thanks to [Matt] for the tip.

the algae panel

Move Aside Solar, We’re Installing An Algae Panel

[Cody] of Cody’sLab has been bit by what he describes as the algae growing bug. We at Hackaday didn’t know that was a disease floating around, but we’ll admit that we’re not surprised after the last few years. So not content to stick to the small-time algae farms, [Cody] decided to scale up and build a whole algae panel.

Now, why would you want to grow algae? There are edible varieties of algae, you can extract oils from it, and most importantly, it can be pumped around in liquid form. To top it off, all it needs is just sunlight, carbon dioxide, and a few minerals to grow. Unlike those other complicated land-based organisms that use photosynthesis, algae don’t need to build any structure to hold themselves up or collect sunlight; it floats.

The real goal of the algae is to build a system known as “Chicken Hole.” The basic idea is to have a self-sufficient system. The algae feed the insects, the insects feed the chickens, and so on up the chain until it reaches [Cody]. While glass would make an ideal material for the algae tubes, plastic soda bottles seem like a decent proxy for a prototype and are much cheaper. He connected around 100 half-liter bottles to form long tubes and a PVC distribution system. The algae needs to be pumped into an insulated container to prevent it from freezing at night. At first, a simple timer outlet controlled the pump to only run during the day, draining it via gravity at night. However, the algae can’t heat up enough when running on cloudy, cold winter days, and it cools off. A solar panel and a temperature sensor form the logic for the pump, with a minimum temperature and sunlight needed to run.

[Cody] mentions that he can expect around 10 grams of algae per day on a panel this size in the winter. He’s going to need quite a few more if he’s going to scale up properly. Perhaps in the future, we’ll see panels growing algae robots? Video after the break.

Continue reading “Move Aside Solar, We’re Installing An Algae Panel”

BenAkrin-PlottyBot-TypeWriterMode

PlottyBot: A DrawBot That Plots A Lot

Fire up those 3D printers because if you’re like us, you’ll want your own PlottyBot. Still, have a pile of “thank you notes” to write from recent winter holiday gift exchanges? Hoping to hand letter invitations to a wedding or other significant event? Need some new art to adorn your lock-down shelter or shop? It sounds like [Ben] could help you with that.

Besides being a handsomely designed desktop DrawBot, this project from [Ben] looks to have some solid software to run it, a community of makers who have tested the waters, and very detailed build instructions. Those include everything from a BOM with links for ordering parts to animated GIF assembly for the trickier steps.

If you’d like to graduate from “handwritten” cards and letters to something poster-sized are customization tips for expanded X and Y dimensions. As we’ve included in other recent articles, one caveat to mention is the current scarcity of the Raspberry Pi Zeros that PlottyBots require. But if you have one on hand or think you’ll be able to source one by the time you’ve 3D printed all the parts, it might just be the perfect time to add another bot to your family. As a heads up, this project is self-hosted on a solar-powered server, so maybe take turns reading the complete build log.

A nice bonus if you need help drawing something suitably complex to require a robot’s help, [Ben] also created MandalGaba which looks like an awesome online tool for drawings like the ones shown above.

Fluke DMM Hack Adds One Digit To Model Number

Among his many interests, [Dave Jones] likes test and measurement equipment. He recently posted a few videos on his EEVblog exploring the reasons why Fluke voltmeters are so expensive. In the process, he stumbled upon an interesting hack for the Fluke 77.

The Fluke 77 was introduced in 1983, and is an average responding meter in the AC modes. This model has become a de-facto standard for use in maintenance depots and labs for equipment which has very long lifespans — think military and industrial gear, for example. Many test procedures and training materials have been designed around the use of the the Fluke 77. The cost to change them when a new and better meter comes along is usually so prohibitive they might as well be cast in stone — or at least hammered into 20 pound fanfold paper by a WordStar-driven daisy-wheel printer. But for those unburdened by such legacy requirements, Fluke has the 17x series of True RMS reading meters from since the beginning of this century. These meters bear a strong visual resemblance to their siblings in the 7x family and are substantially interchangeable but for their AC measurement methods. Continue reading “Fluke DMM Hack Adds One Digit To Model Number”

A USB interface connected to a Psion Organiser II

Arduino Nano Adds USB Interface To The Psion Organiser II

Introduced in 1984, the Psion Organiser series defined the first generation of electronic organizers or PDAs (personal digital assistants). Even though these devices are now over 30 years old, the Psion Organiser scene is alive and well: with new hardware and software is still being developed by enthusiasts the world over.

A USB interface connected to a Psion Organiser II
The Organiser II, with its brand-new USB interface

One of those enthusiasts is [James Stanley], who designed and built a USB interface for the Psion Organiser II. Although a “CommsLink” module providing an RS-232 port was available back in the day, it’s become hard to find, inspiring [James] to design a completely new module based on an Arduino Nano. Hooking it up to the Psion’s data bus was a simple matter of wiring up the eight data lines to the Nano’s GPIO ports. A set of series resistors served to prevent bus contention without having to add glue logic.

Getting the software working was a bit more difficult: the Organiser’s native OPL programming language doesn’t allow the user to directly access the expansion port’s memory address, so [James] had to write a routine in HD6303 machine code to perform the read, then call that routine from OPL to display the result on the screen. Currently, the routine only supports reading data from the Arduino, but extending it to a bidirectional interface should be possible too.

Finally, [James] designed and 3D printed a neat enclosure for the Arduino-USB interface, which makes it look almost as sleek as the original CommsLink module. Perhaps with a bit of further development, this could turn into another way to connect old Psions to the internet. We’ve also featured a new type of Datapak to enhance the Organiser’s memory. Continue reading “Arduino Nano Adds USB Interface To The Psion Organiser II”

Crimping Tools And The Cost Of Being Cheap

Crimp connectors provide an easy and convenient way to connect electronics while still allowing for them to be removed and swapped without having to reach for a soldering iron and desoldering wick. While browsing one’s favorite cheap shopping site, you may get the impression that all one has to do to join the world of crimp-awesome is order a $20 crimp tool and some assorted ‘JST’ and ‘DuPont’ (a Mini-PV clone) connectors to go with it. After all, it’s just a bit of metal that’s squeezed around some stripped wire. How complicated could this be?

The harsh truth is that, as ridiculous as the price tag on official JST and Mini-PV crimping tools may seem at hundreds of dollars each, they offer precise, repeatable crimps and reliable long-term stability. The same is true for genuine JST, Mini-PV and Molex connectors. The price tag for ‘saving a buck’ may end up being a lot higher than the money originally saved.

Continue reading “Crimping Tools And The Cost Of Being Cheap”

Pick and place reels

Pick And Place Hack Chat

Join us on Wednesday, February 9 at noon Pacific for the Pick and Place Hack Chat with Chris Denney!

We in the hacker trade are pretty used to miracles — we make them all the time. But even the most jaded among us has to admit that modern PCB assembly, where components that could easily hide under a grain of sand are handled by robots, borders on witchcraft. The pick and place machines that work these wonders not only have to hit their marks accurately and precisely, but they also do it at blinding speeds and for days on end.

join-hack-chatLuckily, even those of us who design circuits for a living and depend on PCB assembly services to realize those designs can, at least to some degree, abstract the details of the pick and place phase of the process away. But making it “just work” isn’t a trivial task, and learning a little bit about what it takes to do so can make us better designers. Plus, it’s just plain cool to watch a pick and place do its thing. And to dive a little deeper into pick and place, Chris Denney, CTO of Worthington Assembly and co-host of “Pick, Place, Podcast” will stop by the Hack Chat. If you’ve ever wondered about the inner workings of PCB assembly and the role pick and place plays in it, or if you’re looking for tips on how to optimize your layouts for pick and place, this is one you won’t want to miss!

Our Hack Chats are live community events in the Hackaday.io Hack Chat group messaging. This week we’ll be sitting down on Wednesday, February 9 at 12:00 PM Pacific time. If time zones have you tied up, we have a handy time zone converter.

Continue reading “Pick And Place Hack Chat”