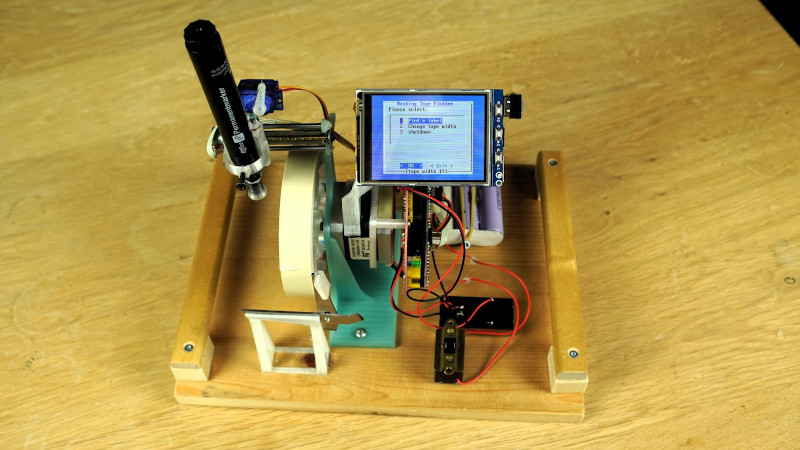
Printable sticky labels are a marvelous innovation, but sadly also one beset by a variety of competing offerings, and more recently attempts by manufacturers to impose DRM on their media. Fortunately they don’t have to rely on expensive printers or proprietary rolls of stickies, as [michimartini] demonstrates with the masking tape plotter. It’s a tiny pen plotter that writes your label onto the tape.
At its heart is the popular grbl G-code to motion parser, and its mechanism uses the lead screw axis from a DVD drive. Not for this project simply another hacked-apart drive mechanism though, for it has a custom-designed carriage for the axis. It’s 3D printed, and to ensure the least friction possible for a pen using only its weight to keep contact with the tape it was heated up once assembled to ensure all parts had a chance to bed in. Meanwhile the tape roll forming the X axis is turned directly by a standard stepper motor.
We like this project a lot, and look forward to any refinements to the idea. Meanwhile, it’s not the first custom label printer we’ve shown you.


To save people hunting for it…
https://www.youtube.com/watch?v=js4_p1S9vIM
This is awesome, and such good output quality…
And you havent even seen the crisp 2mm high text i plottet with it using a really sharp pencil. And when I say sharp, i mean David Reese levels of sharpness.
If there was an award for a hack with day to day practical use this would probably win it.
I just need to work out how you do that quantum temporal superposition of the pen cap. Does it occupy a different space or a different time?
Nice catch. As you correctly perceived I used a commonly available Heisenberg-cap that happens to blink in and out of place depending on who watches it.
Fun aside – this is one of the unsolved usability problems with this thing. Maybe I will be able to just park the pen’s felt tip in a fixed cap right at the end of of the y-travel. But those optical drive leadscrews are quite short, so I might have to sacrifice top end reach when using the 38mm tapes.
If you use a 6H pencil sharpened until it has a coronal glow from ionization of unlucky air molecules, then you can probably cut stencils too.
A friend of mine worked as a conservator for a museum. The bane of her life was cleaning off ancient masking tape goo from incoming collections; she was dealing with tape 50+ years old and it was /nasty/. The solvents involved in removing that residue were spectacularly awful to work with.
This is still a really cute idea.
Yes, that is the dreadful dark side of using masking tape for labels, the glue petrifies and can only be chiseled off after some years.
I hand write onto “blue” painters masking tape that is low to zero residue when removed. How ever it is assumed that it will be removed in a matter of day.
I could use something like this with the printer and a standard keyboard, s0 minus the screen or maybe a 1602 instead.
The problem with masking tape (of which the blue tape family belongs) isn’t that it doesn’t come off cleanly; it does, for a time. However, if you leave it on there *for years* it hardens and becomes like rock. I believe this is due to oxidation that occurs from exposure to UV light (so if you can keep it in the dark it’ll last longer).
If you use it on things like plastics and metal surfaces this is no big deal because solvents like alcohol can soften the adhesive well enough to take them off–even after it has hardened. On painted surfaces, not so much (an all-purpose solvent like alcohol will destroy the paint).
*Having said all that* most label tape uses the same exact adhesive as masking tape and thus, will have the same exact problems 😁
Mineral oil applied and allowed to stay will soften the glue, as will turpentine, and hand lotion. Learned that from a kindergarten teacher.
Still won’t be easy to clean, but the tape is gone
+1 for masking tape hate! I just threw out some of those small multidrawer storage things because the previous owner used masking tape as labels. The tape basically fell off, but it left a hard, lumpy residue that nothing I tried would cut. It was so bumpy I couldn’t get my labels to stay stuck. I sanded a couple down, but it just was taking way too long, so they all went in the bin.
I’m sure this machine could use different types of tape though! Someone needs to do a long term test of different types of tape and see what is the best. I’m guessing Gaffers would probably win…
Not so sure gaffer tape is a good solution. Just like masking tape, it is mean for short term use only. It’s meant to stick well, and come off without leaving any residue. As long as you remove it within a day or two. After that, all bets are off. So says at least one manufacturer.
If you’ve never seen “Mavalus” tape, it is the perfect solution to the problems with residue mentioned here. Many teachers know about it and love it. Apparently it is US made, too.
And a power switch you need hearing protection to use!
I wish my keyboard switches sounded like that.
Any switch can be made to be as loud as you want *if you hook up the right clacking mechanism* 👍 Example: https://youtu.be/6hMOGKTudcg
Absolutely lovely! Thanks James for posting [michimartini]’s video.
All it needs are some Jolly Wrenchers…
Some of the finest SVGs from my private stash:
https://gist.github.com/hexagon5un/9e3c206fe5b193ecd3e8da1f33f85698
https://gist.github.com/hexagon5un/7e843102c9a74101bbaa49e418b2af64
Also a really old community version from Thingiverse, of all places. I still like the curves.
https://www.thingiverse.com/thing:51236
Wow, that’s a low thing number.
Yeah right?
https://www.thingiverse.com/thing:18937 (Mini-flex!)
But I know we have folks with lower in the audience!
Yes!!!!!
That’s gold!!!
Nice – Buuutttt…..
Any accommodations for the changing roll diameter? A few layers won’t matter – But as you go down, it’ll narrow, reducing the surface speed, thus compressing the printing if no compensation is made.
. . . Factory worker here, to me this just screams problem waiting to happen. Other than that, pretty freaking cool – I could use one myself.
I’d just throw a potentiometer and spring loaded roller on the bottom to measure. Unless the label is really long, I would think a once per label correction would probably be sufficient.
You could devise a tracking print head that has wheel on the back that keeps the head height from the tape the same regardless of how much tape is on the roll.
The head could pivot and be spring loaded so it doesn’t lift.
No adjustment or calculation in software is needed.
Instead of having the motor drive the centre of the tape spool, have it drive a rubber wheel pressed onto the circumference of the tape. Now the tape moves the same linear distance per step, regardless of the spool diameter.
Good Idea! Would potentially also solve the problem of the heavier 38mm wide spools. As you can see from the video of the pre-alpha version the thing used to move faster, but that proved to much for when the heavier spool was loaded and i got overshoot and ringing.
Too simple. Come back when you have a solution that utilitizes stereoscopic imaging at the very least.
Sorry. I should have used a 555.
Yes, I am very aware of that and had the same idea. An alternative is to forego the roller and mount the potentiometer on the pivot point of the y-carriage (the pivot joint would also eliminate the complicated and hard to align z-axis), but that is for another iteration of the design.
All the labels produced in one session will look the same though, so I didn’t worry too much for this first working version.
Good point, also does it change the width of the text to accommodate the length of the text, or at least reject text that is too long? Anyway I like it, now he just has to add simple graphics (dot matrix)?
Seems like with a little manual assistance, i.e., guiding the tape off the roll as the label is printed, it should be possible to print 50m labels. I don’t think I’d want the software to be limiting it any further than this.
I can see guiding the tape off the roll would allow you to print much longer labels, but it might affect the printing as humans aren’t as precise as machines.
Probably not automatic (Guessing, have not checked).
Difference between inner and outer diameter is about 10%, and not such a big deal.
Also, changing the number of steps for a revolution is just a single number in GRBL’s setup. You could keep track of the length of tape printed and compensate in software.
I have a limit of 295mm set in Grbl itself. Of course the actual limit varies with how much of the tape is still on the roll. See discussion above.
This could use a trick that Cypher streaming tape drives used: these drives did not have a capstan; the tape motion was all done just by turning the supply and take-up reels. But there was a roller and encoder that rode on top of the tape on the take-up reel that measured how much tape was passing through, which was used to adjust the motor speed to get a consistent tape speed. The same approach could be used here, where a rubber wheel connected to a rotary encoder could measure the tape circumference before starting, or could be used as the feedback sensor in a closed-loop control for the longitudinal axis.
I want one!
Niiice! This is really cool – well done!
I’m still putting label sheets in the laser printer. Super cheap and easy. You can even get sheet labels with a transparent part specifically designed for cable labels.
Dude could have just bought a Dymo, but where’s the fun in that?
The “fun” was buying a used Dymo for about $2 and getting 7 rolls of labels with it!
B^)
Nice!
Just need an upgrade to a thermal die sublimation head or something to get rid of those stupid polaroid stickers too.
The possibilities are endless. Any kind of tape you can find becomes a label substrate. I kind of like the Sharpie, because like the tape, it’s a cheap commodity. Pick any tape, pick any color of Sharpie.
I have to agree with everyone here – this is truly awesome! Well done.
I’ve seen some kinds of tape this could make more permanent labels on. Smooth white surface too. They can be covered with that “magic” clear tape to make smear and fade resistant labels as well. Looks neat and easy to read in a many users parts bins or materials situation. It beats quickly written text.
Yes, i need to make another version that uses electrical tape (especially the white variety), because the masking tape label on my mail box is by now all crinkley from the rainwater soakage.
THIS is what has been missing since label makers first appeared! Great job!
Beware that masking tape labels fade over time…
I have labels on blue painter’s tape and sharpie that are approaching 20 years old, and still totally legible. (My filing system is unstoppable!)
Top tip I got from someone way back when — pick a distinct color tape for labels, and use it consistently, and maybe exclusively. It makes the labels visually recognizable and brings a little uniformity to the whole thing.
I’ve of course half-assed it: I used to use blue tape for other things, and have taken up using a nice yellow masking tape for labels over the last 10 years. But it’s a good idea!
Add an reused inkjet cartridge and you have a killer project.
https://www.instructables.com/Make-a-Handheld-InkJet-Printer-Print-on-ANY-Surfac/
Love it!
SLOW, combine it with inkjet head!
What? So you can have cheap labels that you have to buy expensive inkjet cartridges to print?
Gaffers tape! Please! You’d have stagehands around the world beating a path to your door!
I feel like my old Atari plotter has been resurrected!
I use Masking Tape to label the tops of my Canning Jars. I write on the tape witha felt tim pen whats in the jar and when I canned it. The jars are stored in a cool and dark place and the food is good for 5 years, but they actually don’t go that long before we open the jar and cook dinner. I’ve often wondered if there was some way to automate the labeling. This looks really doable.
I love this. Can’t name that font “Hackaday” label used- anyone?