Lessons Learned While Building A DIY Pen Plotter

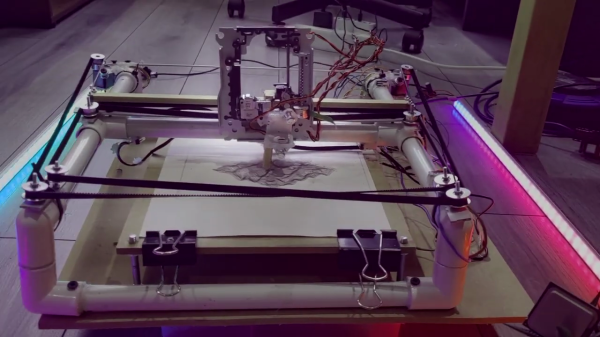
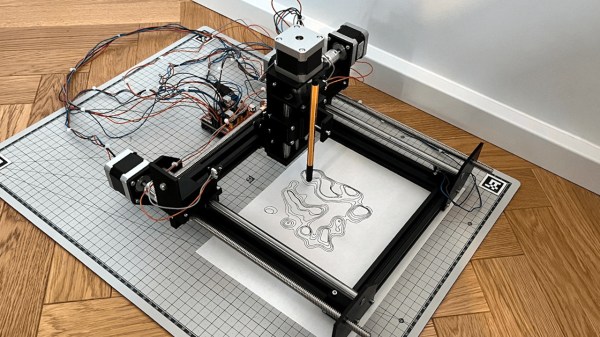
There was a time when plotters were the pinnacle of computer graphics output. While they aren’t as common as they used to be, there are some advantages to having a plotter. [Symon] wanted a plotter and decided to make one from scratch. Truthfully, he wants to build a CNC machine, so the plotter is just a stepping stone. In fact, some of it may be a little much for just a plotter. Other design choices have worked for the plotter, but don’t look like they will work well for the eventual CNC design.

As an example, the plotter uses 2020 extrusions and lead screws. An Arduino with a CNC shield provides the brains. GRBL, of course, runs on the Arduino, so the whole machine runs fine with normal G-code. This post will be especially interesting if you want to build a plotter or something similar. We especially like that it covers the design rationale for each choice made It is great to learn from others successes and, of course, their mistakes.

If you really want just a plotter, you don’t have to spend much. You can even go super minimal if you want.

GrblHAL CNC Controller Based On RP2040 Pico

[Phil Barrett] designed a new CNC controller breakout board called the PicoCNC which uses the Raspberry Pi Pico RP2040 module and grblHAL. It packs a bunch of features typical of these controllers, and if you use the Pico W, you get WiFi connectivity along with USB. And if you don’t want connectivity, you can execute G-code directly from a micro SD card. The board is available in kit form, and schematics are posted on the GitHub repository above. Some of the features include four axes of motion, spindle control, limit switches, relay drivers, expansion headers, and opto-isolation.

This isn’t [Phil]’s first controller board. He also designed the grblHAL-based Teensy CNC controller breakout board, a step up from the usual Arduino-based modules at the time and boasting Ethernet support as well. According to the grblHAL site, nine different processors are now supported. There are well over a dozen CNC controller breakout boards listed as well. And don’t forget [bdring]’s 6-Pack grbl-ESP32 controller, a modular breakout board we covered a few years back. So pick your favorite board or roll your own and get moving.

DIY Laser For Ablating Metal

For those who wish to go beyond through-hole construction on perfboard for their circuit boards, a printed circuit board is usually the next step up. Allowing for things like surface-mount components, multi-layer boards, and a wider array of parts, they are much more versatile but do have a slight downside in that they are a little bit harder to make. There are lots of methods for producing them at home or makerspace, though, and although we’ve seen plenty of methods for their production like toner transfer, photoresist, and CNC milling, it’s also possible to make them using laser ablation, although you do need a special laser to get this job done.

The problem with cutting copper is that it reflects infra-red, so a higher-wavelength blue green laser is used instead. And because you want to ablate the copper, but not melt the surrounding areas or cut straight through the board, extremely short, high-power pulses are the way to go. Here, the [Munich Fab Lab] is using 9 kW pulses of around 30 microseconds each.  With these specifications the copper is ablated from the surface of the board allowing for fine details in the range of about 20 µm, which is fine enough for just about any circuit board. The design of the laser head itself is worth a look.

Aside from the laser, the rest is standard CNC machine fodder, but with an emphasis on safety that’s appropriate for a tool in a shared workspace, and the whole project is published under an open license and offers an affordable solution for larger-scale PCB production with extremely fine resolution and without the need for any amounts of chemicals for the more common PCB production methods. There is a lot more information available on the project’s webpage and its GitHub page as well.

Of course, there are other methods of producing PCBs by laser if you happen to have a 20 W fiber laser just kicking around.

Arctos Robotics: Build A Robot Arm Out Of 3D Printer Spares?

ARCTOS is a 6-DOF robot arm based upon 3D printed mechanics running a modified version of GRBL firmware. Let’s get this straight now, the firmware is open source, but the hardware plans are a paid download, but for less than forty euros, we reckon the investment would be well worth it, judging from the quality of the build instructions and the software support already in place. Continue reading “Arctos Robotics: Build A Robot Arm Out Of 3D Printer Spares?”

The $50 Pen Plotter

[Arca] sets out to build himself a low-cost pen plotter that doesn’t require access to a 3D printer. The plotter uses a coreXY arrangement, powered by 28BYJ-48 stepper motors, which he overdrives with +12 VDC to increase the torque. Pen up and down control is done using a stepper motor salvaged from a DVD reader. The frame is constructed using PVC electrical conduit and associated fittings, and [Arca] uses the hot glue gun quite liberally. Steppers were driven by A4988 modules with heatsinks, and motion control is provided by GRBL running on an Arduino UNO.

He has a few issues with glitches on the limit switches, and is continuing to tweak the design. There is no documentation yet, but you can discern the construction easily from the video if you want to try your hand at making one of these. This is a really cool DIY plotter, and many parts you probably have laying around your parts boxes. As [Arca] says, it’s not an AxiDraw, but the results are respectable. Keep a lookout for part 2 of this project on his YouTube channel.

Continue reading “The $50 Pen Plotter”

$60 Laser Makes The Cut With New Controller

If you are reading the Lightburn forums, you probably already have a laser cutter of some kind.  But, if you are like most of us, you can always be tempted into another “deal.” [Dkj4linux] has a post where he bought a $79 laser engraver  (now selling for between $59 and $65, we noticed). Like most of these cheap engravers, the machine takes a proprietary controller with Windows-only software. No surprise that [Dkj4linux] would want to use…um… Linux. The answer? Rip the board out and replace it with an old spare.

The machine looks well constructed, as you can see in the video below. For that price, you get a 3-watt laser head (that is likely way less than that in terms of optical power), and a build area of 220x290mm. The controller was in a small metal enclosure, and it was easy to simply unplug the two axis and the laser control cable.

Continue reading “$60 Laser Makes The Cut With New Controller”

AntRunner Is The Satellite Antenna Mount You Need To Take With You

It stands to reason, that should you wish to communicate with a satellite, whatever antenna you use should point at that satellite. Some of us have done this by hand, following the bright dot of the space station in the night sky. Still, for anything more serious than trying to catch a fleeting SSTV image, a more robust solution is called for. In other words, a motorized antenna rotator, and AntRunner from [Wuxx] is just the ticket. Better still, it’s portable for those /p operating sessions off the beaten track.

The rotator itself is an az-el design with a couple of geared stepper motors. The full mechanism design has been published, but it shouldn’t be too difficult to copy. The interesting part is the controller and software, which can work with Gpredict, Hamlib, and SDR for automated satellite tracking. The controller is as straightforward as an ESP32 running the ESP port of GRBL.

So here’s a portable antenna rotator that’s accessible and widely supported, what’s not to like? As you might expect though, it’s not the first we’ve seen. In fact, the 2014 Hackaday Prize was won by SatNOGs, which includes a 3D printed antenna positioner.

Thanks [Abe Tusk] for the tip!