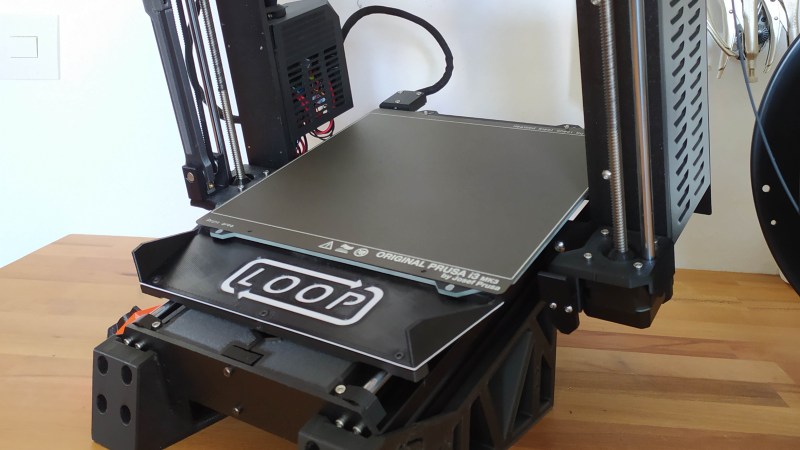
One of the issues with 3D printing is that when a print is done, you need to go back and pull the print off the bed to reset it for the next one. What if you needed to print 600 little parts for whatever reason? Most people might say get lots of printers and queue them up. Not [Pierre Trappe], as he decided that his Prusa i3 MK3S+ would print continuously.
The setup was dubbed Loop and consisted of a few parts. First, there’s an arm that sweeps the build plate to clear the printed pieces, a slide for the pieces to descend on, and a stand for the printer to sit on that puts it at an angle. The next step is to modify OctoPrint to allow a continuous print queue. The slicer needs to change as [Pierre] provides some G-code to reset the printer and clear the print.
We were especially impressed with the attention to detail in the documentation for this one. There’s extensive guidance on getting the bed adhesion just right, as you can’t have it come off mid-print, but you need it to detach cleanly and easily when the arm sweeps across the bed. Calibrating that first layer is essential, and he provides handy instructions to dial it in. Additionally, temperature and material play a crucial role, and [Pierre] documented the different materials and temperatures he used while developing Loop.
While continuous belt printers are arguably the “correct” answer to the question of printing 600 little parts, they come with their own baggage. Being able to pull off something similar on a printer as reliable and well supported as the Prusa i3 makes for a compelling alternative.


Could make the world’s slowest random dice roller. Print a set, knock them loose. Read the numbers. Toss printed dice into a grinder to be re-extruded into filament.
Now that’s thinking outside the 3D-printed box!
Guarantees dice that haven’t worn all their randomness off from too much rolling!
(/s)
new from ronco, the messimatic. tired of have a clean living room floor? well suffer no more…
https://www.youtube.com/watch?v=xef6TdkXVxY Here’s ours from 2013 that we sent to HaD back then but got lost in transit
Wild guess…the fact that you have “Please ask for schematics and source code; the mechanical design should be visible from the video” in the description whereas this project has a GitHub repo will all of the information up front probably has something to do with it getting “lost” when you sent it in.
RW’s 1st law of online content, the signal to noise ratio of a video is 1% until proven otherwise.
RW’s 2nd law of online content, if a blog post starts off reading like ad copy, the signal to noise ratio is 1% until proven otherwise.
RW’s 3rd law of online content, the signal to noise ratio of a comment done by a pretentious and arrogant user is 1% until proven otherwise.
My guess is that the overhangs are great on the 45° oriented printer… is that true? Except for trying to print a 45° overhang towards the front of the printer.
From previous articles it seems that overhangs are mostly about inter-layer geometry. You can print upside-down just fine.
Very nice. Pretty elegant – presume it’s best for filaments that almost come off by themselves as they cool?
This is directly stolen from a trademarked system developed by 3DQue. At first the guy behind loop still provided credit to where it was due but as this system got traction he’s miraculously forgotten to credit the team that is rightfully responsible for this design. Pathetic.
Just looked them up – WOW. This thing is almost a carbon copy of that
I have no intentions on stealing IP. If you would inform yourself better, you would know that all used sources are declared on my GitHub page of this project since the first full publish.
This mod is a gift from me to the community from which I’ve learned a lot.
As stated on the GitHub page, I got some inspiration from 3D Que but all parts are made from scratch. A small portion of my motivation was to build a better system as I was not satisfied with knocking the parts off the buildplate with the extruder.
The main reason behind this project was to bring really cheap FDM automation to the masses as I have a background in building expensive belt 3D printers and I thought that there has to be a better and cheaper way to do this.
Thanks dude this is interesting as fuck. Also, something to até least keep an eye open. When the nozzle goes up and is close to the top. The filament gets loose. There might happen 2 things. It may break if it is not new or the spool can get a knot. Both are issues for the continuous print jobs. Have you ever seen something like this happening?
Yes, you are right. In the final design I solved that with a reversed bowden tube which. Check out the first picture on my GitHub.
I made one in 2013 and there’s video to prove it and I even posted it here, it’s not as if this is some big industrial secret or anything.
I don’t care
This will work great for little items that have a small footprint on the bed. Larger items likely won’t work well I would imagine…
I would like to see extra videos of this thing running… which is easier to do since it can do continuous prints by itself. The camera can record only when the part is about to be ejected.
Feel free to check out my discord channel: https://discord.gg/bM9NaB5h
I post more videos and information related to Loop there.