X1Plus: Open Source Bambu Lab X1 Firmware

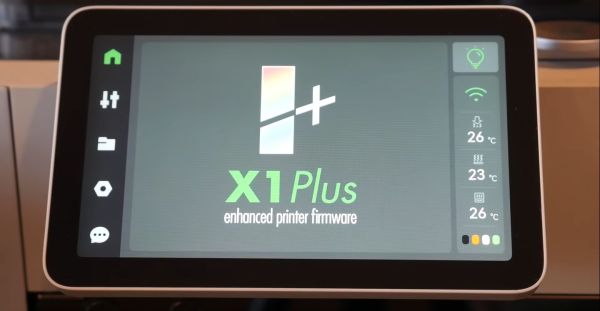
Recently [Michael] over at the [Teaching Tech] YouTube channel got access to the X1Plus firmware, and takes us through what it may mean for Bambu Lab X1 owners. X1Plus is alternative firmware for the Bambu Lab X1 FDM 3D printer that was developed by X1 owners who felt that there were some features that they were missing, such as a detailed report on automatic bed leveling, input shaping calibration response graphs and more.

Perhaps most interesting is that this firmware does not replace the Bambu Lab firmware, but rather runs completely from a microSD card that’s inserted into the display’s SD card reader. This means that only the bootloader of the printer’s boot medium is changed, and the printer thus retains the ability boot to the OEM firmware as needed. Whether you want to try it on your own X1 depends on a few factors, first of all being that it only works with the OEM firmware up to and including version 1.7.0.

Since the bootloader modification relies on an exploit that was patched in newer firmware, a lot depends on whether Bambu Lab allows such tinkering, much like Prusa does with the Mini printer, or allows flashing of older firmware which would enable the exploit on newer X1 printers. Depending on Bambu Lab’s response, the imminent public release of this open source firmware may as a result run into some pretty big hurdles.

Continue reading “X1Plus: Open Source Bambu Lab X1 Firmware”

The Prints Don’t Stop With This Prusa I3 MK3 Mod

One of the issues with 3D printing is that when a print is done, you need to go back and pull the print off the bed to reset it for the next one. What if you needed to print 600 little parts for whatever reason? Most people might say get lots of printers and queue them up. Not [Pierre Trappe], as he decided that his Prusa i3 MK3S+ would print continuously.

The setup was dubbed Loop and consisted of a few parts. First, there’s an arm that sweeps the build plate to clear the printed pieces, a slide for the pieces to descend on, and a stand for the printer to sit on that puts it at an angle. The next step is to modify OctoPrint to allow a continuous print queue. The slicer needs to change as [Pierre] provides some G-code to reset the printer and clear the print.

We were especially impressed with the attention to detail in the documentation for this one. There’s extensive guidance on getting the bed adhesion just right, as you can’t have it come off mid-print, but you need it to detach cleanly and easily when the arm sweeps across the bed. Calibrating that first layer is essential, and he provides handy instructions to dial it in. Additionally, temperature and material play a crucial role, and [Pierre] documented the different materials and temperatures he used while developing Loop.

While continuous belt printers are arguably the “correct” answer to the question of printing 600 little parts, they come with their own baggage. Being able to pull off something similar on a printer as reliable and well supported as the Prusa i3 makes for a compelling alternative.

Continue reading “The Prints Don’t Stop With This Prusa I3 MK3 Mod”

Unique 3D Printer Turned CNC Engraver

As we’ve said in the past, one of the most exciting things about the proliferation of low-cost desktop 3D printers (beyond all the little boats we get to see on Reddit), is the fact that their motion control systems are ripe for repurposing. Outfitting a cheap 3D printer with a drag knife, pen holder, or even a solid-state laser module, are all very common ways of squeezing even more functionality out of these machines.

But thanks to the somewhat unusual nature of his printer, [Hammad Nasir] was able to take this concept a bit farther. Being considerably more rigid than the $99 acrylic-framed box of bolts we’ve become accustomed to, he was able to fit it with a basic spindle and use it for CNC engraving. He won’t be milling any steel on this rig, but judging by the pictures on the Hackaday.io page for the project, it does a respectable job cutting designs into plastic at least.

The IdeaWerk 3D printer that [Hammad] used for this project is phenomenally overbuilt. We don’t know whether the designers simply wanted to make it look futuristic and high-tech (admittedly, it does look like it could double as a movie prop) or they thought there was a chance it might get thrown down the stairs occasionally. In either event, it’s built like an absolute tank.

While the frame on lesser printers would likely flex as soon as the bit started moving across the workpiece, this thing isn’t going anywhere. Of course this machine is presumably still running on the standard GT2 belt and NEMA 17 arrangement that has been used in desktop 3D printers since the first wooden machines clattered to life. So while the frame might be ready to take some punishment, the drive system could respectfully disagree once the pressure is on.

Modification was simplified by the fact that the hotend and extruder assembly on the IdeaWerk is mounted to the X axis with just a single bolt. This makes it exceptionally easy to design alternate tool mounts, though arguably the 3D printed motor holder [Hammad] is using here is the weak link in the entire system; if it’s going to flex anywhere, it’s going to be there.

If you’re more photonically inclined, you might be interested in this similarly straightforward project that sees a 2.5 W laser module get bolted onto an entry level 3D printer.

Folding An Off-The-Shelf 3D Printer

Most 3D printers don’t take up a lot of space, but they can be pretty bulky and awkward to travel with. [Jón Schone] needed a compact folding 3D printer for a secret project on his YouTube channel ProperPrinting, so he decided to modify a Creality Ender 3 Pro to achieve this.

Starting with a brand new Ender 3 Pro, and his first steps were to move the display and power supply unit into the bottom frame to make space for the folding top frame. For the folding mechanism, he settled on a four bar linkage that allows the vertical frame to translate to the front of the printer as it folds down, which lets it become a really compact package with minimal wasted space. The joints consist of fitting 3D printed in carbon fibre reinforced nylon, with bolts for shafts. The entire mechanism is made adjustable for fine-tuning by using threaded rod and sliding mounting points on the extruded frame. Small brackets on each side of the frame allows the printer to snap securely into both its upright and folded positions.

All in all we think this is well-designed and beautifully executed hack, enough to make us really want to build one for ourselves. It will remain to be seen if any slop develops with repeated folding and use, especially at the snap-in end stops, but that should still be an easy fix if it happens.

We’ve previously featured [Jón]’s custom 3D printed D-sub connectors, also for his Ender 3. Also check out another folding printer, the X-printer.

Continue reading “Folding An Off-The-Shelf 3D Printer”

Feeding Both Filament And Electrons Through A Custom D-Sub Connector

We sometimes forget that 3D printers are just CNC platforms with a hotend attached, and there a whole range of alternative tool heads to use. [Jón Schone] has been doing exactly that, and needed a way to quickly disconnect his hotend completely from his printer, so he 3D printed his own custom D-sub connector for both filament and wires. (Video, embedded below.)

[Jon] has added a number of upgrades for his Creality CR10 3D printer, including a quick change tool mount to allow him to also use a laser engraver and even a small spindle. When the hotend is removed there’s no way to quickly disconnect the wiring , so the print head is usually left connected and placed to one side of the printer. For a quick detach solution for both wiring and the Bowden tube, he first modified an off-the-shelf D-sub connector. The connector was relatively expensive, and the tube had a tendency to pop out, which led to some failed prints.

[Jon] wanted to use proper Bowden tube fittings inside the connector, so he designed and printed his own D-sub connector and bought loose contacts. Pushing the contacts into the housing turned out to be quite difficult to do without breaking them, so he’s working on making that process simpler. This is just one of many examples of 3D printing 3D printer upgrades, which has been a core feature of the RepRap project right from the beginning. Check out the video after the break

We have no shortage of 3D printer hacks and there will be many more to come. Some cool recent ones includes the Jubilee CNC that was built from the start with automatic tool changing in mind, and a printer that fits in your backpack. Continue reading “Feeding Both Filament And Electrons Through A Custom D-Sub Connector”

Autodrop3D Continues Working At 3D Printer Automation

It is an unfortunate fact that 3D printers spend most of their time sitting idle, waiting for a human to remove finished prints or waiting for the next print to start. Hackers see such inefficiency as an open invitation to devise a better way, and we’ve seen several innovative ideas come across these pages. Some have since been abandoned, but others have kept going. At Maker Faire Bay Area 2019 we had the chance to revisit one presented as Autodrop3D.

We saw a much earlier iteration entered in our Hackaday Prize in 2017 and it was fascinating to see how the basic ideas have developed over the past few years. The most visible component of the system is their print ejection system, which has greatly improved in robustness. Because the mechanism modifies the print bed and adds significant mass, it is best suited to delta printers as their print bed remains static. The concept might be adaptable to printers where the print bed only has to move along Z axis, but for now the team stays focused on deltas. There were two implementations on display at Maker Faire: a large one built on a SeeMeCNC RostockMAX v4, and a small one built on a Monoprice Mini Delta.

The ejection system is novel enough by itself, but the hardware is only one part of the end-to-end Autodrop3D vision. Their full software pipeline starts with web-based CAD, to integrated slicing, to print queue management, before G-code is fed to a printer equipped with their ejection system.

We admire inventors who keep working away at turning their vision to reality, and we look forward to seeing what’s new the next time we meet this team. In the meantime, if you like the idea of an automated print ejection mechanism but want more cartoon style, look at this invention from MatterHackers.

Relive The Dot Matrix Glory Days With Your 3D Printer

With the cost of 3D printers dropping rapidly, we’ve started to see a trend of hackers re-purposing them for various tasks. It makes perfect sense; with the hotend and extruder turned off (or removed entirely), you’ve got a machine that can move a tool around in two or three dimensions with exceptional accuracy. Printers modified to carry lasers, markers, and even the occasional rotary tool, are becoming a common sight in our tip line.

Last year [Matthew Rayfield] attached a marker to his 3D printer and had it sketch out some pictures, but recently he decided to revisit the idea and try to put a unique spin on it. The end result is a throwback to the classic dot matrix printers of yore utilizing decidedly modern hardware and software. There’s something undeniably appealing about the low-fi nature of dot matrix printing, and when fed the appropriate images this setup is capable of producing something which we’ve got to admit is dangerously close to being art.

To create these images, [Matthew] has created “Pixels-to-Gcode”, an online service that anyone can use to turn an arbitrary image into GCode they can feed their 3D printer. There’s a number of options available for you to play with so you can dial in the specific effect you’re looking for. Pointillist images can be created using a tight spacing of dots, but widen them up, and your final image becomes increasingly abstract.

The hardware side of this project is left largely as an exercise for the reader. [Matthew] has attached a fine-point pen to his printer’s head using a rubber band, but admits that it’s far from ideal. A more robust approach would be some kind of 3D printed device that allows you to quickly attach your pen or marker so the printer can be easily switched between 2D and 3D modes. We’d also be interested in seeing what this would look like if you used a laser mounted on the printer to burn the dots.

Back in the ancient days of 2012, we saw somebody put together a very similar project using parts from floppy and optical drives. The differences between these two projects, not only in relative difficulty level but end result, is an excellent example of how the hacker community is benefiting from the widespread availability of cheap 3D motion platforms.

Continue reading “Relive The Dot Matrix Glory Days With Your 3D Printer”