Toner transfer is a commonly-used technique for applying text and images to flat surfaces such as PCBs, but anybody who has considered using the same method on 3D prints will have realized that the heat from the iron would be a problem. [Coverton] has a solution that literally turns the concept on its head, by 3D printing directly onto the transparency sheet.
The method is remarkably straightforward, and could represent a game-changer for hobbyists trying to achieve professional-looking full-color images on their prints.
First, the mirrored image is printed onto a piece of transparency film with a laser printer. Then, once the 3D printer has laid down the first layer of the object, you align the transparency over it and tape it down so it doesn’t move around. The plastic that’s been deposited already is then removed, and a little water is placed on the center of the bed. Using a paper towel, the transparency gets smoothed out until the bubbles are pushed off to the edges.
Another few pieces of tape hold the transparency down on all corners, and the hotend height is adjusted to take into account the transparency thickness. From there, the print can continue on as normal. When finished, the image should be fused with the plastic. If it’s hard to visualize, check out the video after the break for a step-by-step guide.
There are, of course, some caveats. Aligning the transfer and the print looks a little fiddly at the moment, the transparency material used (obviously) has to be rated for use in laser printers, and it only works on flat surfaces. But on the other hand, there will be some readers who already have everything they need to try this out at home right now — and we’d love to see the results!
We’ve covered some other ways to get color and images onto 3D prints in the past, such as this hydrographic technique or by using an inkjet printhead, but [Coverton]’s idea looks much simpler than either of those. If you’re interested in toner transfer for less heat-sensitive materials, then check out this guide from a few years back, or see what other Hackaday readers have been doing on wood or brass.
Here’s a quick video of the toner transfer process. from 3Dprinting
Thanks to [Shaun] for the tip.


This is the sort of “why didn’t I think of that” hack that I come here for. Brilliant.
Agreed. Genius. Kicking myself for not thinking of that one. Adding to the toolbox.
I have several mono laser printers but this might just be the impetus to get a colour one. I’ll try it with the inkjet anyway.
doubt it would work with inkjet as the toner powder is a plasticy power designed to be heated and melt onto the surface … and ink is … ink
Sublimation ink and nylons are compatible so that could work. Not sure what other filaments would work with it, but I’d guess PET might as well.
Any plastic you can dye would likely work with inkjet ink, but I was planning to simply leave the transparency film in place: Treat it like a Stratasys build plate but don’t remove the model from it, just trim the film after. It’s worth a test.
I came up with this today, posted this as a question on reddit. What do you know? I’m always late to the party :(
I wonder if there is a way to import the image file into the slicer (as a 3MF, maybe?) to align the parts on the graphics that way? A one-time calibration would be needed to find the common origin of the printer and, err the printer.
Looking online I see several sites that convert an SVG to an STL, so that would work.
(delete the image STL before printing, obviously)
Many laser cutters have a feature where, before cutting, you can manually move the cutter head to an alignment mark on the work piece. The cut then happens relative to that. It should be straightforward to do the same with a 3D printer (just a matter of software).
You can do it if you can enter some manual commands to your printer. G54 (work offset) but you need to calculate that offset somehow, for example by going to starting point of your 3d model, noting coordinates, then going to the same point on your foil on bed and noting difference. There is a lot of manual steps to this unfortunately.
There’s a much simpler way: set an identically sized bounding box around both your part and the printed image, just larger than both and smaller than the actual print bed. Centre the 3d print in the bounding box and make it the size of the print bed in your slicer settings.
Ensure the bounding box is actually printed in the laser print.
Ensure the laser print is taped straight on the bed, not wonky, but exact location not important.
Move the nozzle of the printer to the front left corner of the bounding box exactly, and the correct height for printing. Check alignment visually in both X and y.
Edit your GCODE file to remove any G28 homing commands (or G29 tramming) and instead use the command G92 X0 Y0 Z[1st layer height]
Start printing.
On Marlin (and several other 3D printer firmwares) the command G92 “sets” the current position. so you could move the hotend to a known reference spot, set the current position with G92, and as long as you don’t repeat the homing sequence all coordinates of the rest of the gcode will be relative to this. But in order to do this you must be relatively sure that you won’t exceed the mechanical limits of the print area, and you must have a print surface properly trammed because you won’t be able to use automatic bed leveling or mesh leveling.
Fun idea, though the bed temperature wanted for some filament means water is a nogo – making steam under that sheet isn’t going to help (most things will be fine at 60-80C but 100C+ bed I find is occasionally really required)… Wonder if a thin oil capable of the temperatures would harm the build plate surfaces function when you are not printing on the transparency.
Don’t think any of the laser capable transparencies would be bothered by the hotter bed, but that would need testing too.
Still a great method that looks to create a more durable finish than I expected it to be, wonder how much colour bleed though from the plastic filament the image will have if you say want to print reds/yellows on a bright blue or something.
Hairspray would probably work as a fixative – I already use 3dlac for PETG prints to glass as a release interface layer. Will try it.
I wonder if a mold release product like Universal would work instead of water. Certainly an awesome concept to print an elegant panel with such professional results. Thanks for sharing this idea!
If you’re printing a plastic that needs above 100C bed then I’d try the iron on process before going this route. The transfer solution is likely done because the person is using a lower temperature plastic.
This seems quite well suited to making badge pins. It wouldn’t take much to stick a flexible pcb to the back, perhaps with some LEDs, either.
Although it could be automated, I expect it will no doubt be kept to one off items.
I can’t help but think of a spooled sheet of plastic being fed into a printer. Perhaps with the punched edges, like an old dot matrix used to have. Add some sort of automated pallet knife to release the prints. Hmm.
Hot [Infinite z axis](https://sgd3d.co.uk/infinate-z-axis-printing/) 3D printers in your area would like to chat!
Having to stop after a few cycles through the first layer seems like something we could optimize. What about setting the skirt much closer, say 0.5 or 1mm distance with 2-3 loops to give some time to stop, and using that rather than sacrificing perimeters of the actual object?
Better than that, PrusaSlicer emits markers denoting the structure being printed. It should be easy to make a postprocessor that looks for the first “@Object” marker, which comes right after the skirt, and inserts commands to pause and adjust the Z offset.
Or just try to level your bed while clear piece of foil is on it (to not smudge printout). That way you use foil as build plate.
Related: You can transfer laser printouts to timber using “medium” (look in arts & crafts shop), using just ordinary paper printouts. It’d dead simple process and cheap. Plenty of tutorials on YouTube. I’m pretty sure the same process would work on 3d printed surfaces.
You’ve broadly described something very specific. “Medium” in this context could mean so many things, I’m not entirely sure what you mean. Anything that would be printed on could be described as the “medium”. Also, the materials FOR printing could be described as the “medium”. There are acrylic mediums for prepping a surface for painting and mediums for thinning paint.
Please leave a link to the specific product you’re referencing.
I believe they mean acrylic paint medium, as in the paint sans any pigment.
I’ve seen a few variations of the concept including solvent that soften the toner and the paper just ‘dissolves’ off it.
The fact that they put “medium” in quotes, and suggested to look in an arts/crafts store was enough for me to spend 3 words (vs your 69 word post) on a google search to educate myself on what they meant.
This is Hackaday, a certain amount of curiosity driven initiative is assumed….
https://www.google.com/search?q=acrylic+medium+art
you can do all the registration in your slicer
w 2x 3d object as separate prints:
the first is a rectangle to align the transparency (cut marks[if needed] mirrored in the color artwork)
lay in the transparency (water, tape and all)
then, print the second 3d object
Brilliant! And what a good finish! What filament material is used here? PLA? PETG? ABS?
Cutting the transparency to full bed size and setting coordinates in 2D drawing program might be easiest.
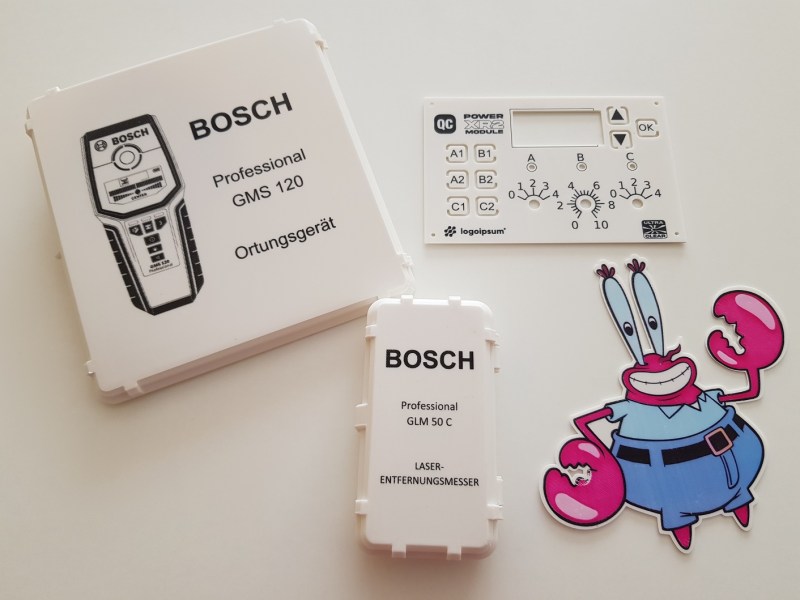
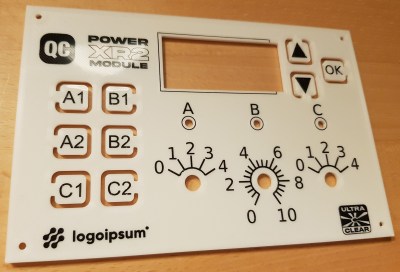
Depending on the panel size it would take a lot of toner, but if you use a clear or translucent filament and take advantage of negative space, I can imagine some pretty cool backlit front panels.
DIY flight sim cockpit controls and stuff like that.
Nice Idea, I tried it: https://www.reddit.com/r/FDM_TonerTransfer/comments/xve302/backlit_front_panel_test_first_two_layers_are/
Great idea for those 2D prints on 3D printers.
Wow, this is a really slick idea. I’ll have to give this a try: ever since I’ve gotten some “cool white” filament, I now keep it in stock because it just looks so nice. I’ve got transparencies for pcb creation though I use the dry film method to optically expose it, no toner transfer.
If it’s anything like doing a toner transfer onto a copper clad PCB then make sure that you have plenty of extra printer filament and plenty of extra time because you are going to need it. Toner transfer has unquestionably been the biggest waste of time I have spent on anything in the last 20 years. I have literally burned through 2 dedicated laser printers trying to get the process down to something at least kind of dependable but never succeeded. Personally I’m done with anything toner transfer related for a long time unless someone comes up with a groundbreaking new approach. The only remotely dependable option I have found for DIY pcb fab is CNC engraving however that also requires some serious investment in both money and time to get it right but at least it gets the job done.
“I have literally burned through 2 dedicated laser printers trying to get the process down to something at least kind of dependable but never succeeded. ”
Wow – I lean more towards stopping and re-evaluating what I am doing if I get anywhere close to failing, let alone go through a printer….or two! Please post flyers when you start learning to drive a car :-)
Anyway, to add something helpful: I experimented a lot with toner transfer, and after truly understanding the process can reliably transfer PCB designs, front panel artwork, badge designs etc using a cheap printer and free transfer paper (magazines/flyers that get delivered to my house).
TT success needs 0) an understanding of why the next three points are important 1) a mechanism to easily release toner from the substrate, 2) the right toner/printer (some printers use organic mixes, no good) and 3) the right heat and pressure to transfer to the final substrate – a laminator is good for PCBS and front panels.
And a normal domestic clothes iron is good for almost everything else – used one to transfer onto many oddly shaped objects like putting a new name on a toy boats hull (can even hit the paper with a little blast steam to help it conform to the odd surface).
Never actually tried it for a PCB yet myself, but a bit of experimenting with the method on other things means I know its going to be easily possible if/when I ever have to.
If you can do this, you shouldn’t be printing the part to begin with…
Stop praising people for printing flat rectangles!
At this point, I’m genuinely surprised when Hackaday hilights a 3d printing project that WOULDN’T get you banned from a printer in a hackerspace.
You are part of the problem…
What problem is that, exactly? I often print flat rectangles, as this is the most precise way I have of printing rectangles, especially when they need holes in specific places. I’m not sure why this bothers you.
Also, in the example shown, yes, it’s a flat part. But there are also non-flat parts that have one flat surface. Again, not sure why you care.
Totally agree with you. I’m making a very cool plane cockpit for simulators. Yoke, pedals, throttles and…. Guess what… Panels and frames… I really prefer buy plywood, saw, making a hell of dirty and painting, ofc. #not
Idea: Lay a sheet of dye-sublimation film over the print-bed, print (without filament!) the pattern so that the dye is selectively transferred to the print-bed.
Remove the film, print on top of the dye, dye transfers to model.
It looks like they are using the heated bed to heat transfer the print to the object. Could you do this after the item is printed, and set the transparency and the object on the bed, heat it up, and let it sit for a while?
Actually, it’s kind of the opposite. Instead of heating the toner until it melts and sticks to the object, you’re heating the object (freshly melted PLA/etc) and so it sticking to the toner. The toner probably melts/softens somewhat to aid in the bonding, but the heat doing the work is coming from the extruder, not the bed. In theory this should work with a non-heated bed.
It’s a great idea !
My needs:
I currently print custom box for small electronic devices, and I need to have electrical specifications written on them, plus my logo. Using stickers is not clean enough (labels wears in time).
The box / cases I want to label are quite small: 40x20x10 mm (LxWxH), so I print from 4 to 10 cases at once.
I have 6 different labels depending on what is inside the case thus need a flexible way to deal with demands.
I use from 10 to 20 cases a week, so I need a fast and reliable process (the case should stay at a low price in material, and in human resources).
Explored ways (before reading this):
I was considering buying or making a stamping machine. A stamping machine is quite expensive and does not allow to have lots of different labels (you need to engrave an iron sheet for each different label).
I also started to directly melt toner on printed cases using a laser (5W), but it’s quite time consuming and placing toner powder on the printed object is tricky and not healthy (it would release a lot of toner powder in the air).
So just after reading this article I gave it a try at this method, but using simple paper instead of transparency film (because I don’t have some, all my stock was used during the COVID pandemy ;).
For this first experiment:
– I used regular A4 (80g/m²) paper
– I use a “classical” 3D printer (Geeetech I3 Pro B) with a heated glass print bed
– I drawn marks on the (glass) hotbed to know were my cases will be printed using a pen
– I print using PETG filament (because it does not melt in sunny days, and it does not smell when I print it)
– The sheet of paper was hold in place with some adhesive tape
– I use an old B/W HP Laser printer
– The cases I want to label are 40x20x10 mm (LxWxH), I print from 4 to 10 cases at once.
– I use 10 to 20 cases a week, so I need a fast and reliable process
– I use 6 different case types and thus need a flexible way to change between labels
Here are the problems I faced with this very first try:
– paper is not “strong” enough, and my prints tend to wrap / bend: I may need to increase my hotbed temperature or I may fix the paper with more adhesive tape. By the way, as the print bends with time, the first layer is well stuck to the toner.
– the toner tends to “smudge”/”spread”: it seems to follow the print head. As a result, the text is not perfectly transferred, even if still readable. I think that I should level up the print head to avoid the print head to touch the toner and spread it when printing.
– it requires some post processing: cleaning the printed object (using water and soap to dissolve the paper), and cleaning the print bed (the paper melt with the adhesive spray I used for previous print)
– the print has a particular texture because the paper is not flat as glass (or plastic transparency: please don’t throw me rocks ;)
– the main problem: the paper is hard to place at the right place because it’s not transparent enough to see the marks behind
– I fear that if the paper moves, or is not at the right place, I may lost many prints at once
What’s next ?
By the way, this first result is quite impressive: the print is mainly clean, and I was not able to remove the toner when I used my nails (gently). So I will try again this week end tweaking my process: I will mainly level my print-bed with the sheet on paper already on it.
I will also try to transfer the toner on already printed objects using a cloth iron. I think that this method will allow me better precision to place the paper on the printed object. If this last method works, I think that I will make a tool specifically for this task: a kind of heated press that will allow me to label each case, one after the other depending on demand.
PS: I would have attached pictures of the result if I could … I can post some somewhere and link them here if needed.
For those that have tried this and are getting good results, what bed temp are you using?
This is lovely, this is why I read Hackaday.
A revolution in personalized fabrication.