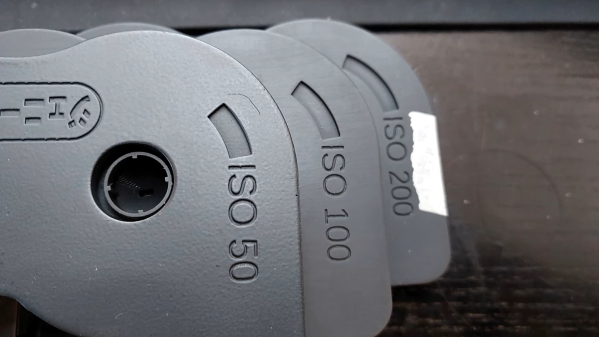
[Jenny List] has been reverse-engineering and redesigning the Single8 home movie film cartridge for the modern age, to breathe life into abandoned cine cameras.
One of the frustrating things about working with technologies that have been with us for a while is the proliferation of standards and the way that once-popular formats can become obsolete over time. This can leave equipment effectively unusable and unloved.
There is perhaps no greater example of this than in film photography – an industry and hobby that has been with us for over 100 years and that has left many cameras orphaned once the film format they relied on was no longer available (Disc film, anyone?).
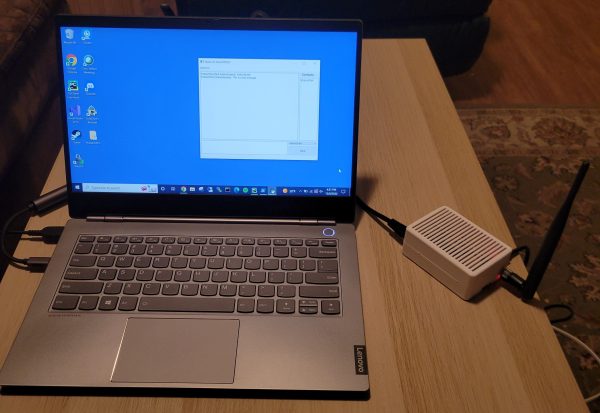
The Internet has allowed us to communicate more easily than ever before, and thanks to modern cell-phone networks, we don’t even have to be tied down to a hard line anymore. But what if you want something a little more direct? Maybe you’re in an area with no cell-phone coverage, or you don’t want to use public networks for whatever reason. For those cases, you might be interested in this Secure Communication Network project by [Thomas].
By leveraging the plug-and-play qualities of the Raspberry Pi 4 and the Adafruit LoRa Radio Bonnet, [Thomas] has been able to focus on the software side of this system that really turns these parts into something useful.
Messages are tagged as “authenticated” when a shared hashing code is included in the message
Rather than a simple point-to-point radio link, a mesh network is built up of any transceivers in range, extending the maximum distance a message can be sent, and building in resilience in case a node goes down. Each node is connected to a PC via Ethernet, and messages are distributed via a “controlled flooding” algorithm that aims to reduce unnecessary network congestion from the blind re-transmission of messages that have already been received.
Security is handled via RSA encryption with 256-byte public/private keys and additional SHA256 hashes for authentication.
The packet-size available through the LoRa device is limited to 256 bytes, of which 80 bytes are reserved for headers. To make matters worse, the remaining 176 bytes must contain encrypted data, which is almost always more lengthy than the raw message it represents. Because of this, longer messages are fragmented by the software, with the fragments sent out individually and re-assembled at the receiving end.
If you’re in need of a decentralized secure radio communications system, then there’s a lot to like about the project that [Thomas] has documented on his Hackaday.io page. He even includes an STL file for a 3D printed case. If you need to send more than text, then this Voice-over-LoRa Mesh Network project may be more your style.
Anybody who has ever seen a video wall (and who hasn’t?) will be familiar with the idea of making large-scale illuminated images from individual coloured lights. But how many of us have gone the extra mile and fitted such a display in our own homes? [vcch] has done just that with his Deluxe Smart Curtain that can be controlled with a phone or laptop.
The display itself is made up of a series of Neopixel strips, hung in vertical lines in front of the window. There is a wide gap between each strip, lending a ghostly translucent look to the images and allowing the primary purpose of the window to remain intact.
The brains of the system are hosted on a low-cost M5stack atom ESP32 device. The data lines for the LEDs are wired in a zig-zag up and down pattern from left to right, which the driver software maps to the rectangular images. However, the 5V power is applied to the strips in parallel to avoid voltage drops along the chain.
If you’d like to build your own smart curtain, Arduino sketch files and PHP for the mobile interface are included on the project page. Be sure to check out the brief video of what the neighbors will enjoy at night after the break.
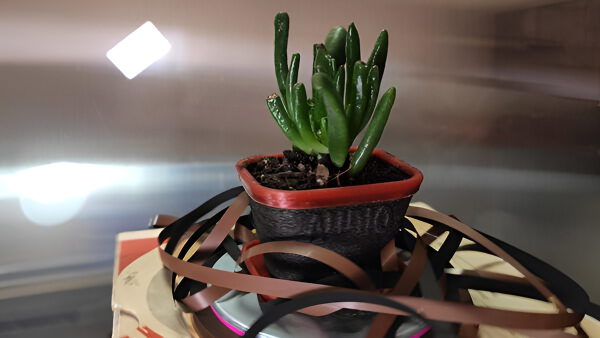
At heart, 3D printers are just machines that can melt plastic “wire” into interesting shapes. It’s well-known and oft-lamented that plastic of various sorts has been used to make all manner of household objects that might eventually end up in landfill or otherwise littering the environment. With these facts in mind and a surplus of tape, [brtv-z] decided to see if he could recycle some old reel-to-reel audio tapes into working filament for a 3D printer.
The homebrew rig to convert old audio tape into the unconventional filament
This isn’t the first time he has tried to print with unusual second-hand polymers, back in 2020 he pulled of a similar trick using VHS tape. Through experimentation, it was soon determined that seven strands of quarter-inch tape could be twisted together and fused to form a very tough-looking filament approximately 1.7 mm in diameter, which could then be fed into the unsuspecting printer.
The resulting prints are certainly different in a number of respects from using virgin filament. The material is porous, brittle and (unsurprisingly) rather rusty-looking, but it does have some interesting properties. It retains its magnetism and it catches the light in an unusual way. The video is after the break (in Russian, but YouTube does a reasonable job of generating English captions).
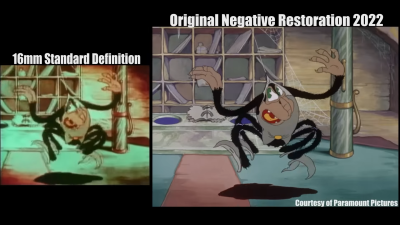
For a large part of the 20th century, motion pictures were distributed on nitrate film. Although cheaper for the studios, this film was highly flammable and prone to decay. On top of that, most film prints were simply discarded once they had been through their run at the cinema, so a lot of film history has been lost.
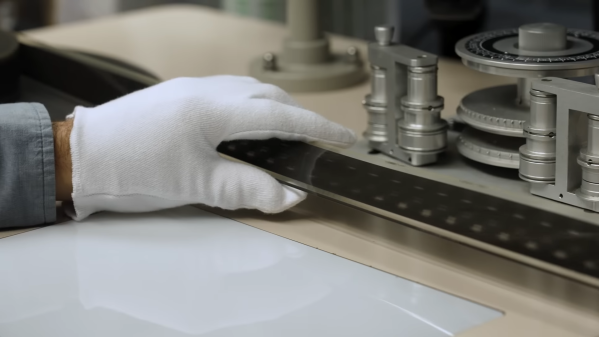
Sometimes, the rolls of projected film would be kept by the projectionist and eventually found by a collector. If the film was too badly damaged to project again, it might still get tossed. Pushing against this tide of decay and destruction are small groups of experts who scan and restore these films for the digital age.
The quality difference between a smaller-format print and the original restored negative can be startling
The process is quite involved – starting with checking every single frame of film by hand and repairing any damaged perforations or splices that could come apart in the scanner. Each frame is then automatically scanned at up to 10K resolution to future-proof the process before being painstakingly digitally cleaned.
The real expertise is in knowing what is damage or dirt, and what is the character of the original film. Especially in stop-motion movies, the subtle changes between frames are really part of the original, so the automatic clean-up tools need to be selectively reined in so as not to lose the charm and art of the film-makers.
The results are quite astonishing and we all have teams like this to thank for protecting our cultural heritage.
If you’re interested in watching the process, then check out the video after the break. If you fancy a go at automatic film digitising yourself (preferably not on unique historical prints!) then we’ve shown projects to do just that in the past.
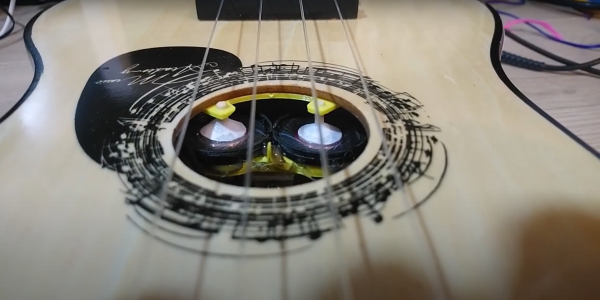
With the holiday season fast approaching, there’s a good chance that some well-meaning friend or relative might buy a toy musical instrument for your children, safe in the knowledge that they’ll never have to listen to the results! The sound from these cheap toy guitars is pretty terrible, partly because they’re just too small to tune to a pleasing guitar tuning, so [joekutz] decided to see if one could be turned into an electric ukulele instead.
The first modification on the list was to reduce the string count from six to four, by notching out new positions on the nut and drilling the corresponding fixings on the bridge. One advantage of these cheap instruments is that it’s less of a risk to take tools to the bodywork! Continue reading “A Kid’s Toy Guitar Turned Into An Electric Ukulele”→
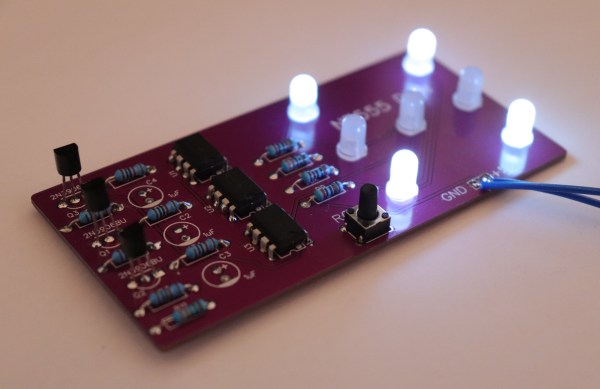
It has become a bit of a running joke in the Hackaday community to suggest that a project could or should have been done with a 555 timer. [Tim] has rather taken this to heart with his latest Electronic Dice project, which uses three of the venerable devices.
If three seems like a lot of 555s to make an electronic die, then it may be worth considering that the last time we shared his project he was using 22 of them! Since then, [Tim] has been busy optimising his design, whilst keeping within the constraints of an old-school through-hole soldering kit.
Maybe the most surprising thing about this project is the purpose to which the NE555 devices are pressed. Rather than using them for their famous oscillation properties, they are in actual fact just being used as Schmitt Triggers to clean up the three-phase ring oscillator that is constructed from discrete transistors and passives.
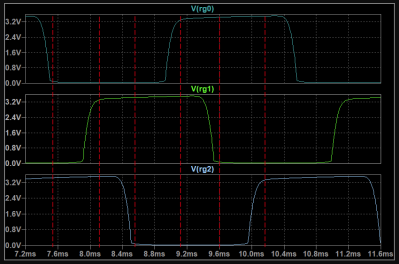
Simulation trace of the three-phase ring oscillator before Scmitt Trigger stages
The ring oscillator cleverly produces three phase-shifted square waves such that a binary combination of the three phases offers six unique states. Six being the perfect number for a dice throw, all that then remains is to figure out which LEDs need to be switched on in which state and wire them up accordingly.
To “roll” the dice, a push-button powers up the oscillator, and stops it again when it is released, displaying the random end-state on the LEDs.
It can be fun to see what can be done using old technology, and educational to try to optimise a design down to the fewest parts possible.
[Tim]’s earlier project is here if you want to see how the design has evolved. The documentation on both of these iterations is excellent and well worth a read.