Using Local AI On The Command Line To Rename Images (And More)

We all have a folder full of images whose filenames resemble line noise. How about renaming those images with the help of a local LLM (large language model) executable on the command line? All that and more is showcased on [Justine Tunney]’s bash one-liners for LLMs, a showcase aimed at giving folks ideas and guidance on using a local (and private) LLM to do actual, useful work.

This is built out from the recent llamafile project, which turns LLMs into single-file executables. This not only makes them more portable and easier to distribute, but the executables are perfectly capable of being called from the command line and sending to standard output like any other UNIX tool. It’s simpler to version control the embedded LLM weights (and therefore their behavior) when it’s all part of the same file as well.

One such tool (the multi-modal LLaVA) is capable of interpreting image content. As an example, we can point it to a local image of the Jolly Wrencher logo using the following command:

llava-v1.5-7b-q4-main.llamafile --image logo.jpg --temp 0 -e -p '### User: The image has...\n### Assistant:'

Which produces the following response:

The image has a black background with a white skull and crossbones symbol.

With a different prompt (“What do you see?” instead of “The image has…”) the LLM even picks out the wrenches, but one can already see that the right pieces exist to do some useful work.

Check out [Justine]’s rename-pictures.sh script, which cleverly evaluates image filenames. If an image’s given filename already looks like readable English (also a job for a local LLM) the image is left alone. Otherwise, the picture is fed to an LLM whose output guides the generation of a new short and descriptive English filename in lowercase, with underscores for spaces.

What about the fact that LLM output isn’t entirely predictable? That’s easy to deal with. [Justine] suggests always calling these tools with the --temp 0 parameter. Setting the temperature to zero makes the model deterministic, ensuring that a same input always yields the same output.

There’s more neat examples on the Bash One-Liners for LLMs that demonstrate different ways to use a local LLM that lives in a single-file executable, so be sure to give it a look and see if you get any new ideas. After all, we have previously shown how automating tasks is almost always worth the time invested.

Streaming Video From An ESP32

The ESP32, while first thought to be little more than a way of adding wireless capabilities to other microcontrollers, has quickly replaced many of them with its ability to be programmed as its own platform rather than simply an accessory. This also paved the way for accessories of its own, such as various sensors and even a camera. This guide goes over taking the input from the camera and streaming it out over the network to multiple browsers.

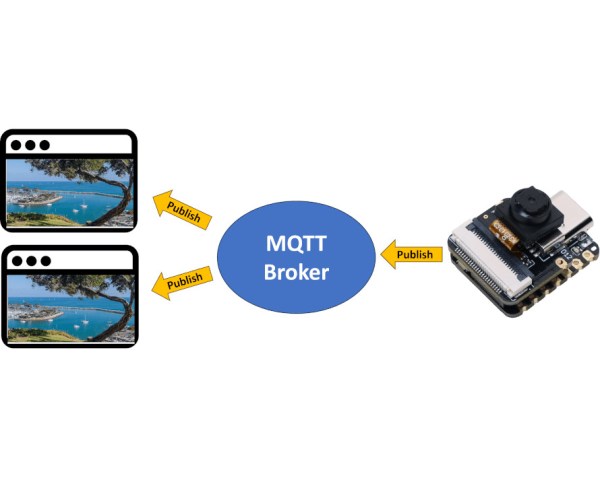
On the server side of things, the ESP32 and its attached camera are set up with MQTT, a lightweight communications protocol which uses a publish/subscribe model to send information. The ESP32 is configured to publish its images only, but not subscribe to any other nodes. On the client side, the browser runs a JavaScript program which is able to gather these images and stitch them together into a video.

This can be quite a bit of data to send out over the ESP32’s compact hardware, so there are some tips and tricks for getting more out of these little devices, including using an external antenna for better Wi-Fi signal, or omitting it entirely in favor of Ethernet. As far as getting a lot out of a tiny microcontroller, though, leveraging MQTT really helps the ESP32 go a long way. These chips have come along way since they were first introduced; they’re powerful enough to act as 8-bit gaming consoles too.

Thanks to [Surfskidude] for the tip!

Networking With Balloons

Starlink has been making tremendous progress towards providing world-wide access to broadband Internet access, but there are a number of downsides to satellite-based internet such as the cluttering of low-Earth orbit, high expense, and moodiness of CEO. There are some alternatives if standard Internet access isn’t available, and one of the more ambitious is providing Internet access by balloon. Project Loon is perhaps the most famous of these (although now defunct), but it’s also possible to skip the middleman and build your own high-altitude balloon capable of connection speeds of 500 Kbps.

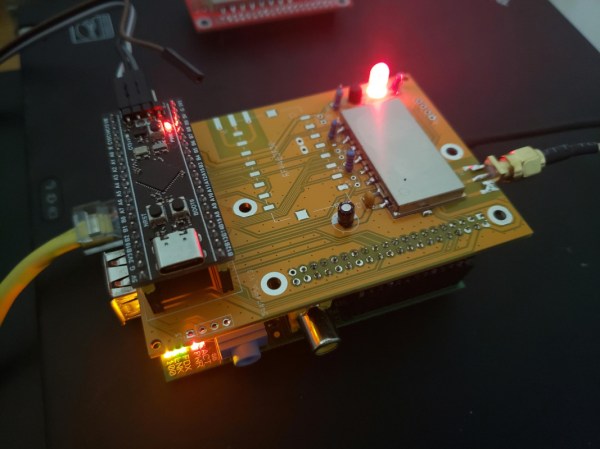
[Stephen] has been working on this project for a few months and while it doesn’t support a full Internet connection, the downlink on the high altitude balloon is fast enough to send high-resolution images in near-real-time. This is thanks to a Raspberry Pi Zero on board the balloon that is paired with an STM32 board which handles the radio communication on a RF4463 transceiver module. The STM32 acts as an intermediary or buffer to ensure reliable information is sent out on the radio, rather than using the Pi directly. [Stephen] also wrote a large chunk of the software responsible for handling all of these interactions, optimized for balloon flight specifically.

The blog post for this project was written a few weeks ago with a reported first launch date for the system already passed, so we will eagerly anticipate the results and the images he was able to gather using this system. Eventually [Stephen] hopes the downlink will be fast enough for video as well.Balloons are an underappreciated tool as well, and this isn’t the only way that they can be used to help send radio signals from place to place.

£D printed parts with glossy toner transfer images on

Add Full-Color Images To Your 3D Prints With Toner Transfer

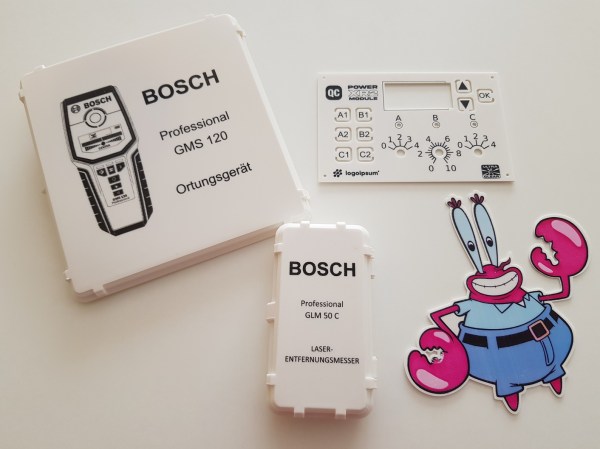
Toner transfer is a commonly-used technique for applying text and images to flat surfaces such as PCBs, but anybody who has considered using the same method on 3D prints will have realized that the heat from the iron would be a problem. [Coverton] has a solution that literally turns the concept on its head, by 3D printing directly onto the transparency sheet.

instrument panel design with toner transfer markings
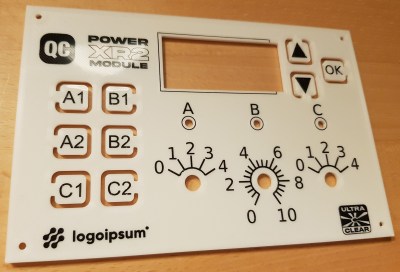
The fine detail is great for intuitive front-panel designs

The method is remarkably straightforward, and could represent a game-changer for hobbyists trying to achieve professional-looking full-color images on their prints.

First, the mirrored image is printed onto a piece of transparency film with a laser printer. Then, once the 3D printer has laid down the first layer of the object, you align the transparency over it and tape it down so it doesn’t move around. The plastic that’s been deposited already is then removed, and a little water is placed on the center of the bed. Using a paper towel, the transparency gets smoothed out until the bubbles are pushed off to the edges.

Another few pieces of tape hold the transparency down on all corners, and the hotend height is adjusted to take into account the transparency thickness. From there, the print can continue on as normal. When finished, the image should be fused with the plastic. If it’s hard to visualize, check out the video after the break for a step-by-step guide.

There are, of course, some caveats. Aligning the transfer and the print looks a little fiddly at the moment, the transparency material used (obviously) has to be rated for use in laser printers, and it only works on flat surfaces. But on the other hand, there will be some readers who already have everything they need to try this out at home right now — and we’d love to see the results!

We’ve covered some other ways to get color and images onto 3D prints in the past, such as this hydrographic technique or by using an inkjet printhead, but [Coverton]’s idea looks much simpler than either of those.  If you’re interested in toner transfer for less heat-sensitive materials, then check out this guide from a few years back, or see what other Hackaday readers have been doing on wood or brass.

Continue reading “Add Full-Color Images To Your 3D Prints With Toner Transfer”

How To Hide A Photo In A Photo

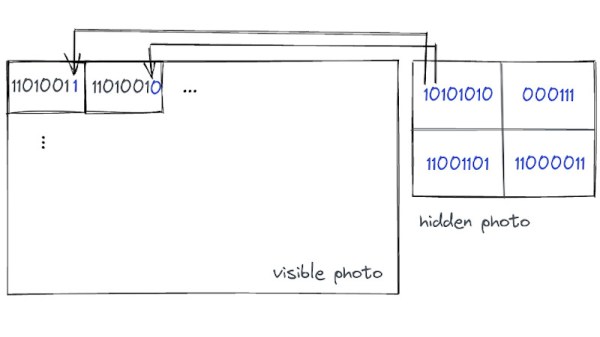
If you’ve ever read up on the basics of cryptography, you’ll be aware of steganography, the practice of hiding something inside something else. It’s a process that works with digital photographs and is the subject of an article by [Aryan Ebrahimpour]. It describes the process at a high level that’s easy to understand for non-maths-wizards. We’re sure Hackaday readers have plenty of their own ideas after reading it.

The process relies on the eye’s inability to see small changes at the LSB level to each pixel. In short, small changes in colour or brightness across an image are imperceptible to the naked eye but readable from the raw file with no problems. Thus the bits of a smaller bitmap can be placed in the LSB of each byte in a larger one, and the viewer is none the wiser.

We’re guessing that the increased noise in the image data would be detectable through mathematical analysis, but this should be enough to provide some fun. If you’d like a closer look, there’s even some code to play with. Meanwhile as we’re on the topic, this isn’t the first time Hackaday have touched on steganography.

What Exactly Is A Gaussian Blur?

Blurring is a commonly used visual effect when digitally editing photos and videos. One of the most common blurs used in these fields is the Gaussian blur. You may have used this tool thousands of times without ever giving it greater thought. After all, it does a nice job and does indeed make things blurrier.

Of course, we often like to dig deeper here at Hackaday, so here’s our crash course on what’s going on when you run a Gaussian blur operation. Continue reading “What Exactly Is A Gaussian Blur?”

Argos Book Of Horrors

If you live outside the UK you may not be familiar with Argos, but it’s basically what Americans would have if Sears hadn’t become a complete disaster after the Internet became popular. While they operate many brick-and-mortar stores and are a formidable online retailer, they still have a large physical catalog that is surprisingly popular. It’s so large, in fact, that interesting (and creepy) things can be done with it using machine learning.

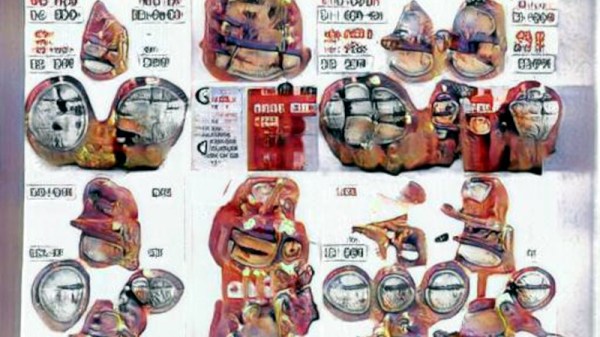
This project from [Chris Johnson] is called the Book of Horrors and was made by feeding all 16,000 pages of the Argos catalog into a machine learning algorithm. The computer takes all of the pages and generates a model which ties the pages together into a series of animations that blends the whole catalog into one flowing, ever-changing catalog. It borders on creepy, both in visuals and in the fact that we can’t know exactly what computers are “thinking” when they generate these kinds of images.

The more steps the model was trained on the creepier the images became, too. To see more of the project you can follow it on Twitter where new images are released from time to time. It also reminds us a little of some other machine learning projects that have been used recently to create short films with equally mesmerizing imagery. Continue reading “Argos Book Of Horrors”