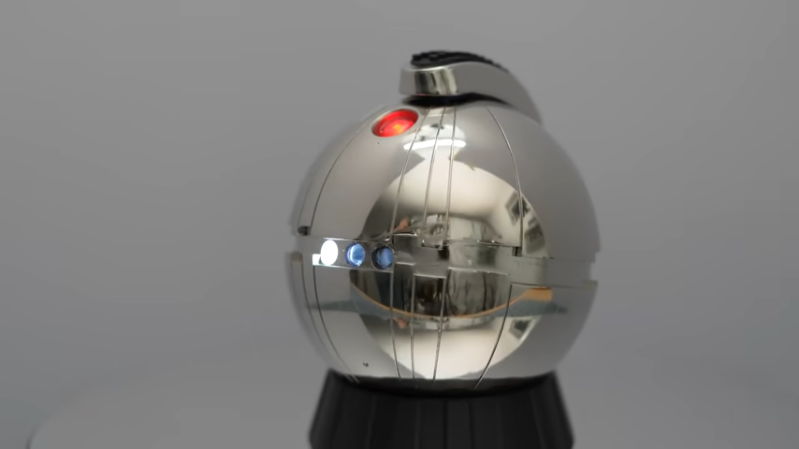
3D printing is known for producing parts with a fairly average finish at best. Even the smoothest resin prints are still fairly plasticky and dull in appearance. However, it’s possible to do much better if you get creative with electroplating. This thermal detonator prop from [HEN3DRIK] shows just how good a 3D print can look with a little post-processing and some chemical help.
[HEN3DRIK] started with a Star Wars thermal detonator model found online, and printed it in resin for the best possible surface finish from the get go. The parts were cleaned after printing and cured, as per usual resin processing techniques. From there, fine steel wool and sandpaper was used to make the print as smooth as possible. A conductive layer of copper paint was then sprayed on with an airbrush, with mating surfaces masked off to avoid ruining the fit.
The part was then dunked in an acidic copper bath while attached to a power source, and gently rotated during the electroplating process. The results were excellent, resulting in near-mirror finish copper-plated parts after polishing. Nickel was then plated on top to get the prop to the proper silver color. The prop was finally then assembled with an Arduino Nano inside to run several LEDs for visual effect.
Electroplating isn’t just for making things pretty. It can also add strength to your 3D prints, too! Video after the break.
[Thanks to Keith Olson for the tip!]


Great… Another project on my list :P
Well executed and it look really great, I’m really impressed with the surface finishing. Amazing!
Looks quite nice! But you still see fine scratches in the image, when the thing rotates. I don’t think they’re from handling the ball after it was electroplated. Rather, I think they are scratch marks caused by the steel wool or the sand paper. I don’t think electroplating will fill those little scratches like paint would, but will rather follow their contours making them more visible instead. Lightly sand/glass/soda/whateverworksbest-blasting might make a more smooth finish, I’d think.
Also:
“Nickel was then plated on top to get the prop to the proper silver color.”
Technically, after plating with nickel, the prop will have the proper nickel color, not the proper silver color. :)
Hi, these scratches are the result of polishing with compound. They are barely visible with the naked eye. It‘s that the camera amplifies it a lot. But you are right, scratches on the base are transported to the plating and are visible later, it can be seen on the detonator in various places. ;-)
Yes, nickel top layer should be plated with palladium or chrome for an different look.
It needs distressing if anything. I find the hardest part of prop making is achieving an artificially worn/weathered finish. Adam Savage has some great tips, but you can’t replicate his experience.
What is in the Super Duper conductive paint? It doesn’t seem to be a product that you can buy.
Hen3drik,
I understand how the scratches came to be, have you tried a very diffuse light source when talking images with your camera as they should eliminate most of the defects, a bit like using vaseline on a lens. By having no light truly directional the cracks will not flash and stand out.
On an subject would love to hear more of your efforts for metalizing resin and the results you have had in strengthening items you have printed. Thanks in advance.
Oh, i didn’t know that. That sounds very interesting and I’ll def try this the next time. “unfortunately” I just finished another video which comes out on saturday. Item stenghtening is a thing. I noticed that _all_ prints get much more rigid and stiff. especially for delicat resin parts. I’ll do some investigation/measurement. thanks..
Just needed a final buffing with very fine compound.
Sandpaper only goes so far.
Punchline:
Pinocchio: Who needs a girlfriend now that I have sandpaper!
nice, can bounce some laser beams around with a surface like that.
Light projection and reflection with even-lumin patterns come to mind more than any franchise spoiled movie.
Complex shapes required.