Generating Motion Via Nitinol Wires

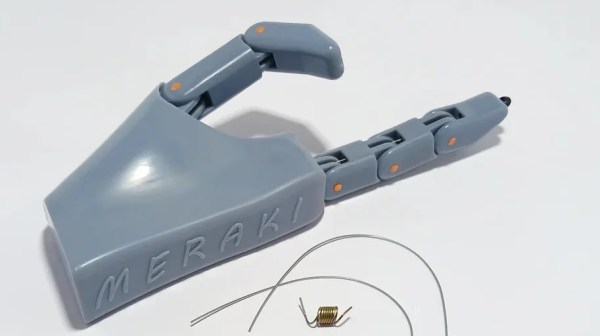
Generally, when we’re looking to build something that moves we reach for motors, servos, or steppers — which ultimately are all just variations on the same concept. But there are other methods of locomotion available. As [Jamie Matthews] demonstrates, Nitinol wires can be another way to help get things moving.

Nitinol is a type of metal wire made of nickel and titanium that is also known as “memory wire”, because it can remember its former shape and transition back to it with a temperature change. [Jamie] uses this property to create a simple hand that is actuated by pieces of wire sourced from Amazon. This is actually a neat way to go, as it goes some way to mimicking how our own hands are moved by our tendons.

[Jamie] does a great job of explaining how to get started with Nitinol and how it works in a practical sense. We’ve seen it put to some wacky uses before, too, such as the basis for an airless tire.

Continue reading “Generating Motion Via Nitinol Wires”

Electroplating Makes 3D-Printed Star Wars Prop Shine

3D printing is known for producing parts with a fairly average finish at best. Even the smoothest resin prints are still fairly plasticky and dull in appearance. However, it’s possible to do much better if you get creative with electroplating. This thermal detonator prop from [HEN3DRIK] shows just how good a 3D print can look with a little post-processing and some chemical help.

[HEN3DRIK] started with a Star Wars thermal detonator model found online, and printed it in resin for the best possible surface finish from the get go. The parts were cleaned after printing and cured, as per usual resin processing techniques. From there, fine steel wool and sandpaper was used to make the print as smooth as possible. A conductive layer of copper paint was then sprayed on with an airbrush, with mating surfaces masked off to avoid ruining the fit.

The part was then dunked in an acidic copper bath while attached to a power source, and gently rotated during the electroplating process. The results were excellent, resulting in near-mirror finish copper-plated parts after polishing. Nickel was then plated on top to get the prop to the proper silver color. The prop was finally then assembled with an Arduino Nano inside to run several LEDs for visual effect.

Electroplating isn’t just for making things pretty. It can also add strength to your 3D prints, too! Video after the break.

Continue reading “Electroplating Makes 3D-Printed Star Wars Prop Shine”

Electroplating 3D Printed Parts For Great Strength

Resin 3D printers have a significant advantage over filament printers in that they are able to print smaller parts with more fine detail. The main downside is that the resin parts aren’t typically as strong or durable as their filament counterparts. For this reason they’re often used more for small models than for working parts, but [Breaking Taps] wanted to try and improve on the strength of these builds buy adding metal to them through electroplating.

Both copper and nickel coatings are used for these test setups, each with different effects to the resin prints. The nickel adds a dramatic amount of stiffness and the copper seems to increase the amount of strain that the resin part can tolerate — although [Breaking Taps] discusses some issues with this result.

While the results of electroplating resin are encouraging, he notes that it is a cumbersome process. It’s a multi-step ordeal to paint the resin with a special paint which helps the metal to adhere, and then electroplate it. It’s also difficult to ensure an even coating of metal on more complex prints than on the simpler samples he uses in this video.

After everything is said and done, however, if a working part needs to be smaller than a filament printer can produce or needs finer detail, this is a pretty handy way of adding more strength or stiffness to these parts. There’s still some investigating to be done, though, as electroplated filament prints are difficult to test with his setup, but it does show promise. Perhaps one day we’ll be able to print with this amount of precision using metal directly rather than coating plastic with it.

Thanks to [smellsofbikes] for the tip!

Continue reading “Electroplating 3D Printed Parts For Great Strength”

Printing, Plating, And Baking Makes DIY Microlattices Possible

To be honest, we originally considered throwing [Zachary Tong]’s experiments with ultralight metallic microlattices into the “Fail of the Week” bucket. But after watching the video below for a second time, it’s just not fair to call this a fail, so maybe we’ll come up with a new category — “Qualified Success of the Week”, perhaps?

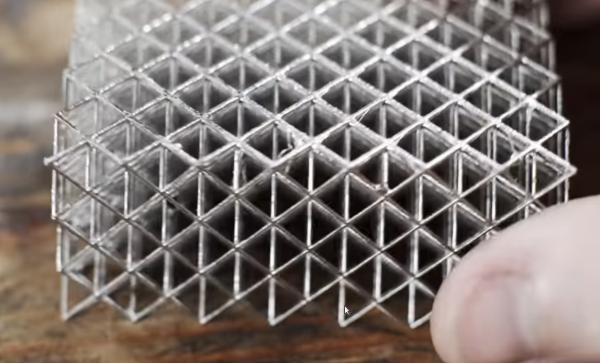
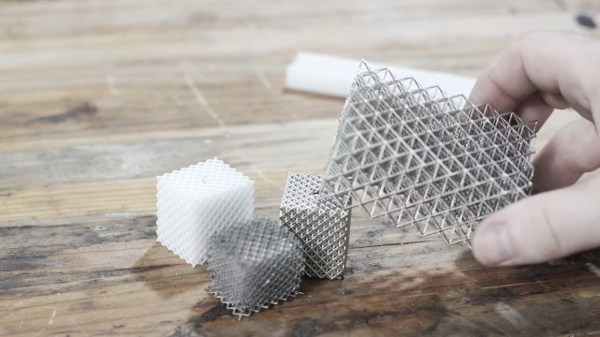
[Zachary]’s foray into the strange world of microlattices began when he happened upon a 2011 paper on the subject in Science. By using a special photocurable resin, the researchers were able to use light shining through a mask with fine holes to create a plastic lattice, which was then plated with nickel using the electroless process, similar to the first half of the electroless nickel immersion gold (ENIG) process used for PCBs. After removing the resin with a concentrated base solution, the resulting microlattice is strong, stiff, and incredibly light.

Lacking access to the advanced materials and methods originally used, [Zachary] did the best he could with what he had. An SLA printer with off-the-shelf resin was used to print the skeleton using the same algorithms used in the original paper. Those actually turned out pretty decent, but rather than electroless plating, he had to go with standard electroplating after a coat of graphite paint. The plated skeletons looked great — until he tried to dissolve the resin. When chemical approaches failed, into the oven went the plated prints. Sadly, it turns out that the polymers in the resin expand when heated, which blew the plating apart. A skeleton in PLA printed on an FDM printer fared little better; when heated to drive out the plastic, it became clear that the tortuous interior of the lattice didn’t plate very well.

From aerogels to graphene, we love these DIY explorations of new and exotic materials, so hats off to [Zachary] for giving it a try in the first place.

Continue reading “Printing, Plating, And Baking Makes DIY Microlattices Possible”

Brass And Nickel Work Together In This Magnetostrictive Earphone

When you go by a handle like [Simplifier], you’ve made a mission statement about your projects: that you’ll take complex processes and boil them down to their essence. So tackling the rebuilding of the humble speaker, a device he himself admits is “both simplified and optimized already,” would seem a bit off-topic. But as it turns out, the principle of magnetostriction can make the lowly speaker even simpler.

Most of us are familiar with the operation of a speaker. A powerful magnet sits at the center of a coil of wire, which is attached to a thin diaphragm. Current passing through the coil builds a magnetic field that moves the diaphragm, creating sound waves. Magnetostriction, on the other hand, is the phenomenon whereby ferromagnetic materials change shape in a magnetic field. To take advantage of this, [Simplifier] wound a coil of fine copper wire around a paper form, through which a nickel TIG electrode welding filler rod is passed. The nickel rod is anchored on one end and fixed to a thin brass disc on the other. Passing a current through the coil causes the rod to change length, vibrating the disc to make sound. Give it a listen in the video below; it sounds pretty good, and we love the old-time look of the turned oak handpiece and brass accouterments.

You may recall [Simplifier]’s recent attempt at a carbon rod microphone; while that worked well enough, it was unable to drive this earphone directly. If you need to understand a little more about magnetostriction, [Ben Krasnow] explained its use in anti-theft tags a couple of years back.

Continue reading “Brass And Nickel Work Together In This Magnetostrictive Earphone”

PCB Finishes Hack Chat

Join us on Wednesday, March 11 at noon Pacific for the PCB Finishes Hack Chat with Mark Hughes and Elijah Gracia!

There’s no way to overestimate the degree to which the invention of the printed circuit board revolutionized electronics. What was once the work of craftspeople weaving circuits together with discrete components, terminal strips, and wiring harnesses could now be accomplished with dedicated machines, making circuit construction an almost human-free process. And it was all made possible by figuring out how to make copper foil stick to a flat board, and how to remove some of it while leaving the rest behind.

​Once those traces are formed, however, there’s more work to be done. Bare copper is famously reactive stuff, and oxides soon form that will make the traces difficult to solder later. There are hundreds of different ways to prevent this, and PCB surface finishing has become almost an art form itself. Depending on the requirements for the circuit, traces can be coated with tin, lead, gold, nickel, or any combination of the above, using processes ranging from electroplating to immersion in chemical baths. And the traces aren’t the only finishes; solder resist and silkscreening are both important to the usability and durability of the finished board.

For this Hack Chat, we’ll be talking to Elijah Gracia and Mark Hughes from Royal Circuit Solutions. They’re both intimately familiar with the full range of PCB coatings and treatments, and they’ll help us make sense of the alphabet soup​: HASL, OSP, ENIG, IAg, LPI, and the rest. We’ll learn what the different finishes do, which to choose under what circumstances, and perhaps even learn a bit about how to make our homebrew boards look a little more professional and perform a bit better.

join-hack-chatOur Hack Chats are live community events in the Hackaday.io Hack Chat group messaging. This week we’ll be sitting down on Wednesday, March 11 at 12:00 PM Pacific time. If time zones have got you down, we have a handy time zone converter.

Click that speech bubble to the right, and you’ll be taken directly to the Hack Chat group on Hackaday.io. You don’t have to wait until Wednesday; join whenever you want and you can see what the community is talking about.

Make An Electroplating Marker, Because Plating Complex Objects Is Hard

If an object is conductive or has been given a conductive coating, it can be given a metal skin via electroplating. Electroplating is a simple process that is perfectly accessible to anyone in possession of vinegar, salt, a power supply, and some metal such as copper or nickel.

The process might be simple, but as with all such things there are a few gotchas. One of them is this: because electricity follows the path of least resistance, recessed areas of an object may not electroplate well (or at all) no matter how long the object is left immersed. To address this, [Brodie Fairhall] designed a 3D printed electroplating marker. The marker is essentially a more refined version of brush plating, and allows more precision and control than full immersion in an electrolyte bath.

[Brodie] created an excellent video that explains all one needs to start electroplating, and demonstrates using his marker to electroplate complex recessed shapes. Watch him coat a 3D-printed cat pendant in both copper and nickel in the video embedded below. It’s concise, well-edited, and chock full of useful tips.

Continue reading “Make An Electroplating Marker, Because Plating Complex Objects Is Hard”