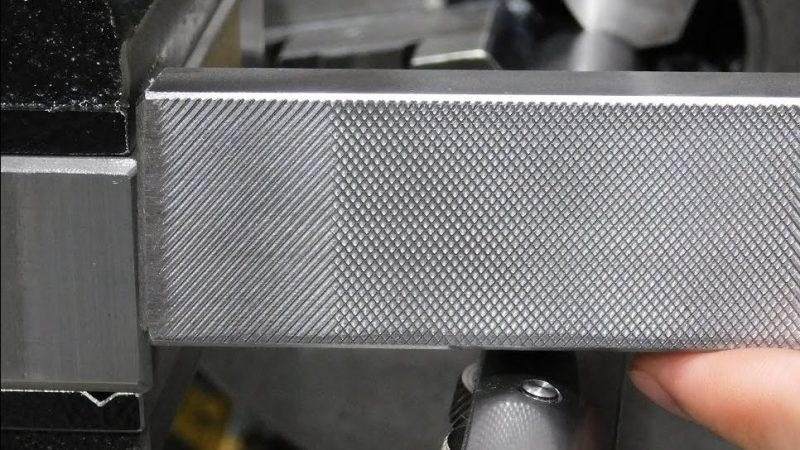
Knurling is a popular way to finish handles of tools and other hardware, with a pattern of crossed lines rolled into metal to provide better grip and an attractive finish. It’s most commonly done on a lathe to round stock, but it can also be achieved on flat surfaces if you have the right tool. Of course, you can make one yourself.
The build is simple, and is based around by creating a special carrier out of a solid piece of steel. It’s a long bar has a space milled out to hold two wheels in the middle. A pair of off-the-shelf knurling wheels are then installed in the bar, with socket head bolts serving as axles.
With the tooling complete, it’s then a simple matter of installing the carrier bar in a lathe and running it back and forth over a flat workpiece. The workpiece is rolled back and forth to allow the wheels to do their work, while also being shifted horizontally to allow the entire flat surface to be worked over.
A nice knurled finish really can elevate the form and function of any tool or other piece of metal craftsmanship. We’ve explored how to create your own knurled knobs before, too.
[Thanks to Zane Atkins for the tip!]


Reminds me – how exactly do they make files?
Historically it used to be with a chisel on soft steel. So I expect it still is, just the chisel is now whole file at once hydraulic powered form tool… Don’t actually know though.
if you want to see some Hand-cut files (and how the teeth can be irregular), look up Clickspring on YT. (see comment above) They’re still made one tooth at a time, but now it’s done by machine so it’s a lot more consistent. the size of tooth is directly proportional to the force of strike so by adjusting the strikeforce in a machine you can dial in exactly how large or small you want the teeth.
Clockspring’s beautiful video on the topic: https://www.youtube.com/watch?v=SOw9WqMOHjA
I used to resent what I paid for files but I’m just now over that.
There’s also a video from a German small shop file maker – https://youtu.be/dlicoawaDWA
Seconded on the Clickspring video. In short, the grooves are cut first, then the steel is hardened afterward.
Here are two videos of how files were made in Germany.
Here a Kultures heritage channel: “https://www.youtube.com/watch?v=FlvXkdkmZ5U”
And here a reuplaod of a television broadcast on a private channel: “https://www.youtube.com/watch?v=dlicoawaDWA”
$ cat < my-flat-filecontent goes here
EOF
… ohh not that sort of file?
This does not work, at least on bash 5.1.16. Try instead
$ cat > my-flat-file << EOF
content goes here
EOF
Knurling on a flat surface is commonly called “Checkering.” Several checkering files available for wood/plastic or metal. You young’uns reinventing the wheel and not knowing what it’s called…=-).
I’m partial to “engine turning” on a flat surface that big though, easily done with a cratex mandrel and any table with repeatable movements, can even make a jig with notches.
The cheat knurl, where you use a vice and shims to roll a soft metal knob against a file would also work on a flat if you use round files and pull the flat out, instead of using round knob and pulling flat file out.
Not sure that I need, or even want, to figure out how to make a 3D print with a knurled surface, but this has started the wheels turning. I use 3D prints for impressions in pottery and aside from flat prints I also make rolling pin “slip covers.” Fun, but at time it can be a real time suck…
https://github.com/stbotman/pattern_roller_maker may be a useful tool to save some time.
module FlatKnurl(TopSurface)
{
KnurlSpacing = 1.8;
KnurlDepth = 0.6;
difference()
{
children();
for( i = [0:1000])
{
translate([i * KnurlSpacing – 500, 0, TopSurface])
{
rotate([270, 90, 60])
cylinder(d=KnurlDepth, h=1000, $fn=3);
rotate([270, 90, -60])
cylinder(d=KnurlDepth, h=1000, $fn=3);
}
}
}
}
// Use as follows. The top surface height of the child needs to be known
TOP_HEIGHT = 20;
FlatKnurl(TOP_HEIGHT)
cube([100,100,TOP_HEIGHT]);
First attempt to post failed, and I left off the description for the second. This was along the lines of a quick flat knurl concept in OpenSCAD, just to the top of a 100x100x20 plate. It’s rough but seems to work. I am not sure if OpenSCAD allows the dimensions of the child object to be extracted, this would make it neater.
The question is:
How do you make a 3d print without a slightly knurled surface on the top?
Before milling machines there was the shaper. Cutting some checkering with a shaper would be trivial. All hail the shaper. Well, I guess if you do not want a ton of cast iron machine in the shop, the method in the article works nicely as well.
My dad’s shop still has and uses a few shapers from the 1940’s, old WW2 surplus machines that made war parts… they’ve been making internal splines on pulleys and forming the die shape for Fritos corn chips for the last 25+ years. I used to run them for him, and a Barber Coleman 1943 gear hobbing machine.
Hi. Any chance of pics of the shaper makin corn chips does?