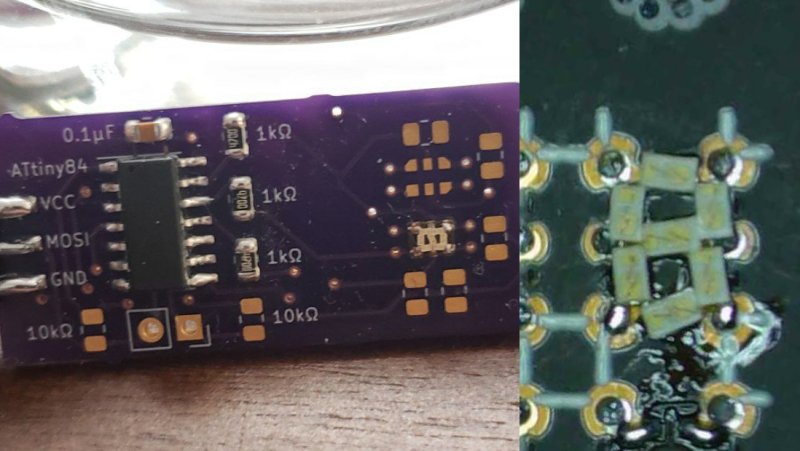
Inspired by a prank tweet, [Sam Ettinger] endeavored to create an SMD seven-segment display. The NanoRaptor NanoSegment implements a panel of seven-segment display modules sized at “0806” each or just a bit wider than a standard 0805 SMD footprint. Each of the seven segments is a single 0201 LED. Six I/O lines and three resistors are required to operate each module.
To demonstrate the operation of his tiny display modules, Sam also created the “6Pin 7Seg” development board featuring an ATtiny84 microcontroller coupled to PCB footprints sized to receive the NanoRaptor NanoSegment display modules. A demonstration of the board counts through digits displayed on one of the tiny seven-segment modules.
Hoping to reduce the module’s interface to two pins, Sam is now experimenting with a seven-segment display on a flex PCB that folds up into a 1208 footprint. He is attempting to fold the resistors and a ATtiny20 microcontroller into an “origami PCB” configuration.
If these hacks are getting a little too small for your tastes, we’ve got you covered with this giant seven-segment display.


Love the use of the PCB as its own solder stencil.
People who collect HP calculators are searching for ways to replace the 7 segment displays that have failed in their 1st generation calculators.
am i just missing the photos of it lit up?
I wasn’t expecting a blog post about it, so it’s not very well documented yet! There’s just this video of it at Supercon, counting from 0 to 2: https://twitter.com/DHammarskjold/status/1589357682448019456
Or, for the same video but on the Fediverse: https://indieweb.social/@settinger/109418186716029298
I’m not a great [photo/video]grapher, I’ll be the first to admit that, hah!
I’m curious how you’d display a 3 on this; the current should take the shorter path through the LEDs on the left and turn it into an 8.
Unless I’m misunderstanding something the segments are multiplexed, only one is lit at a time for a short duration by driving the correct two pins as high+low outputs while all other IO are set as high impedance inputs. Scanning through all segments that should be lit quickly enough will make them look like they are simultaneously lit.
Oh, that’s clever!
You wanna really flip people out, make the LEDs green in one direction and red in the opposite direction. Stretch goal, add PWM to give a range of colours.
This is not working. I mean, I tried this before and leds light like a single point. When you join 7 leds you see seven single points, no matter how you position them. You MUST use diffusers and a receptacle to independize the light of each led or you have not the effect of a seven segment display.
In addition to using a flex PCB as the module base and as my solder paste stencil, I’ve had some promising early results using it as a diffuser, too :) As for light barriers between the segments, that hasn’t been an issue for me yet, but there’s a lot of experimentation left to do!
maybe you should take a look at how charlieplexing works?
http://ruemohr.org/~ircjunk/projects/micro7seg/slide.htm
Oka, but why is it so bad soldered? Did he had no right angle?
Olaf
My guess is the pad shape, having multiple leds on a larger pad, and solder surface tension during reflow pulling the leds into some unintended angle of higher stability/equilibrium. It’s the same reason pad shape is very important for very small smd parts to prevent tombstoning or shorting to nearby components.
You might be underestimating just how small an 0201 component is. Fitting a right angle in there is basically impossible. A precision-cut stencil (a misalignment of 3deg gives a required precision of .1mm or 4thou, not suitable for another one of his PCB stencils) of some kind could be used, but that’d be added cost.
I didn’t have the actual 0201 LEDs on-hand when I ordered the PCBs, so I couldn’t measure them. They turned out to be a bit longer than I’d anticipated, so there isn’t enough space for them all to sit flush. The fact that they work *at all* continues to amuse me!
Despite the package shape, only the LED dies illuminate, so when displaying an ‘8’, it will look something like this:
·
· ·
·
· ·
·
It would be a bit clearer, if the LED packagess were turned 90° and doubled up, like this:
··
︰ ︰
··
︰ ︰
··
If the microcontroller power system can tolerate a 3.3 and a 5v level, why not utilize a 1 wire protocol for communications to set the seven-segment value? Maybe 1 way UART communication would work. That might even open the door for other extensions I saw mentioned in other comments like PWM dimming or possibly different colors.
You may notice the few 0201 sights. Mounting the angle is not easy. You can use a precision cutting stencil (3 degrees misalignment will give you the required precision of 0.1mm or 4 mils, not suitable for other PCB stencils), but this adds cost.
AWESOME!