The Game Boy Color Accessory You’ve Been Waiting For

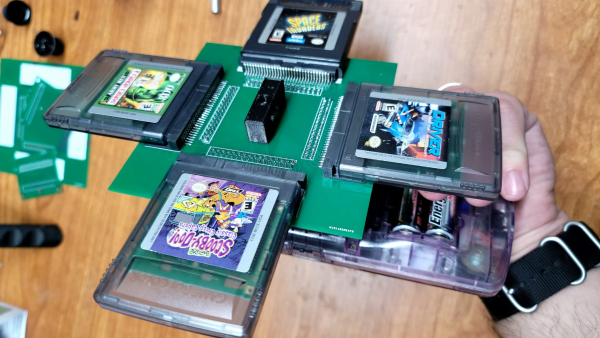
Sometimes silly projects catch our eye, and we just can’t resist covering them. Over on Hackaday.io, [solderking] realized that there was a glaring omission in the multi-game management hardware for the Game Boy Color. Obviously, it’s too mundane to carry the handheld around with a bunch of games in one’s pocket, and a hardware multi-changer would definitely improve the usability. This convenient, pocket-friendly solution allows you to dock up four cartridges at a time, and with only a little mild inconvenience, spin the whole assembly, lock in a game and load it up. What could be easier?

Constructed from a ridiculous three-tier PCB stack, with a rotating center joint, the assembly is completely passive, with the connections from the selected game cartridge passed down a series of connectors before finally entering the Game Boy via the usual edge connector. The mere fact that this works at all just shows how tolerant (and we guess, slow) older gaming platforms used to be, and just what you can get away with! Still, it’s a fun build, and it does work, which just goes to show that just because you can, then you should.

We’re no strangers to Game Boy hacks. Here’s a useful cartridge to help with developing your first program. If the old platform is just a bit too limited for you, then we’ve got you covered with a hack that wedges an iCE40 FPGA and a Pi Zero inside the case, to give a bit more oomph.

Continue reading “The Game Boy Color Accessory You’ve Been Waiting For”

small actor on giant table

NERF – Neural Radiance Fields

Making narrative film just keeps getting easier. What once took a studio is now within reach of the dedicated hobbyist. And Neural Radiance Fields are making it a dramatic step easier. The guys from [Corridor Crew] give an early peek.

Filming and editing have reached the cell phone and laptop stage of easy. But sets, costumes, actors, lighting, and so on haven’t gotten substantially cheaper, and making your own short film is still a major project.

Enter 3D graphics. With a good gaming laptop, anybody can make a photorealistic scene in Blender and place live action actors in it. But it takes both a lot of skill and work. And often, the scene you’re making is available as  a real place, but you can’t get permission to film or haul actors, props, crew, and so on to the set.

A new technology, NERF, for “NEural Radiance Fields”, has decreased the headaches a lot.  Instead of making a 3D model of the scene and using that to predict what reaches the camera, the software starts with video of the scene and machine learns a “radiance field” – a model of how light is reflected by the scene. Continue reading “NERF – Neural Radiance Fields”

An esp32 weather station with 3d printed anemometer, rain gauge and wind vane mounted on an aluminum frame sitting in an overgrown lawn

A Weather Station For Whether It Rains Or Shines

[Giovanni Aggiustatutto] creates a DIY weather station to measure rain fall, wind direction, humidity and temperature. [Giovanni] has been working on various parts of the weather station, including the rain gauge and anemometer, with the weather station build incorporating all these past projects and adding a few extra features for measurement and access.

An esp32 module connected to three level shifters inside of a grey utility junction box with a USB power connector coming in powering the ESP32 device and an external wifi antenna mounted on the outside of the junction box, all siting on a wooden table

For temperature and humidity, a DHT22 sensor is located in a 3D printed Stevensen screen, giving the sensor steady airflow while protecting the module from direct sunlight and rain. A mostly 3D printed wind vane is printed with the base attached to a ball bearing and magnet so that the four hall sensors positioned in a “plus” configuration at the base can detect direction. The 3D printed anemometer uses a hall sensor to detect the revolution speed of the device. The rain gauge uses a “tipping bucket” mechanism, with a magnet attached to it that triggers the hall sensor affixed to the frame. The rain gauge (or pluviometer if you’re fancy) needs extra calibration to adjust for how much water the buckets take on before tipping.

An ESP32, with additional level shifters and BMP180 atmospheric pressure sensor module, are placed in a junction box. The ESP32 is used to communicate with each of the sensors and allows for an external internet connection to a Home Assistant server to push collected data out.

[Giovanni] has done an excellent job of documenting each piece, including making the 3D STL files available. Weather stations are a favorite of ours with a lot of variety in what gets collected and how, from ultrasonic anemometers to solar powered weather stations, and it’s great to see [Giovanni]’s take.

Video after the break!

Continue reading “A Weather Station For Whether It Rains Or Shines”

tiny surface mount seven segment display

Nano-Sized 7-Segment LED Display On A Surface Mount Module

Inspired by a prank tweet, [Sam Ettinger] endeavored to create an SMD seven-segment display.  The NanoRaptor NanoSegment implements a panel of seven-segment display modules sized at “0806” each or just a bit wider than a standard 0805 SMD footprint.  Each of the seven segments is a single 0201 LED.  Six I/O lines and three resistors are required to operate each module.

To demonstrate the operation of his tiny display modules, Sam also created the “6Pin 7Seg” development board featuring an ATtiny84 microcontroller coupled to PCB footprints sized to receive the NanoRaptor NanoSegment display modules.  A demonstration of the board counts through digits displayed on one of the tiny seven-segment modules.

Hoping to reduce the module’s interface to two pins, Sam is now experimenting with a seven-segment display on a flex PCB that folds up into a 1208 footprint.  He is attempting to fold the resistors and a ATtiny20 microcontroller into an “origami PCB” configuration.

If these hacks are getting a little too small for your tastes, we’ve got you covered with this giant seven-segment display.


Cardboard Game Tokens Become Shiny Click-Clacks With DIY Treatment

Tabletop games and cardboard tokens go hand-in-hand for a good reason: they are economical and effective. However, their tactile attributes leave a little to be desired. There’s something really great about high-quality pieces possessing a shiny, pleasing smoothness and click-clack handling that cardboard simply can’t deliver, but that all changes with [Dzhav]’s simple method for converting cardboard tokens into deluxe versions of themselves with a little work and a resin coating.

The result is a token with a crystal-clear, smooth, and slightly-convex coating of hardened resin on it. They feel (and sound) like plastic, rather than cardboard. The resin used is a two-part clear jewelry resin, used for casting things like pendants. It benefits from a long working time and unlike UV-cured resin (like the SLA 3D printer resin) it won’t be affected by light.

Careful application of resin relies on surface tension to prevent messes.

Like with most things, good results come from careful preparation and technique. [Dzhav] suggests preparing the tokens by sanding the edges completely smooth with fine sandpaper, then using a black marker to color them. Then, tokens are coated one side at a time with a paintbrush and correctly-mixed resin: while holding a token down with a toothpick, resin is brushed right to (but not over) the edges. Then, additional resin can be dropped in the center of the token, and gravity and surface tension will work together to ensure an even coating that doesn’t drip.

After the resin has had plenty of time to cure, the tokens are flipped over and the process repeated. The end result are tokens with both sides coated in a nice, smooth, ever-so-slightly-convex shield of resin.

They look fantastic, and sound even better. Turn up your volume and play the two-second video embedded below to listen for yourself. And when you’re ready for another gamer that didn’t settle for what was in the box, check out this redesigned Catan version.

Continue reading “Cardboard Game Tokens Become Shiny Click-Clacks With DIY Treatment”

JCB Is Exploring Hydrogen Combustion Engines For Construction Machinery

When we think about greening up the planet, solar panels and electric cars are often at the forefront of our mind. However, there’s a whole bunch of other things out there that are spewing out carbon dioxide that also need to be cleaned up. That includes leaf blowers, lawn mowers, and yes – big equipment for construction and agricultural work!

JCB manufactures diesel engines for big machines, but is now looking to switch things up for a cleaner future. To that end, the company is working on hydrogen-burning engines for its big machines.

Continue reading “JCB Is Exploring Hydrogen Combustion Engines For Construction Machinery”

A grey keyboard with orange and dark grey accents is angled away from the camera. The keys nearby are clearly distinguishable in the foreground but blurry toward the back/right. The keyboard is quite thick as it also contains a computer motherboard.

Mechanical Keyboard With A Framework Inside

Like the Commodore 64 and other keyboard computers of yore, the [Elevated Systems]’s CJ64 fits all of its processing and I/O into a single keyboard-shaped package.

This iteration of the project takes it to the next level with an enclosure milled out of aluminum instead of the mere 3D printed enclosure of the previous versions. With a Framework mainboard, the ports are configurable via the Framework expansion card system giving you even more options to customize this build. To round it out, this keyboard PC doesn’t scrimp on the keyboard part either with mechanical switches and MT3 profile keycaps.

If you’d like to build one of these for yourself, [Elevated Systems] has uploaded the 3D printed enclosure files to his GitHub repository. The files for machining are available as well, but only to patrons.

For some more Framework-based mods, check out this Framework Tablet, the Framedeck, or this other retro-inspired Framework build. If you want an all-in-keyboard slabtop, then maybe check out Are Slabtops the Future of Computing?

Continue reading “Mechanical Keyboard With A Framework Inside”