Camera shutter speed is an essential adjustment in photography – along with the aperture, the shutter moderates the amount of light entering the camera. Older cameras (and some newer ones) use mechanical shutters that creep out-of-spec over the years, so [Dean Segovis] built a handy shutter speed tester.
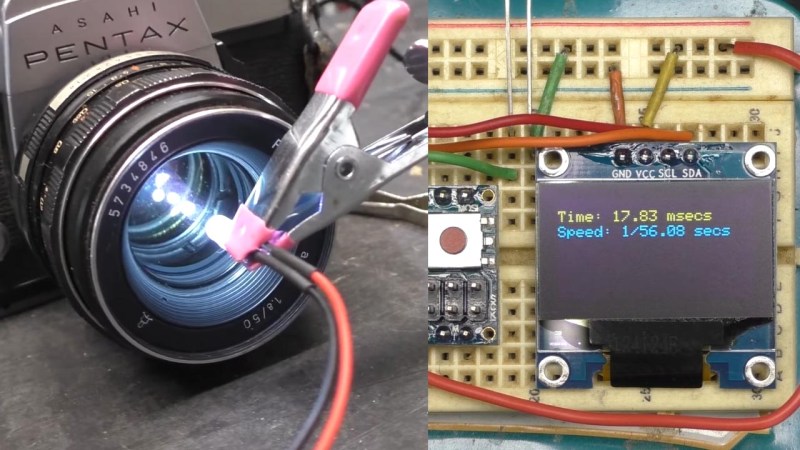
With just a handful of basic components, this project is a great one for beginners to sink their teeth into. The tester is based around a photoresistor that measures light from another source (a flashlight) that travels through the camera body. When the shutter on the camera is released, the shutter speed can be measured and displayed on the OLED screen. An Arduino naturally handles all the computational duties. The whole thing can be easily assembled on a breadboard in just a couple of minutes.
The original project by [hiroshootsfilm] is over on Project Hub, however [Dean] takes a deeper dive with some code troubleshooting, as well as trying out a variety of old film cameras with the breadboard tester. His testing revealed that the photoresistor was better able to detect shutter speed when the camera lens was removed, which is a hot tip for anyone else that wants to try this.
While it’s not surprising that these older cameras are having trouble with their mechanical shutters, this little tester would be an invaluable tool when it comes time to start tweaking shutter mechanisms. If this project has brought out the shutterbug in you, make sure to check out this brain transplant for a Polaroid 100-series Packfilm camera that we covered way back in 2011.


Nice, but maybe overkill?
I’ve been checking old camera shutter with no more than a scrap solar cell and a scope.
Great, if you have a scope. And 50 ohm termination.
Back then we didn’t have even a scope. We checked it with the raster of a TV screen or the rotation of a fan blade.
You had TVs and fans? Lucky.
Back in my day we had to consume mind altering substances to slow down time and observe it ourselves.
Luxury! In my day, we’d have to smack our foreheads with a rock, repeatedly to alter our minds sufficiently.
You had mind altering substances? Bliss!
In my day we had to count the shutter time on our fingers really really fast, while eating gravel, uphill both ways!
You had a hill? We could only ever dream of a hill, and it would be a small hill at that! Even our dreams were small, we couldn’t fathom even seeing a REAL 35mm camera.
Even that’s overkill! I’ve been checking by holding it up to the laptop mic and zooming in on the waveform in audacity!
You hear the mirror, not the shutter.
By the way. I can understand the amiosity between hackaday and hackaweek, but here is the whole blogpost: http://hackaweek.com/hacks/shutter-speed-tester-with-arduino/
No animosity really. I send them tips and they post them. Thanks for posting the link.
No animosity at all! Dean does great stuff!
ah, good concern to think about. I was testing a rangefinder though, so there’s no mirror to hear.
That’s the real hack. No special hardware required.
Cool little project. The basic design is simple and effective. I’m sure the same basic principles it uses can be applied to solve many other problems too.
For example I expect it wouldn’t be very hard to convert this into a touchless tachometer. The shaft might need a bit of flat black and strip of white paint. Alter the code a bit here and there. But I’m sure it would work.
It is a phototransistor, a photoresistor would be to slow I think.
I am here laughing and waxing introspective. My whole journey into electronics began over 20 years ago with exactly this project as a goal. And now perhaps 25 years later, I have never actually completed the original project. The original rabbit hole led to other rabbit holes within which were other rabbit holes and just who does the guy stand on who is holding up the earth anyway.
Just for old times sake, I should just build this project. I don’t know if I even have any manual shutters any more! Back then I was fooling around with view cameras, but I gave all that gear away …
I can see this being very useful when we’re checking old cameras we’ve been donated at our darkroom. Shutters wear and springs get less springy, so actually knowing that the speeds or accurate (or what they actually are) would be good to know before putting a roll of film through. I can make this, put it in a 3D printed case and store in along with the cameras for the whole darkroom group to use.
I would have thought an easier way would be to use a line of LEDs and turn them on one at a time at a predictable rate. Add a scale next to it and provided you start the sequence when you press the shutter, essentially counting the number of lights in the picture, will give you the lag time.
I’ll take it back, I like this design. Although I do wonder if it could be made to read faster and repurposed for timing other things.
Perhaps if it could take multiple readings it could evolve into a sort of optical bus pirate.
We did this back in college with a turntable and a disk with a white dot on it.
I started down the path of making a shutter speed tester at one point. Used an IR LED and IR receiver to make it. Worked pretty well for an SLR focal plane shutter until I got up to speeds around 1/1000 of a second, and the Arduino just wasn’t fast enough with analog reads to get a meaningful number. I also got so bogged down in the weeds that I never went any further with it…things like a leaf shutter that slowly opens and then snaps shut more quickly – do you start timing the instant a tiny bit of light appears through the small opening? Halfway through? Full open? How do you determine any of those? Then for a focal plane shutter that goes across for an SLR, the leading part can be faster or slower than the trailing part that closes it, how do you measure that? An LED and receiver on each end of it? Probably just worrying too much about the minute details, especially when it comes to film that has a certain amount of exposure latitude and probably doesn’t matter so long as the shutter is reasonably close…
Look into the TI TDC7200, might be of help if the ‘duino is too slow.
You start the measurement the moment a tiny bit if light starts hitting a point on the film, and stop measuring when the light stops hitting that point because that is the exposure time.
This is true regardless of the shutter mechanism.
In particular, for a focal plane shutter, it does not matter if the trailing curtain moves faster than the leading curtain, so long as the length of time it takes them to pass a particular point on the film, one after the other, is the same on each point of the film at any particular shutter speed, and if it isnt then there is something very wrong with the shutter mechanism.
The width of the slit between opening and closing curtains is a surrogate for the shutter speed and is effectively widened beyond the physical frame width at low shutter speeds.
You determine this with a point light source that hits a detector, so yes an LED and receiver on each side if it.
None of my cameras have a shutter, so no speed to measure.
I thought I still.lived in the past.
All cameras have shutters, but not all shutters are mechanic.
Won’t give an accurate result on focal plane shutters for the reason stated by Wesley. The shutter does not simply “open and close” in a set time. It has two curtains which travel across the film. First the lead curtain moves, then the trailing curtain. At very slow speeds the film iscompletely exposed for a given length of time but at most speeds there is a variable width moving gap the exposes the film sequentially. The gap width determines the exposure. This device can’t measure that.
The gap width determines the shutter speed. At particularly low shutter speeds the effective gap width is expanded by the delay in the trailing curtain being more than the frame width.
The gap width moves across a point on the film in a set period of time. The exposure of the film at a particular lens f stop is determined by how long that part of the film is exposed to the light coming through the slit.
The time that it takes for the start of the slit passing by, to the end of the slit passing by is whats being measured as the exposure time, the width of the slit is what sets the time.
If you measure a point on the film from when the leading curtain passes (light on) to when the trailing curtain passes (light off) that’s the exposure time. The width of the slit is not what’s being measured (even though its a surrogate for the exposure time).
I’ve done something just like this a while back! https://github.com/guax/shutter-meter