A vintage film camera with a bright light emitting diode shining through it, next to electronic equipment to measure the shutter speed

Clock Your Camera With This Shutter Speed Tester

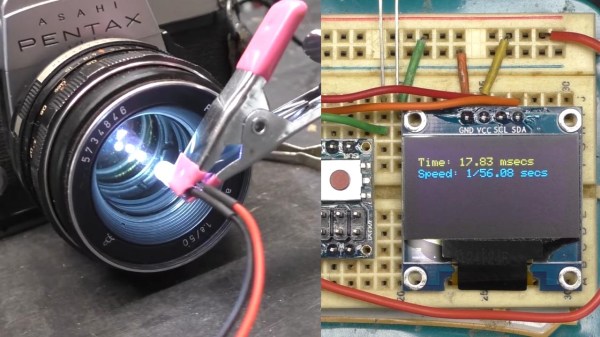
Camera shutter speed is an essential adjustment in photography – along with the aperture, the shutter moderates the amount of light entering the camera. Older cameras (and some newer ones) use mechanical shutters that creep out-of-spec over the years, so [Dean Segovis] built a handy shutter speed tester.

With just a handful of basic components, this project is a great one for beginners to sink their teeth into. The tester is based around a photoresistor that measures light from another source (a flashlight) that travels through the camera body. When the shutter on the camera is released, the shutter speed can be measured and displayed on the OLED screen. An Arduino naturally handles all the computational duties. The whole thing can be easily assembled on a breadboard in just a couple of minutes.

The original project by [hiroshootsfilm] is over on Project Hub, however [Dean] takes a deeper dive with some code troubleshooting, as well as trying out a variety of old film cameras with the breadboard tester. His testing revealed that the photoresistor was better able to detect shutter speed when the camera lens was removed, which is a hot tip for anyone else that wants to try this.

While it’s not surprising that these older cameras are having trouble with their mechanical shutters, this little tester would be an invaluable tool when it comes time to start tweaking shutter mechanisms. If this project has brought out the shutterbug in you, make sure to check out this brain transplant for a Polaroid 100-series Packfilm camera that we covered way back in 2011.

Continue reading “Clock Your Camera With This Shutter Speed Tester”

A Computer-controlled Shutter For Polaroid Packfilm Cameras

[Georg] wanted to modify his old Polaroid land camera so he could have control over the exposure time. The resulting project is a neat hack, if we say so ourselves.

The stock electronics in Polaroid 100-series Packfilm cameras were a simple analog computer that integrates current through a light-sensitive resistor. This is a simple, low tech way to make sure the exposure time is correct. The usual mod would be to replace photoresistor with a potentiometer, but [Georg] had little success with this modification. After tearing the old hack out of the camera, [Georg] replaced the ancient electronics with a a PIC microcontroller, and is now able to control the shutter in increments down to 1/512th of a second.

Shutter timing is read by a PIC12F629 μC with a BCD encoder. [Georg] kept the shutter magnet setup, and also added a ‘BULB’ routine that holds the shutter open as long as the button is held down. The test photos are quite nice, even if from a 1960s Polaroid Land Camera. Check out the video of [Georg] running though the shutter settings after the break.

Continue reading “A Computer-controlled Shutter For Polaroid Packfilm Cameras”

StereoData Maker


So you got CHDK working on your camera, and the histograms, raw image files, variable shutter speeds and other added functions are amazing, but stereo imaging is what you really want. If you have two or more CHDK-ready cameras, it’s cheap and easy to run StereoData Maker, a system that synchronizes the shutter and flash of multiple cameras.

The first step in getting SDM to work is installing the software on your SD card. You’ll need to find the correct version for you camera; a list is available on the main SDM page. If you are running Windows XP or Vista, run the installer in the zip file. Otherwise, load the files on the SD card and run the installer directly from the camera. Then decide whether this will be the right or left camera and repeat the steps for your second camera.

Next, you’ll need to prepare a switch unit, essentially a set of synchronized USB remotes. There are many ready made commercial units available, but building one on your own shouldn’t be much trouble, and a few ideas are provided on the SDM instruction page.

You’re basically ready to start shooting stereo images, just take a few test shots to get used to it and to customize the configuration on the cameras.