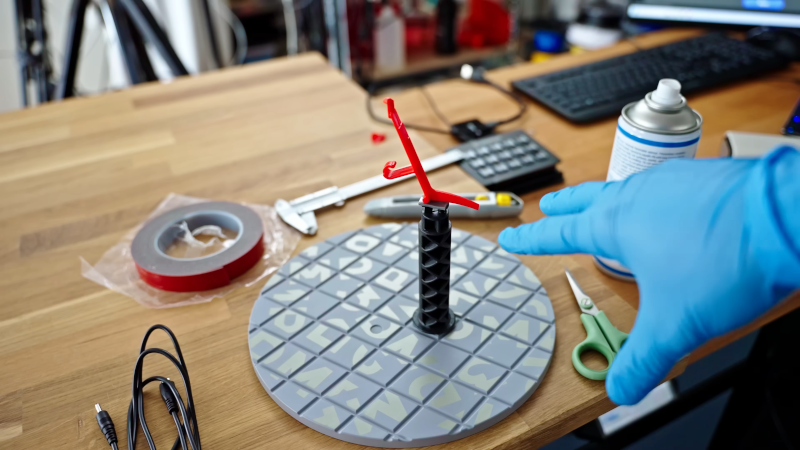
We like [Thomas Sanladerer], so when we say his channel has gone in the toilet, we mean that quite literally. He had a broken toilet and wanted to compare options for effecting a 3D printed repair. The mechanism is a wall-mounted flush mechanism with a small broken plastic part. Luckily, he had another identical unit that provided a part that wasn’t broken.
The first attempt was to 3D scan the good part. The first scanner’s software turned out to be finicky, and [Thomas] finally gave up on it. He finally used a handheld scanner which took about a half hour. It wasn’t, of course, perfect, so he also had to do some more post-processing.
The next step was to make measurements and draw the part in CAD. It took the same amount as the scan, and it is worth noting that the part had curves and angles — it wasn’t just a faceplate. The printed results were good, although a measurement error made the CAD model bind a bit instead of pivoting the way it should. The scan, of course, got it right.
A quick revision of the design solved that problem but, of course, it added some time to the process. At the end, he noticed that the scanned “good” part was also broken but in a different way. He added the additional part, which didn’t seem to bother the function. The scanned object required a little trimming but nothing tremendous.
In the end, the scanning was a bit quicker, partly because it didn’t suffer from the measurement error. However, [Thomas] noted that it was more fun to work in CAD. We thought the results looked better, anyway. [Thomas] thinks the scanners, at least the budget ones, are probably better for just getting reference objects into CAD to guide you when you create the actual objects to print.
It isn’t hard to make a cheap scanner. Some of the open designs are quite sophisticated.


One thing about Thomas – he is a really great YouTuber…But I find his “engineering” and 3d printing skills lacking – although these in this video look good. But in the past, he’s said and done things that are just flat out wrong. So take what he has to offer with a grain of salt. (Well, I guess that goes for all of youtube)
Who is today’s sponsor?
Some VPN? I skipped over that bit.
Mind sharing examples?
this. The flimsy injection molded part he remodeled as flimsy is a shining example. No need to save on material on a small 3d modeled part, a little more meat would even be beneficial for longevity..
Great comparo between scanning and designing!
He’s got _tons_ of experience with the CAD side, though, so that’s a bit unfair — if you were a CAD newb, you’d have a long slog ahead of you to get where he is. That said, he decides to model all of the unnecessary features of the part to handicap himself, so maybe it’s a wash?
He also “cheats” a bit when he discovers that his part had a feature missing. Making the missing feature in CAD was an easy step, while getting a scan of something that’s not there is… impossible. So he ends up adding it on in what is essentially a CAD step in the scanning procedure.
But the comparo is busted anyway. The real takehome here is that scanning and design are two entirely different tools, for different ends. If you want a part, design it. But if you want a part to fit with a complex situation, scan the situation to help you design the part. I think that’s about right. I already do that with importing images into CAD, and scanning must be like that ++.
Very illuminating vid!
Unnecessary in his opinion, but why were those bits made so in the first place? The original engineer would have made it simpler if he didn’t have to, so there was probably some point – like adding rigidity where needed, flexibility where things might experience too much stress… etc.
Or it might be that the original engineer just added those features by the seat of his pants and they were unnecessary – we don’t know until we try, or analyze the situation in simulation, or calculate it. That’s the challenge of reverse engineering – copying features can be cargo cult, but omitting them may be missing something important.
The part has to be molded, it needs to hold up to force in different directions, etc.
You have different constraints in the 3DP version, so it could look totally different.
I’ve bought a scanner specifically to design accessories and terrain for miniature wargames as it can be otherwise challenging to get a good sense of scale and proportions by eyeballing it only.
It’s honestly helped me very much getting a perfect fit for models that sometimes have complex geometries.
Can’t see myself printing directly from a scan though. Reference only it is
> The scan, of course, got it right.
Said with the confidence of someone who hasn’t dealt with all the half baked scanners out there
I also fixed my toilet with a 3D printer. I need to replace the basin when I get the chance to, which will probably be in the next 25 years or so. The top is broken and the way it works in my case is that the water goes sideways, but without the top, the water goes everywhere you don’t want it to. Made an adapter that had a 90 degree smooth angle and now the water just goes straight down. 3D printers are so handy. I’m a terrible designer, but it works and that’s great.
I used to have a small half size basin with a water tap the came on a little too strong. The water would splash back up onto the user when they tried to wash their hands.
Treasure these things. They make the world a much more amusing place to live.
I had the same thing a few months ago. The extended plastic piece of the flush lever was broken.
It was the weekend and I would have had to call my landlord first and he would have then ordered a repairman.
Had I already said that happened on the weekend?
So lets go, degreaser (anything that cleans the fracture without residue goes), superglue and washing soda.
The first thing to do is clean the fracture.
Then superglue to the fracture and put everything back together.
Wait until the superglue has an initial strength.
Then pour washing soda over the fracture with a small spoon and drip superglue over it again.
Repeat the process layer by layer until the fracture is well protected.
Then wait 24 hours according to the instructions on the package until the adhesive has set.
Most adhesives have an initial strength (e.g. after a few minutes) and a final strength (usually after 1 to 2 days).
Next time I will simply glue a metal nail with epoxy over the fracture, which holds more than plastic.
Or just wait until Monday and call the landlord, often the part is so old that there are no spare parts and the craftsmen replace the whole cistern.
I think you mean baking soda.
Tried also superglue and washing soda on wood, works way faster than baking soda. Thanks!
Team washing Soda Here, works faster. I used often diy instand Wood. I soaked Wood dust in washing Soda diluted water and let that dry. I Put the soaked dust i a broken area some Drops of super glue and sanding. Works well. Commercial use forbidden.
People knock the toilet, but without this humble icon of simple applied engineering, our society would grind to a halt.
Dry it, then grind.
It’s a key invention of modern society, I people constantly sh*t all over it….
Actual the invention gets a level up. There are projects to get fertilizer und medicine components out off our shit, no joke real projects.
One fertiliser example is for phosphorus. Lots of people working on that.
Terra preta fromm the aztec work well. The bacteria in the coal transform everthing to fertilizer.
Plastic flush handles are a shining example of why we can’t have good things anymore. I want a rigid link not a chain to the flapper so a clogged flush can be stopped in time to prevent overflow. I’ve seen one in the past, the handle stays down and comes up at the end of the cycle. Should be code it’d save a lot of trouble.
#1 quick flush is enabled by user rather than by those 2 tiny plastic buttons with their problems.
If Tom had a duplicate part that was in perfect condition why not just use a silicone mold to replicate the part?
It’s messy and more difficult for the inexperienced?
That’s not a hack. ;^p jk…
I’d just bodge a working part out of a wire coat hanger. No need for all this scanning, drafting, designing, printing. Ten minutes with pliers and done forever; it will last longer than the loo.
I guess when you have a massive following on a YouTube channel, you steer your fixes to 3D printing so you can create another video. Or you you start a wire twisting channel, just depends what you think would be more successful.
Precisely. We can tell when a favorite channel is circling the drain because they’re struggling to make new content, fishing for suggestions, taking on a new terrible project, etc.