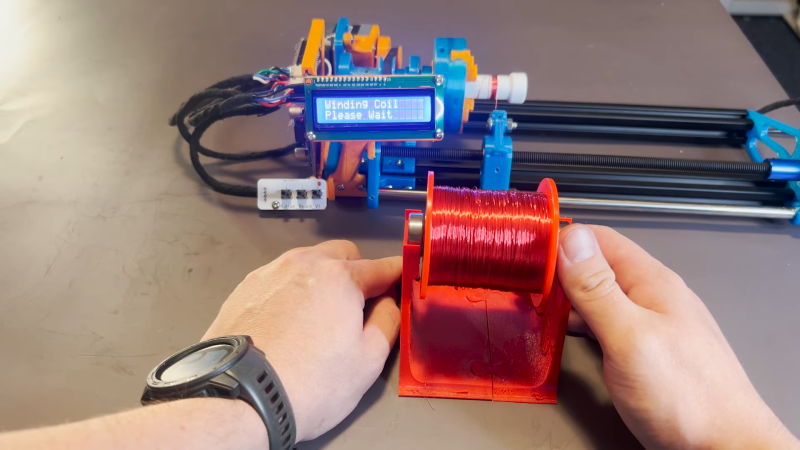
Coil winders are a popular project because doing the deed manually can be an incredibly tedious and time consuming task. After building one such rig, [Pisces Printing] wanted to find even further time savings, and thus designed an improved, faster version.
At it’s heart, it’s a straightforward design, using a linear rail and a leadscrew driven by a stepper motor. Control is via an Arduino Nano, with a few push buttons and a 16 x 2 LCD display for user feedback.
Often, completing a first build will reveal all manner of limitations and drawbacks of a design. In this case, the original winder was improved upon with faster stepper motors to cut the time it took to wind a coil. A redesigned PCB also specified a better buck converter power supply to avoid overheating issues of the initial design. A three-jaw lathe-style chuck was also 3D printed for the build to allow easy fixing of a coil bobbin.
Designing custom tools can be highly satisfying in and of itself, beyond the productivity gains they offer. Video after the break.


It’s not a coil winder – until it winds TOROIDS!
http://www.jovil.com/
So much for 50 years winding machine experience in the USA:
ABOUT JOVIL UNIVERSAL ZHONGSHAN
https://joviluniversal.com/about_us.aspx
Comparing a diy project to professionnal machines serms a bit unfair to me
Thanks for the link, and I’m sure those machines can wind RF balun toroids.
However, I doubt that I wind enough baluns to justify the price.
Originally, I wanted to make a joke and say “this could have been done with a 555”.
But then I thought that it’s nice that people still use air coils these days.
They’re more tedious to make, maybe, but also of good quality (Q factor) if dome with care. Especially on lower frequencies, these things still matter.
That’s why I still build spider web coils occasionally, for example. They’re looking neat, but are also fun to make. The comb coils even more so. They’re an piece of art, of culture, of craftsmanship. And they can’t be made in mass production, so they’re kind of unique and a good reason /a good excuse to getbback into homebrew. ^^ vy73s everyone.
I’m familiar with spider web coils but what at ‘comb’ coils?
Sorry, my bad. 😓 I tried to translate to English here (source word was “Wabenspule”).
What I meant was the 3D version of the spider web coil.
There are several versions/types.
Pictures here.:
https://www.welt-der-alten-radios.de/detektor-honigwabenspule-222.html
The translation mistake probably happened because of the word “honeycomb”, which means “Honigwabe” in my language.
So in my mind I somehow did associate “comb” with “Wabe”.
As a standalone word, “comb” means “Kamm”, though.
Sorry for the confusion here. 😅
Of course classically is his was done mechanically, with a lead screw that reverses direction when a stop was hit. But I suppose this approach does let you change wire sizes without having to calculate and change the gears driving the lead screw.
Lathe tumble gears work like that to reverse direction, though usually not under power.
I’ve seen dot matrix printers use a similar setup, at end of travel the gear would flip and reverse the print head without reversing the motor direction.
Then there’s this: https://www.youtube.com/watch?v=sxsctBXCuGk, that self reversing screw shows up in lot of things, eg fishing reels. Again the down side is you can’t change the coil width. You can buy them.
th for information
A mechanical counter anf a motor would be a lot more dimplr to do anf you vould drive the motor with a 555 as well
Nice! I like it very much! Subscribed on YT :)
I might steal some of the ideas you had there for a completely other field of use (Archery in a broader sense) but still the same basic task: Wind something thin from a big spool to a small spool in a neatly fashion.