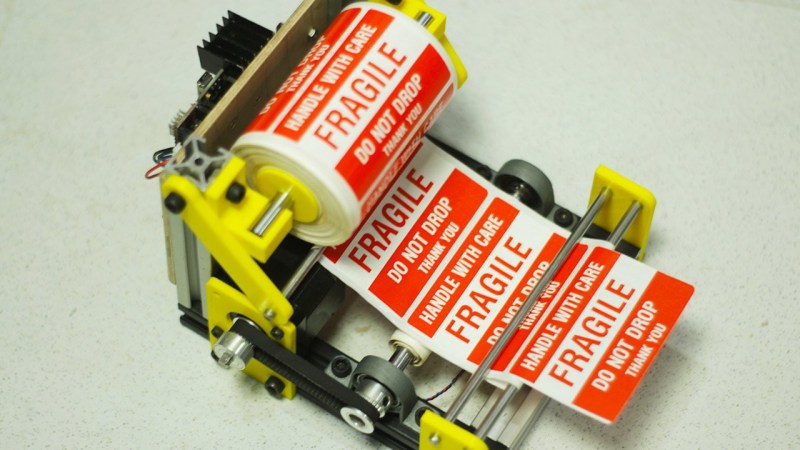
What’s the worst part about packaging up a whole lot of the same basic thing? It might just be applying the various warning stickers to the outside of the shipping box. Luckily, [Mr Innovative] has built an open-source automatic sticker dispenser that does the peeling for you, while advancing the roll one at a time quite satisfyingly.
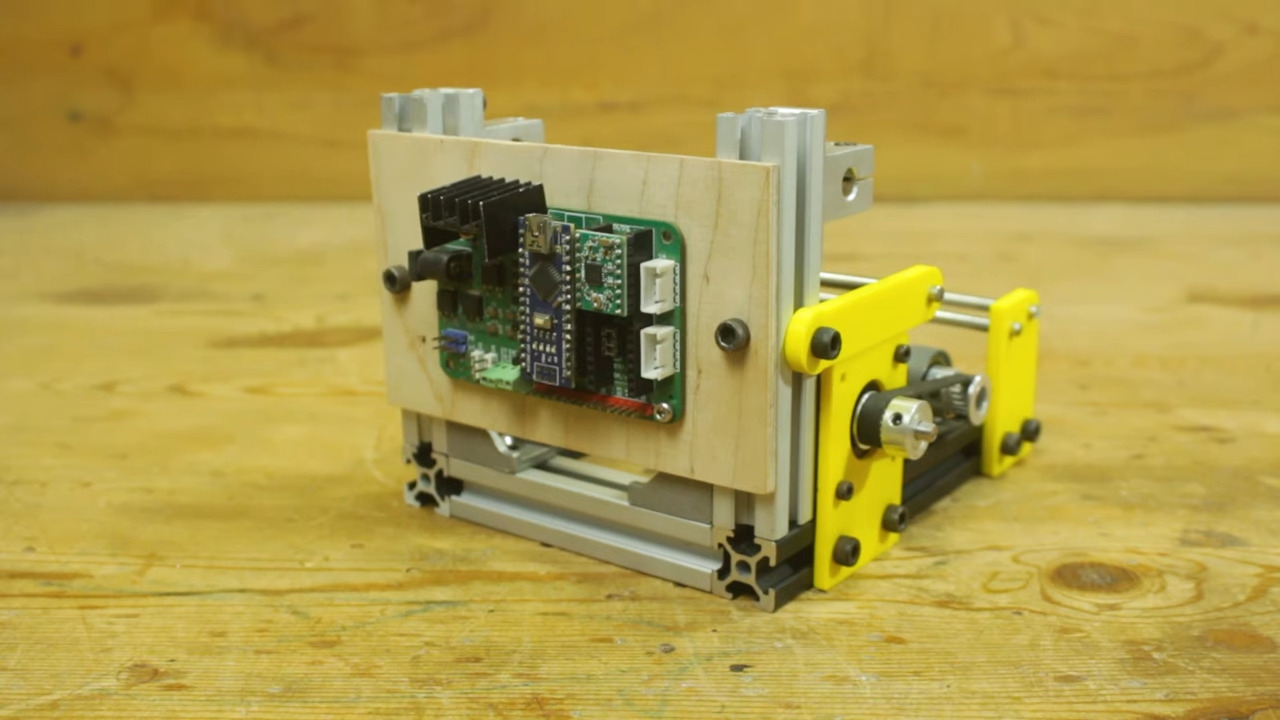 This tidy build is made primarily of 20×20 extruded aluminium and stainless steel smooth rod. All the yellow bits are 3D printed. The brains of this operation is an Arduino Nano, with an A4988 stepper motor driver controlling a NEMA17.
Our favorite part of this build is the IR sensor pair arranged below the ready sticker. It detects when a sticker is removed, then the stepper advances the roll by one sticker height. The waste is collected on a spool underneath.
Between the video and the instructions, [Mr Innovative] has made it quite simple to build one for yourself. Definitely check this one out after the break.
[Mr Innovative] may as well go by [Mr. Automation]. Check out this automated wire prep machine from a few years ago.


That’s a nice neat solution! I can see that saving a lot of time if you are labelling boxes or something.
Nifty machine. Really well thought through. I like how it it self-dislabeling. Sadly, the reality is, this sticker will do virtual zero change in handling of your package. There is practically no step in the process where a human or camera will take notice of it. There is no magic cushy sorting street made out of little pillows where packages go with a fragile sticker. There is no value for ‘fragile’ in the database that can be toggled by this sticker. They get tossed and dropped like all the other on the same conveyor belts and dropping chutes depending on the address. You could change the stickers out to a heart- or a four-leafes-glover-good-luck-emoticon and would have the same result in transport.
Actually have experiences where the fragile label causes the package to be intentionally abused
That should be an interesting experiment. Put accelerometers on board and test whether the packages get abused more when they’re labeled fragile.
You are 100% correct, additionally though in the realm of insurance and wining some damaged package cases against the service, the label is a requirement.
I can’t help but find it slightly amusing, knowing how much the industrial versions of this cost.
Add a thermal printer and save yourself a few grand.
I just forwarded the link to my work email to see if this is something worth playing with.
It’s simple, sturdy practical and effective. It may even be useful. I also like the use of standard Aluminimum profiles amended with some 3D printed details. I do have a bit doubt about the IR sensor though. That looks like the most fragile part of the whole thing. I think the commercial versions use a light sensor that shines though the label to detect some feature on it. Then you can put the sensor in a place where it does not get bumped by your hand, and you can adjust for label size by moving the sensor.
Another small improvement is to set a maximum number of steps per sensor event. (Also time limited?) That will prevent the whole roll of labels being unrolled when the sensor fails during a coffee break or similar.
But I also agree with CRJEEA. It’s unlikely this particular label will have much influence on the handling of packages. But there are plenty of other labels too.
For feature creep:
Add a counter for number of dispensed labels.
Add another axis with a pen for actually wring on the labels. Very much like that pen that wrote on painters tape.
I was also tempted to have a look at the other gadgets he designed, but then the youtube advertising kicked in and I closed the window. I can (barely) tolerate an advertisement for some pcb manufacturer halfway the video (Just skip a few minutes ahead) but youtube is getting far too annoying lately. I guess I need a better ad blocker.
Also: You can also hit the refresh button in your browser. That gets past the advertisements in the start, but don’t tell anyone, or youtube may block that too shortly.
You get ads on Youtube? uBlock and others are quite good at keeping track of YT changes so they can work around it…
Those ads started to get annoying for a while. After reading your comment I had a look at the firefox settings and updated uBlock Origin. After that I browsed around a bit on youtube and it seems to work properly again now.
I never realized you had to update those plugins manually. (I may have turned automatic updates off for plugin at some forgotten past time.) I have gotten a bit forgetful at such things because updates for nearly all programs are handled via package management on my Linux box.
Not bad but I can’t help think it would be more impressive (yet still quite possible) to make something that requires zero electronics and possibly even zero electricity – some sort of 3D printed mechanism that just advances a fixed amount each time you tug a sticker from the reel.
At most, a DC motor and a mircoswitch if you need a bit of power assistance.
In ancient days when the items in stores had price stickers on them, there sticker machines that stamped the price on a blank sticker then stuck the sticker to the item.
People stocking the shelves would set the price on the device, then spend a few minutes whacking the items with the sticker printer.
Purely mechanical, powered by the swing and whack as it hit the item being tagged.
The devices looked like an overly long rubber stamp like you’d use to stamp dates. They included a roll for blank price tages and an inkpad for inking the price stamper.
Set the price, whackit, whackit, whackit – a price tag printed and stuck with every whack.
“Fra-Gee-Lay – Must be Italian” (Ralphy’s Dad in A Christmas Story) 😁
I read this with interest since I have a small business that uses at least 3 labels per order (no fragile labels, though). Other than the video, there seems to be no documentation. While the video is fine (except maybe lose the annoying music), I would really like to see a BOM (ie parts list) with suppliers, STLs for the 3DP parts and a 3D model. My needs are to handle sheet labels so I would have to modify the design. I think a manual version is more likely to be in my future. The key is a sharp bend in the backing material causes the label to come off.
This lack of documentation in projects seems to be increasingly common. Do a video and done. And while, the above video does have a lot of information in it, how hard is it to write down a BOM?
He doesn’t work for you. Perhaps you could hire him to provide documentation as a service to your small business?
meh, I provide that level of documentation for projects I do. Even the free ones. It used to be that most projects had at least a BOM. What’s the point of sharing if people have to recreate everything you did???
The orange link in the hackaday article links to a hackaday.io project with more info. It has some screenshots, simple BOM and the arduino code (about 20 lines) is in the comment. The PCB used is an “universal” motor driver pcb and one of his earlier projects. If you look at the description under his youtube video, it has links to google drive, facebook and other sites I do not go to myself.