
The Raspberry Pi is a popular choice if you’re looking to put together a simple emulation box — it’s relatively cheap, small enough to tuck into pretty much any entertainment center, and benefits from a large and vibrant development community. You can even get enclosures that will dress the Linux single-board computer up like a miniature version of your favorite retro console. But what about the old school PC gamers who want to relive their glory days in a palm-sized package?
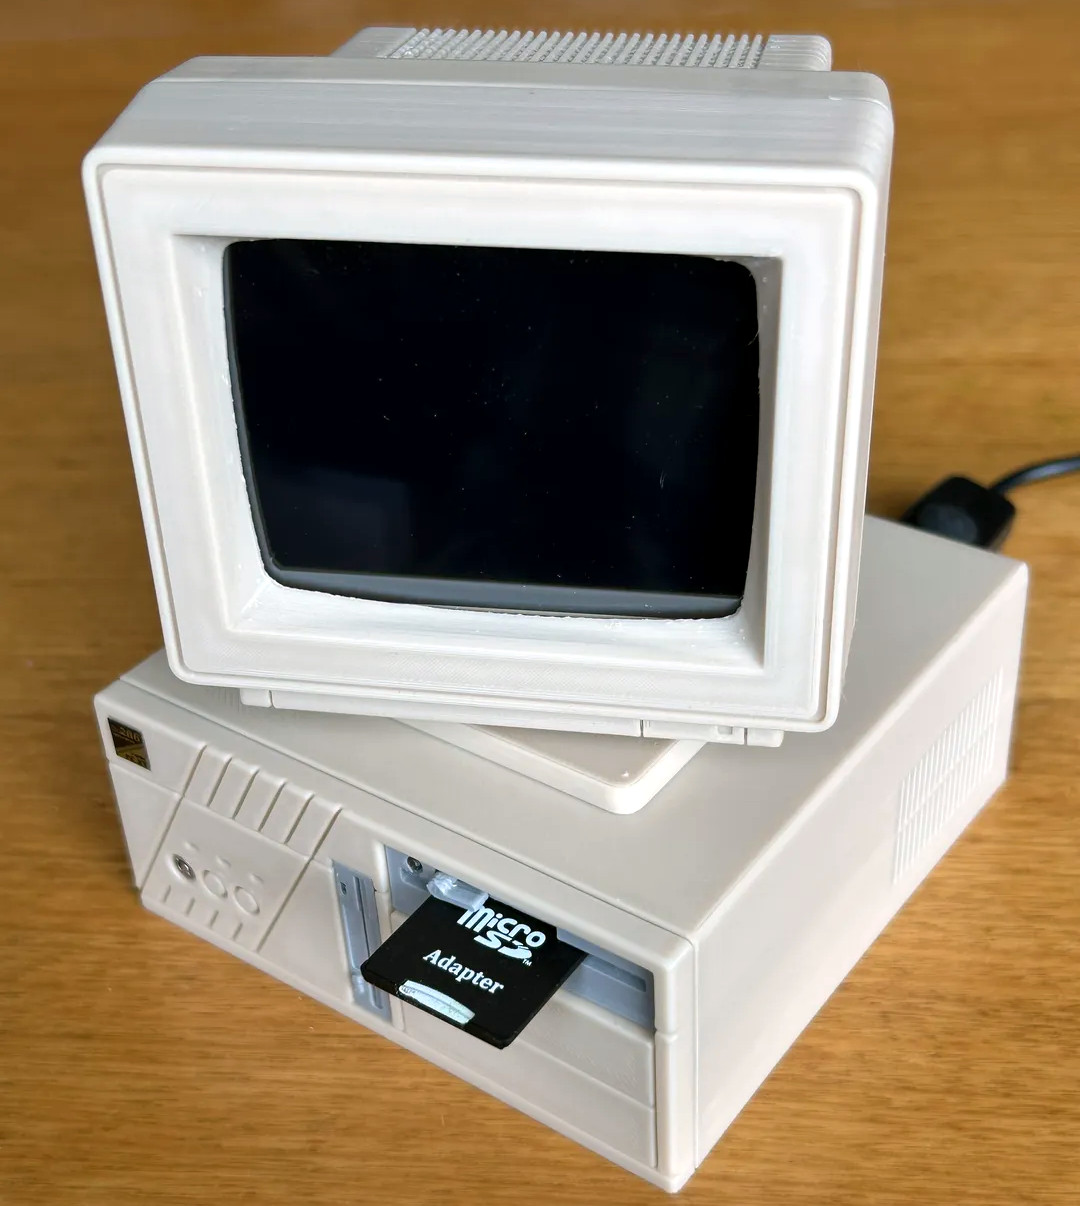 Well, if you’ve got a 3D printer, [fantasticmrdavid] might have just the solution for you. This second iteration of his printable Raspberry Pi enclosure is designed to look like the 286 desktop that he had in his youth, complete with a functional “floppy drive” in the front that takes an SD card. With a 3.5 inch MPI3508 LCD up in the “monitor” and a copy of DOSBox on the SD card, you’re well on your way to booting up a copy of Windows 3.11 or building some contraptions in The Incredible Machine.
While the external aesthetics of the design are impeccable, we appreciate that [fantasticmrdavid] didn’t skimp on the internals. There’s mount points for dual 25 mm fans to keep the more powerful variants of the Raspberry Pi cool, and a speaker expansion board that plugs into the GPIO header to provide era-appropriate bloops and bleeps. The tiny details here really shine, like the fact that the face plates for the dual drives are designed as separate pieces so they can be printed in a different color than the main case.
If you’re not interested in the classics, don’t worry. We’ve seen the Raspberry Pi stand in foraa modern gaming PC, complete with the RGB LEDs you’d expect in a contemporary rig.


Just beautiful. <3
I love the SD FD, it’s the little details that take it over the top.
The disk drive being the sd slot is insanely cool. Love everything about this.
Remember the TURBO button. Like when you NOT keep it on?
In normal operation, you would definitely not want it on, as it slowed the machine down.
As for why you’d use it, many games were written for the clock speeds of the original PCs, and would run unplayably fast on newer systems.
Hi, some buttons worked in reverse.
The Turbo LED would show a higher frequency if the button was pressed.
It depended on the switch/wiring and mainboard, I guess? 🤷♂️
The 7-segment displays just toggled between settings, based on the button position. They didn’t read the mobo / cpu at all. There were jumper blocks on the rear in a T layout to set each segment as on for button position = In/Out/Both. My job interview for scratch building 386 PCs was to set one up (even though pointless on 386 pcs, they were still on the cheap-ass cases we had)
RE: The Incredible Machine
Great game! I should still have a floppy somewhere with that.
Beautiful build!
You might have a floppy, whether you have a floppy with that game on it… who knows?
“With a 3.5 inch MPI3508 LCD up in the “monitor” and a copy of DOSBox on the SD card, you’re well on your way to booting up a copy of Windows 3.11 or building some contraptions in The Incredible Machine.”
There’s a 320×200 256col driver in Windows 3.0a MME.
It works with Windows 3.1, too.
Might be useful on such a tiny screen.
No banana for scale ?
Just the thumb-nail sized ‘SD’ card in the floppy slot ;) .