3D printing metal has been somewhat of a holy grail for the last decade in the hobby 3DP scene. We’ve seen a number of solutions, including using expensive filaments that incorporate metal into the usual plastic. In parallel, we’ve seen ceramic printers, and paste printers in general, coming into their own. What if you combined the two?
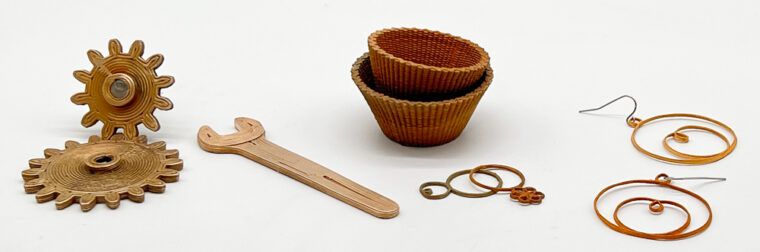
You’d get [Leah Buechly] et al’s CeraMetal process, which is the cheapest and most straightforward metal printing method we’ve seen to date. It all starts off with a custom bronze metal clay, made up of 100 g bronze powder, 0.17 g methyl cellulose, 0.33 g xanthan gum, and 9 g water. The water is fine-tuned to get the right consistency, and then it’s extruded and sintered.
The printer in question is an off-the-shelf ceramic printer that appears to use a pressurized clay feed into an auger, and prints on a linen bed. [Leah] had to write a custom slicer firmware that essentially runs in vase mode but incorporates infill as well, because the stop-start of normal slicers wreaked havoc with clay printing.
 The part is then buried in activated carbon for support, and fired in a kiln. The result is a 3D printed bronze part on the cheap; the material cost is essentially just the cost of the metal powder and your effort.
We had never heard of metal clay before, but apparently jewelers have been using it for metals other than just bronze. The Metal Clay Academy, from the references section of the paper, is an amazing resource if you want to recreate this at home.
Paste printers are sounding more and more interesting. Obvious applications include printing chocolate and printing pancakes, but now that we’re talking metal parts with reasonably consistent shrinkage, they’ve got our attention.


Seems you’d be better off printing a mold and pressing in your metal clay.
I’ve recently learned about a process of injection molding parts which is quite similar to what you describe. It’s a similar powder and binder mixture, which is molded into oversized parts which shrink in the sintering process. It should be fine to do as you suggested, create a mold and pressing the clay into it. The clay consistency is likely easily workable by hand. The biggest hurdle in this process is the baking, which takes about 20h in total, according to the paper.
I’ll certainly add this to the list of solutions, maybe I’ll find a problem which can use it.
Possibly, though metal clay has quite a bit of shrinkage (looking at the graphs so does this approach, to be fair). I would think getting much precision (like the wrench) could be hard with a mold.
I don’t think it stretches the 3d priniting definition to much, it’s like FDM but it also requires postprocessing like SLA requires.It’s certainly 3D metal printing, because the material is almost 100% metal and it uses the same technique as FDM only with a different extruder than we,have seen before. The best part is that this technique seems within reach of hobbyists.
‘Printing’ implies taking a mostly finished object from the machine.
As I said, this IS technically printing with metal, but if you read the paper and references, the post processing is pretty complex.
It is just barely on this side of the other kind of metal 3d printing projets that show up here where someone prints in PLA, covers it in ceramic, bakes the PLA out, and casts with the resulting mold.
This in contrast with “real” metal printing like powder sintering or direct deposition (like a MIG welder).
As I said, at least it isn’t the usual garbage 3d printing clickbait stuff they normally post here.
This is a groundbreaking approach to metal 3D printing! Combining ceramic and metal printing methods for a more affordable and accessible solution is truly innovative.
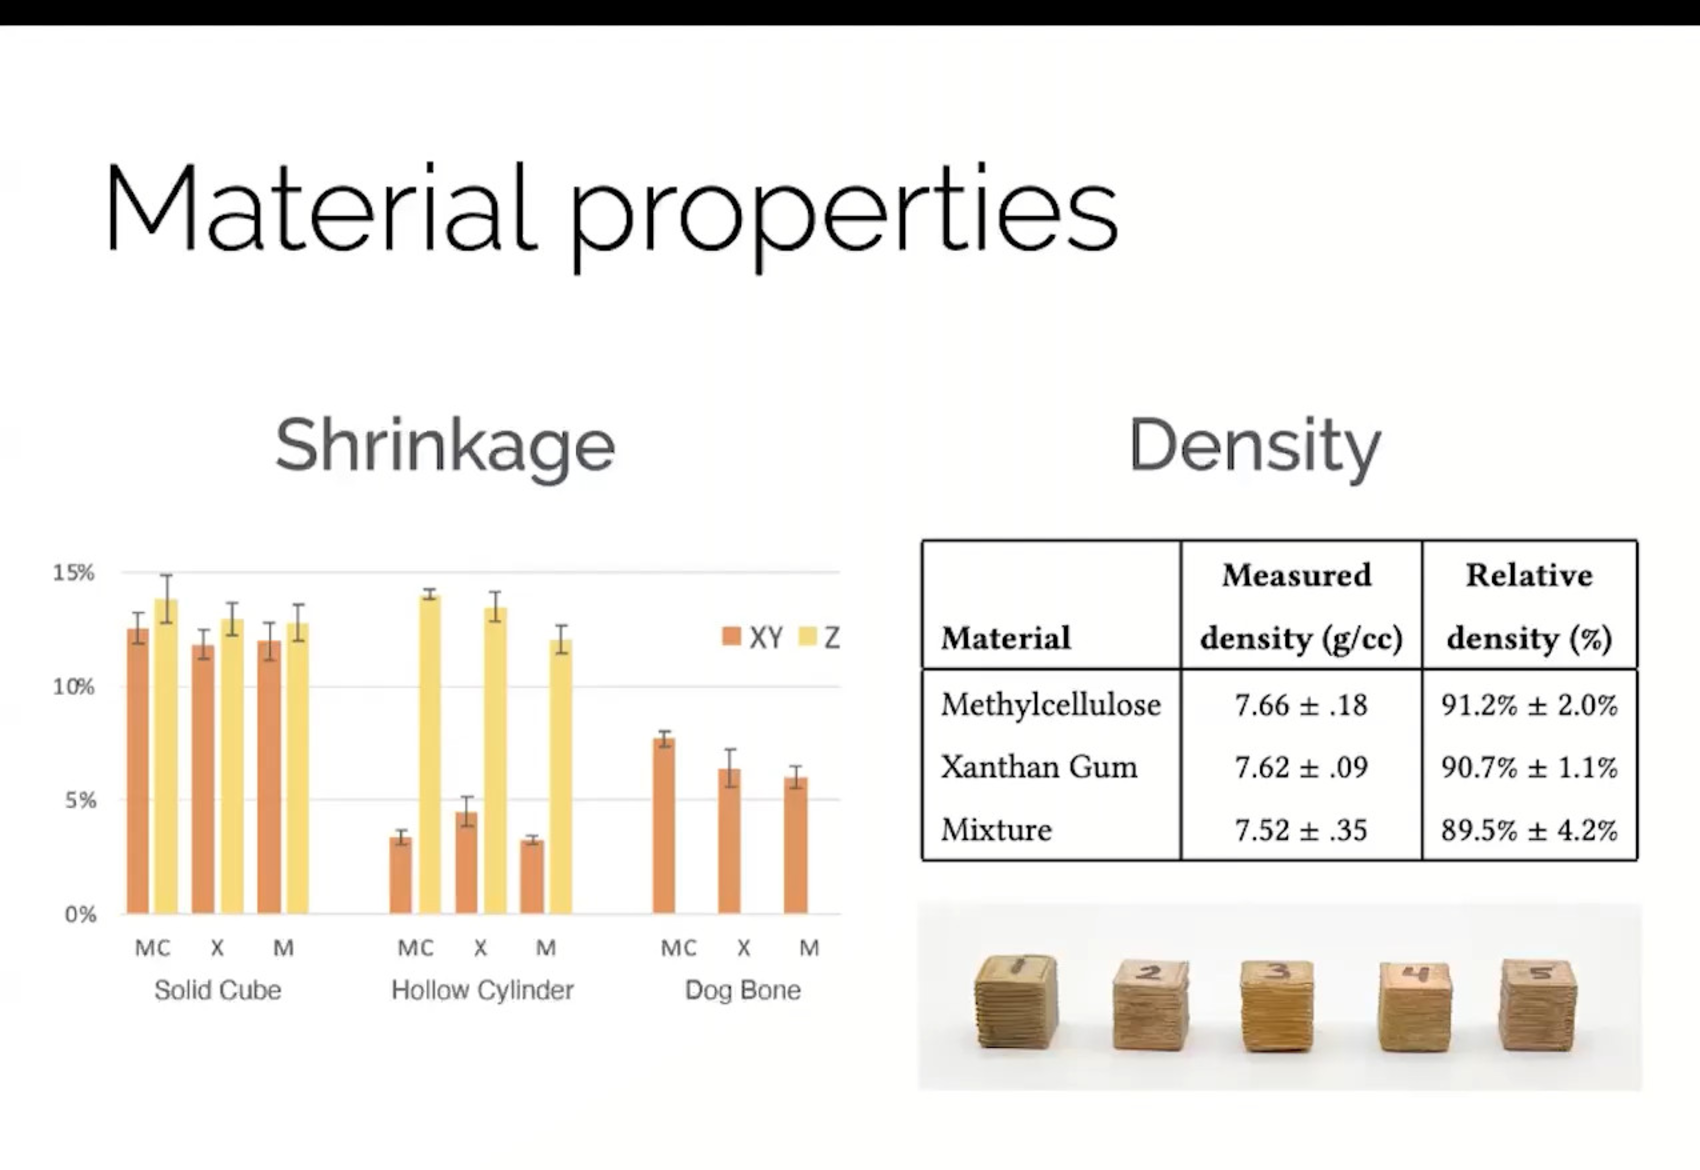
Its important to note that metal clay SHRINKS when fired. 25-30% is pretty common in the PMC Ive used in jewelry work but there are some that only shrink ~10%. Given that these are paste consistency Id expect their shrinkage to be high.
Theres also a tendency for parts to warp a bit during consolidation, so its definitely not great for any sort of precision parts. YMMV
I’d make a very rough guess that these shrink about 10%, because they’re 100g metal, 10g water. Jewelry PMC is closer to 60% metal, 40% clay, so it has like 30% shrinkage.
You’re forgetting that those are measures of mass, not volume – bronze has a density of 7.4-8.9g/cm³, while water has a density of 1g/cm³. So, you have 10cm³ of water and between 11.2-13.5cm³ of bronze.
There is going to be serious shrinkage.
Much of that initial water is evaporating as it is extruded.
The printing process itself should include the adjustments required to account for that, since it will effect the layer height as thy are being laid down.
The shrinkage from dried part to sintered part looks to be pretty low.
And when you try this play-dough version and want to graduate to the adult version, Dan Gelbart has you covered: https://www.rapidia.com/
In Gelbart’s system, the metal is stored in an inert environment. How is this bronze powder paste kept from oxidizing? Or, what’s the shelf life of the paste?
Exposed surfaces of bronze PMC will oxidize but not to a significant depth. Its recommended to scrape away any dark brown to black stained areas and only use the fresh clay beneath. Most PMC has a 2-3 year shelf life in properly sealed containers and syringes.
Doesn’t this shrink in the kiln? Unless it does so in an extremely precisely predictable manner, which the slicer can compensate for, then that ruins the key point of 3d printing, which is to have a physical object made which is true to your CAD design’s dimensions.
This is the real world… nothing you make is “true” to your CAD model.
You just need to understand the required tolerance, and what the materials are going to do.
I feel like this underestimates the work involved in the simple sentence that Leah wrote a custom slicer, _in addition to_ figuring out how the rest of this worked.
Auger?
Auger mechanism: The printer incorporates an auger, which is a screw-like component that helps control and regulate the extrusion of the clay material. The auger system allows for more precise control over the material flow compared to simple pressure-based extrusion.
(via perplexity.ai, since i had to look it up myself)
How about you give proper attribution?
Oh, that’s right, you can’t. That “ai” gave you the answer it had in it’s database, but it didn’t tell you where it came from…
LLMs are theft.
You just stole someone’s work and then attributed it to an “ai”.
It’s very obvious you’ve never used perplexity.ai as it cites all of its sources. Of all the companies to rail against you choose the one that cites it’s sources and has a revenue sharing plan for web publishers.
Ian, you seem to have a lot of strong opinions about technology for someone who probably uses a smartphone every day. Perhaps you should invent a time machine and go back to the era of typewriters and rotary phones. But be sure to give proper attribution to H.G. Wells for the idea.
Signed Chatgpt ;)
The link below is 99% same post processing steps but has the advantage that it can be printed on a normal FDM extrusion machine (have personally done it with a prusa mk3) with minor adjustments to nozzle temp, print speed, and flow rate. Needs .6 hardened steel nozzle, but printing inconel parts for under 1k? Priceless. Also you don’t get your hands (and lungs) dirty rolling your own paste or making your own slicer. Not saying it’s not cool or impressive, just saying there’s a shallower on ramp to entry level metal 3d printing. I usually find the trade off between price vs my time is worth spending the $ for most of the time…. But hey making your own stuff is fun sometimes too!
https://thevirtualfoundry.com/
Honestly a bit surprised I haven’t seen it on hackaday sooner.
Cheers
>Honestly a bit surprised I haven’t seen it on hackaday sooner.
Metal filled FDM is mentioned in this article…
>We’ve seen a number of solutions, including using expensive filaments that incorporate metal into the usual plastic.
But its certainly not the first time the subject nor virtual foundrys offerings have been mentioned here….
in 2016
https://hackaday.com/2016/12/09/maybe-you-can-print-in-metal/
in 2018
https://hackaday.com/2018/03/26/cutting-edge-of-3d-printing-revealed-at-last-weekends-mrrf/#more-300799
and twice in 2021
https://hackaday.com/2021/07/09/3d-printed-copper-rocket-nozzle-costs-under-two-grand/
https://hackaday.com/2021/08/11/3d-printing-steel-parts-at-home-via-special-filaments/
The page is blank for me, but I found a link to a different page that works:
https://thevirtualfoundry.com/getting-started-with-filamet/
Yeah, that’s the “expensive filament” in the article. Leah’s mix is like $30/kg.
I think this is an excellent option for people who understand the constraints of the process. The people that didn’t can keep complaining that this isn’t “real” metal printing or whatever they imagine the limitations of this technology is. Metal clay has been around for years and to be fair I saw diy printers using it almost a decade ago. This isn’t really new but it is a novel way to make parts that are close to tolerance. Even “real” metal printing has shrinkage and warping and may require some post printing machining. The benefit is that that machining may only be 1 or two surfaces and a handful of holes instead of an entire part.
“a pressurized clay feed into an augur”
Don’t try this this at home, it might lead to divine wrath.
Fixed. Thanks.