CeraMetal Lets You Print Metal, Cheaply And Easily

3D printing metal has been somewhat of a holy grail for the last decade in the hobby 3DP scene. We’ve seen a number of solutions, including using expensive filaments that incorporate metal into the usual plastic. In parallel, we’ve seen ceramic printers, and paste printers in general, coming into their own. What if you combined the two?

You’d get [Leah Buechly] et al’s CeraMetal process, which is the cheapest and most straightforward metal printing method we’ve seen to date. It all starts off with a custom bronze metal clay, made up of 100 g bronze powder, 0.17 g methyl cellulose, 0.33 g xanthan gum, and 9 g water. The water is fine-tuned to get the right consistency, and then it’s extruded and sintered.

The printer in question is an off-the-shelf ceramic printer that appears to use a pressurized clay feed into an auger, and prints on a linen bed. [Leah] had to write a custom slicer firmware that essentially runs in vase mode but incorporates infill as well, because the stop-start of normal slicers wreaked havoc with clay printing.

The part is then buried in activated carbon for support, and fired in a kiln. The result is a 3D printed bronze part on the cheap; the material cost is essentially just the cost of the metal powder and your effort.

We had never heard of metal clay before, but apparently jewelers have been using it for metals other than just bronze. The Metal Clay Academy, from the references section of the paper, is an amazing resource if you want to recreate this at home.

Paste printers are sounding more and more interesting. Obvious applications include printing chocolate and printing pancakes, but now that we’re talking metal parts with reasonably consistent shrinkage, they’ve got our attention.

Print Wave Metal Casting

Direct 3D printing of metal remains out of reach for the hobbyist at the moment, so casting is often the next best thing, particularly given the limitations of 3D printed metals. [Denny] from Shake the Future shows us how to simplify the process with “print wave metal casting.”

The first step of printing a PLA object will seem familiar to any 3D print to metal process, but the main differentiator here is pouring the investment casting on the printer build plate itself. We like how he used some G-code to shake the build plate to help remove bubbles. Once the plaster solidifies, the plastic and mold are placed in the microwave to soften the plastic for removal.

The plaster is dried in an oven (or air fryer) and then [Denny] bolts the mold together for the casting process. Adding a vacuum helps with the surface finish, but you can always polish the metal with a generous helping of elbow grease.

If [Denny] seems familiar, you might remember his very detailed breakdown of microwave casting. We’ve seen plenty of different approaches to metal casting over the years here. Need a part in another material? How about casting concrete or resin?

Thanks to [marble] on the Hackaday Discord for the tip!

Continue reading “Print Wave Metal Casting”

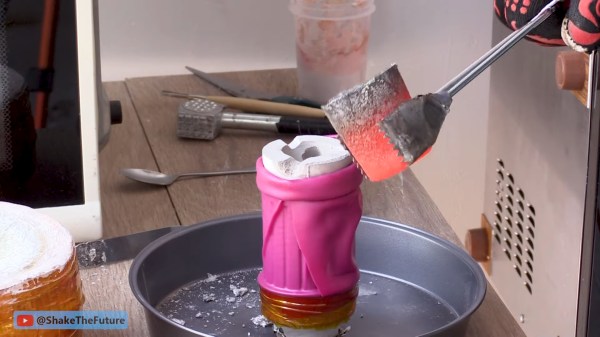
A red hot crucible is held with metal tongs above a white plaster mold. The mold is held in a bright pink silicone sleve atop a metal pan on a wooden workbench. Red cheese wax holds the sleeve to a metal funnel connected to a vacuum cleaner.

Lost Print Vacuum Casting In A Microwave

Hacks are rough around the edges by their nature, so we love it when we get updates from makers about how they’ve improved their process. [Denny] from Shake the Future has just provided an update on his microwave casting process.

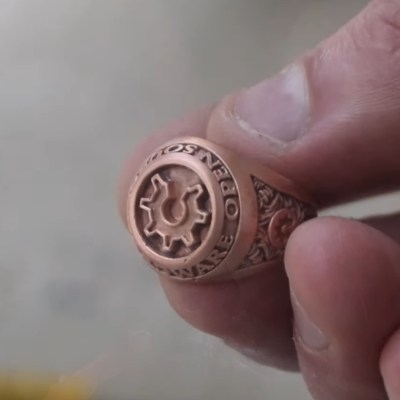
Sticking metal in a microwave certainly seems like it would be a bad idea at first, but with the right equipment it can work quite nicely to develop a compact foundry. [Denny] walks us through the process start to finish in this video, including how to build the kilns, what materials to use, and how he made several different investment castings using the process. The video might be worth watching just for all the 3D printed tools he’s built to aid in the process — it’s a great example of useful 3D prints to accompany your fleet of little plastic boats.A hand holds a very detailed copper ring. It is inscribed with the words "Open Source Hardware" and the open gear logo associated with open source hardware. It looks kinda like a class ring.

A lot of the magic happens with a one minute on and six minutes off cycle set by a simple plug timer. This allows a more gradual ramp to burn out the PLA or resin than running the microwave at full blast which can cause some issues with the kiln, although nothing catastrophic as demonstrated. Vacuum is applied to the mold with a silicone sleeve cut from a swimming cap while pouring the molten metal into the mold to draw the metal into the cavities and reduce imperfections.

We appreciate the shout out to respirators while casting or cutting the ceramic fiber mat. Given boric acid’s effects, [PDF] you might want to use safety equipment when handling it as well or just use water as that seems like a valid option.

If you want to see where he started check out this earlier version of the microwave kiln and how he used it to make an aluminum pencil.

Continue reading “Lost Print Vacuum Casting In A Microwave”

A Guide For Heat-Treating Steel At Home

A lot of colloquial words that we might use when describing something’s durability take on extremely specific meanings when a materials scientist or blacksmith uses them. Things like “strength”, “toughness”, “hardness”, and “resilience” all have different meanings when working in a laboratory or industrial setting than most people might otherwise think.

For the beginner metalworker, this can be a little bit confusing at first but some hands-on practice will help. To that end, this beginner lesson in heat-treating steel from [Blondihacks] demonstrates why it can be beneficial to trade some of the metal’s toughness for improved hardness and just how to accomplish it on your own.

The first part of the lesson is to make sure the steel is high-carbon steel, since most other steels aren’t able to be heat treated. It will also have a specific method for its quenching, either in oil, water, or some other medium. But beyond that the only other thing required for this process is a torch of some sort. [Blondihacks] is using a MAP-Pro torch to get the steel up to temperature, which is recognizable when it turns a specific orange color. From there all that’s needed is to quench the hot metal in whatever fluid is called for. At this point the metal can also be tempered, which restores some of its toughness while maintaining a certain amount of hardness.

While the process doesn’t require specialized tools, [Blondihacks] does have a hardness tester, a fairly expensive piece of instrumentation that measures how deeply the metal can be indented by a force. By measuring the size of the indentation made by the tool, the hardness can be determined. As it’s many thousands of dollars this is mostly for demonstration and not necessary for most of us, but does go a long way to demonstrate the effectiveness of heat treating and tempering in an otherwise simple environment. If you’re looking for excuses to start heat treating and tempering metal, here’s a great project which creates a knife nearly from scratch.

Continue reading “A Guide For Heat-Treating Steel At Home”

Rocket Stove Efficiently Heats Water

Rocket stoves are an interesting, if often overlooked, method for cooking or for generating heat. Designed to use biomass that might otherwise be wasted, such as wood, twigs, or other agricultural byproducts, they are remarkably efficient and perform relatively complete combustion due to their design, meaning that there are fewer air quality issues caused when using these stoves than other methods. When integrated with a little bit of plumbing, they can also be used to provide a large amount of hot water to something like an off-grid home as well.

[Little Aussie Rockets] starts off the build by fabricating the feed point for the fuel out of steel, and attaching it to a chimney section. This is the fundamental part of a rocket stove, which sucks air in past the fuel, burns it, and exhausts it up the chimney. A few sections of pipe are welded into the chimney section to heat the water as it passes through, and then an enclosure is made for the stove to provide insulation and improve its efficiency. The rocket stove was able to effortlessly heat 80 liters of water to 70°C in a little over an hour using a few scraps of wood.

The metalworking skills of [Little Aussie Rockets] are also on full display here, which makes the video well worth watching on its own. Rocket stoves themselves can be remarkably simple for how well they work, and can even be built in miniature to take on camping trips as a lightweight alternative to needing to carry gas canisters, since they can use small twigs for fuel very easily. We’ve also seen much larger, more complex versions designed for cooking huge amounts of food.

Continue reading “Rocket Stove Efficiently Heats Water”

IBM Selectric Typewriters Finally Get DIY Typeballs

IBM’s Selectric line of typewriters were quite popular in the 1960s, thanks in part to an innovation called the typeball which allowed for easy font changes on a single machine. Unfortunately, as if often the case when specialized components are involved, it’s an idea that hasn’t aged particularly well. The Selectric typewriters are now around 60 years old and since IBM isn’t making replacement parts, those restoring these machines have had to get somewhat creative like using a 3D printer to build new typeballs.

It sounds like it would be a simple, but much like the frustration caused with modern printers, interfacing automated computer systems with real-world objects like paper and ink is not often as straightforward as we would like. The main problem is getting sharp edges on the printed characters which is easy enough with metal but takes some more finesse with a printed plastic surface. For the print, each character is modelled in OpenSCAD and then an automated process generates the 3D support structure that connects the character to the typeball.

This process was easier for certain characters but got more complicated for characters with interior sections or which had a lot of sharp angles and corners. Testing the new part shows promise, although the plastic components will likely not last as long as their metal counterparts. Still, it’s better than nothing.

Regular Hackaday readers may recall that the ability to 3D print replacement Selectric typeballs has been on the community’s mind for years. When we last covered the concept in 2020 we reasoned that producing them on resin printers might be a viable option, and in the end, that does indeed seem to have been the missing element. In fact, this design is based on that same one we covered previously — it’s just taken this long for desktop resin 3D printing technology to mature enough.

Robot 3D Prints Giant Metal Parts With Induction Heat

While our desktop machines are largely limited to various types of plastic, 3D printing in other materials offers unique benefits. For example, printing with concrete makes it possible to quickly build houses, and we’ve even seen things like sugar laid down layer by layer into edible prints. Metals are often challenging to print with due to its high melting temperatures, though, and while this has often been solved with lasers a new method uses induction heating to deposit the metals instead.

A company in Arizona called Rosotics has developed a large-scale printer based on this this method that they’re calling the Mantis. It uses three robotic arms to lay down metal prints of remarkable size, around eight meters wide and six meters tall. It can churn through about 50 kg of metal per hour, and can be run off of a standard 240 V outlet. The company is focusing on aerospace applications, with rendered rocket components that remind us of what Relativity Space is working on.

Nothing inspires confidence like a low-quality render.

The induction heating method for the feedstock not only means they can avoid using power-hungry and complex lasers to sinter powdered metal, a material expensive in its own right, but they can use more common metal wire feedstock instead. In addition to being cheaper and easier to work with, wire is also safer. Rosotics points out that some materials used in traditional laser sintering, such as powdered titanium, are actually explosive.

Of course, the elephant in the room is that Relativity recently launched a 33 meter (110 foot) tall 3D printed rocket over the Kármán line — while Rosotics hasn’t even provided a picture of what a component printed with their technology looks like. Rather than being open about their position in the market, the quotes from CEO Christian LaRosa make it seem like he’s blissfully unaware his fledgling company is already on the back foot.

If you’ve got some rocket propellant tanks you’d like printed, the company says they’ll start taking orders in October. Though you’ll need to come up with a $95,000 deposit before they’ll start the work. If you’re looking for something a little more affordable, it’s possible to convert a MIG welder into a rudimentary metal 3D printer instead.