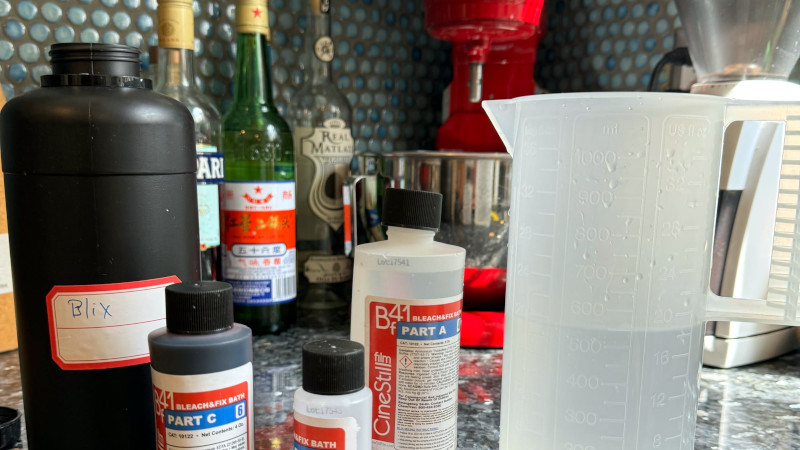
We’re now somewhere over two decades since the mass adoption of digital photography made chemical film obsolete in a very short time, but the older technology remains in use by artists and enthusiasts. There’s no longer a speedy developing service at you local mall though, so unless you don’t mind waiting for one of the few remaining professional labs you’ll be doing it yourself. Black-and-white is relatively straightforward, but colour is another matter. [Jason Koebler] has set up his own colour processing lab, and takes us through the difficult and sometimes frustrating process.
From an exhaustive list of everything required, to a description of the ups and downs of loading a Patterson tank and the vagiuaries of developer chemicals, we certainly recognise quite a bit of his efforts from the Hackaday black-and-white lab. But this is 2024 so there’s a step from days past that’s missing. We no longer print our photos, instead we scan the negatives and process then digitally, and it’s here that some of the good advice lies.
What this piece shows us is that colour developing is certainly achievable even if the results in a home lab can be variable. If you’re up for trying it, you can always automate some of the process.


Developing and digitalizing color film has been done by hobbyist millions of times. It’s pretty straight forward process and doesn’t contain any “secrets”. Even the chemicals today are pretty forgiving, quite tolerant for temperature differences.
Many things are is difficult on first try.
Someone should have told the poor lad to sacrifice one undeveloped (!!) film and train spooling up in daylight. Close the eyes until you get stuck, analyze, start from scratch.
I’ve always wanted to develop color film. Had sous vide been a thing when I was growing up, I certainly would have tried. The one darkroom frustration I don’t remember was loading film into the developing tank. Okay yes, I’m sure I screwed it up once or twice, and maybe using a changing bag makes the task harder. We used stainless steel tanks and reels instead of plastic, and it wasn’t infuriatingly difficult. The author admits he’s only done this 20 times, but I bet he’s gotten pretty good at it by now. Loading film is a “feel thing,” so it pays to practice the first few times in daylight with film you don’t care about (many of us have an “oops roll.” If not, ask around).
So here’s my advice: practice outside the bag with a roll of scrap film. If you can, use undeveloped film that’s never been wet—its stiffer and feels different. Repeat this over and over until you get comfortable. Step two: do it with your eyes closed. Step three: practice the same routine inside a changing bag. Finally: do it for real. This way you’ll be less stressed about ruining film you treasure, and you can start focusing on troubleshooting the rest of the development process. Keep a lab notebook. To quote Monk, you’ll thanks me later.
Stainless steel reels are easy, the secret ti to ignore the stupid clip at the center and think of the process as very slightly pushing the film as you wind the reel instead oof keeping it in tension.
That’s OK for sealed tanks that can be inverted to agitate the chemicals. For tanks with a handle in the center of the reel, with which agitation is accomplished by twisting the handle, film can come off the reel during agitation. For those, the clip or some other mechanism to prevent film slippage is important.
Stainless reels for the win – a touch tricky to learn maybe, but then years of fast, reliable loading. It’s a ‘riding a bike type of skill’ and you can return to it years later without trouble. Supposedly self-loading spirals will fail on the best of us…
Also, SS spirals and tanks use considerably less volume of processing chemicals per film than plastic ones.
I’ve developed C41 at home. the reality of it is that very few of us are making “analog” prints from it. most of us are scanning and that means any color shifts can be corrected in software .
in fact , in none of the C41 rolls I developed I had to correct any color shifts. I suppose my scanner is already doing that.
I came here to say the same thing. Lightroom is a lot more forgiving than RA-4 paper is.
I briefly did photography in high school (black & white only presumably because of how long it takes to heat up the chemicals etc for color film development which won’t work in a classroom setting like that) and getting the film in the tank is the one thing I could never seem to get right.
I wonder if some smart hacker has invented a build-at-home machine that can automate the “load the film into the tank” step (the one thing that I could never seem to get right when I briefly did photography in high school)
There are a few daylight loading tanks you can buy (from years gone by) that allow you to put the film in to a holder, close the lid and you crank the handle until the film is loaded onto the internal spool. Then there’s a blade you can trigger that cuts off the film coming out of the canister and then you’re loaded ready to go. The 35mm one I have works really well.
Olitography did a good video on the subject https://www.youtube.com/watch?v=qZTaE37OClI
I don’t miss all that formaldehyde in the least.
The original Cibachrome i would like to try. All my color work from the 80s and 90s has faded to oblivion. Only Kodachrome and Polaroid is any good.
The original Cibachrome was quite toxic, and the hobbyist variety available some time in the 1980s was somewhat better. I tried the hobbyist variety and did not get good results. I wasn’t willing to put in the time and money to get it right. The kit came with detoxifying chemicals to be mixed with the processing byproducts so that the resulting mess could be safely discarded.
I’ve had no trouble with the stability of color negatives, color prints, or color reversal films by Kodak, GAF, Agfa, (and Konica?), if they’re kept out of the light and kept in a relatively benign environment. I’ve had color prints fade somewhat from too much light exposure. Kodachrome is reputed to have poor light stability.
Polaroid’s products changed a lot over the years. The B&W prints, particularly in the early years, were terribly unstable. The color products were better, but I’ve seen them fade. Not being able to wash out processing chemicals and unused pigments
is an inescapable problem for Polaroid.
When polaroid went to metallic dyes the prints became very stable in light or darkness. The adhesive on the tape holding the SX 70 film together is the main problem. I have a rather famous set of SX 70s , you can google it. They look about the same as they did when they were a day old.
My Kodacolor prints have terrible dark fading and base yellowing. Drum processed, Kodak drum processed ( a machine where the print is on the outside of the drum, Creonite machines, and high end custom labs are all the same. Just terrible. The dark stability of color negatives is pretty awful too.
Oh, and yes the early cibachrome was almost as bad as making tintypes (nitric acid and guncotton disolved in ether, and silver poisoning!) but not nearly the environmental and health catastrophe of Daguerreotypes ( boiling mercury! ) but it sure looked beautiful! I have a 50×50 cibachrome that was displayed in direct sunlight for 3 months in 1986 and still looks perfect.
If anyone knows of an inkjet paper that looks like the original polyester base cibachrome , I’ve been looking for it for a project.
Back in the day I used to develop my own colour slides using E6.
Only one process, to get positive images.
I moved up to bulk film and loaded my own cassettes, which really brought the price down, even when commercial colour processing was still cheap.