The primary feature of stepper motors is listed right within their name: their ability to ‘step’ forwards and backwards, something which they (ideally) can do perfectly in sync with the input provided to their distinct coils. It’s a feature that allows the connected controller to know the exact position of the stepper motor, without the need for any sensor to provide feedback after a movement, saving a lot of hardware and effort in the process.
Naturally, this is the optimal case, and there are a wide number of different stepper motor configurations in terms of coil count, types of rotors and internal wiring of the coils, as well as complications such as skipped steps due to mechanical or driver issues. Despite this, in general stepper motors are quite reliable, and extremely versatile. As a result they can be found just about anywhere where accurate, step-based movement is desirable, such as (3D) printers and robotics.
For each application the right type of stepper motor and driving circuit has to be determined, of course, as they also have many reasons why you’d not want to use them, or just a particular type. When diving into a new stepper motor-based project, exactly what are the considerations to pay attention to?
Stepper Motor Types

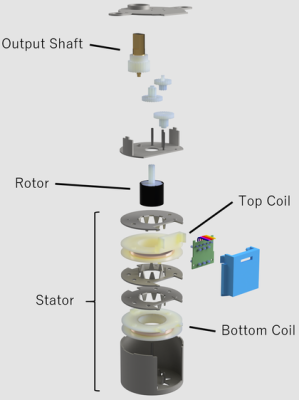
Every stepper motor has a stator and rotor, effectively like any other electric motor. Their unique feature is the segmented nature of the stator, forming what are commonly referred to as ‘teeth’. These stator teeth are used for the coils, which align with either a permanent magnet ring, a soft iron core or both on the rotor. Much like with other electric motors the stator coils rotate the rotor, but due to this segmented design activating one coil can make the rotor progress one step in a very deterministic fashion. By successively activating these coils, the rotor will follow the magnetic field being generated and ‘stepping’ forward by a set amount on the output shaft.
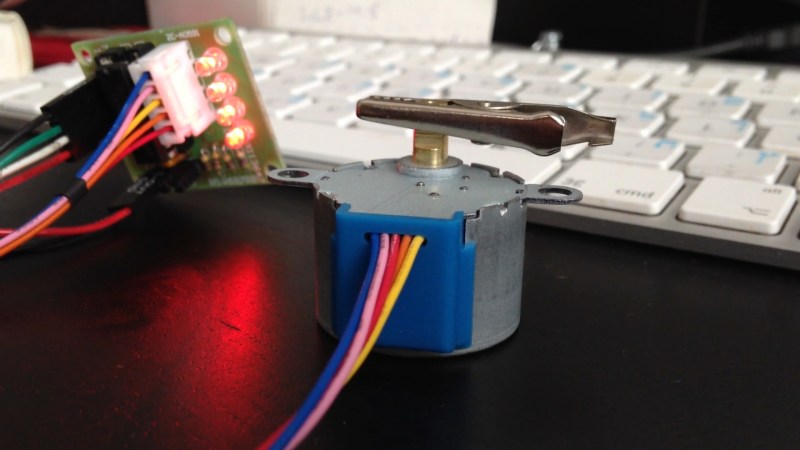
As an example of a basic form you got a unipolar coil design with a permanent magnetic (PM) core, such as the very common 28BYJ-48. This stepper motor features 8 ‘teeth’ on the stator, driven by two coils wound as two levels (top and bottom) with a common center tap, giving a total of five control lines. This makes it a four-phase design, with four lines, two of which are energized in turn to move the rotor and one common line.
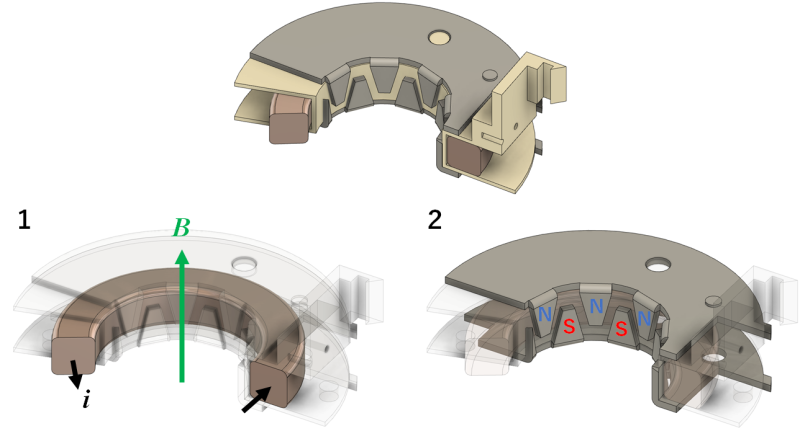
Although many schematic diagrams show pronounced teeth on the stator and/or rotor, this doesn’t have to be the case, as evidenced by e.g. this teardown of a 28BYJ-48 stepper motor by Cookie Robotics. The stator and its teeth are here formed by two coils, each encased in a metal plate with ‘claws’, as is typical for a tin-can stepper motor design. The metal claws are magnetized when the corresponding coil is energized, creating the north and south poles affecting the smooth permanent magnet rotor. This latter rotor’s magnet has a total of 8 alternating north-south pairs.

The choice for a PM rotor in this particular stepper motor is likely due to simplicity, while also providing decent torque when moving as well as when unpowered. Also known as cogging torque, detent torque is a property of PM rotor electric motors where the interaction between the stator and PM rotor resists movement of the latter. While useful in stepper motors with resisting a position change, it also means a lower speed and resolution compared to the alternatives, being:
- Variable reluctance core (VRC) in which the soft iron rotor has temporary magnetism due to the powered stator coils. This provides a faster speed and higher precision, but lower torque and no detent torque.
- Hybrid form, where the rotor has both PM and VRC elements, combining their advantages. The main disadvantage is the much more complex rotor construction and thus higher stepper motor cost.
What is also of note here is the gear train on the 28BYJ-48. While a stepper motor can have a gear train, it’s an optional trade-off between speed and torque. Confusingly, the 28BYJ-48 appears to come with a wide range of gear ratios, ranging from 1/64 to 1/16 and so on. This is likely due to how there is not a single manufacturer for this stepper motor, and thus a single model name covers both the 5V and 12V version, and a wide spectrum of gear ratios. Ergo, caveat emptor.
Uni- And Bipolar

The difference between unipolar and bipolar design is covered in this stepper motor overview by Monolithic Power. A unipolar stepper motor like the 28BYJ-48 has four phases, each of which is controlled by turning the coil on or off, requiring quite basic circuitry. This means that the current in each coil will always only travel in a single direction, ergo unipolar.
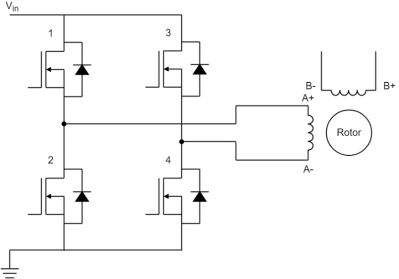
This contrasts with bipolar stepper motors, which do not have the common line and only half the coils, but which can power each coil with the current travelling either direction, ergo bipolar. Naturally, this precludes using a simple unipolar driver like an ULN2003 Darlington array, as these cannot invert the current.
The trade-off between uni- and bipolar stepper motors is thus basically one between driver and stepper motor complexity. Yet as bipolar stepper motor drivers become more affordable and prevalent, the disadvantage of a unipolar stepper motor’s requirement to have twice as much copper in coils and thus weight and bulk is unlikely to ever improve significantly.
Driver Circuits
At this point we have established that driving stepper motors requires activation of their coils in a sequence and manner that produces the desired effect on the output shaft. Here we have effectively four techniques to pick from:
- Wave mode: activate just one phase in sequence.
- Full-step mode: activate two phases adjoining the rotor’s orientation. Increases torque due to activation of two phases at the same time.
- Half-step mode: combines wave and full-step to half the size of steps. Has irregular torque as sometimes two, and sometimes one phase is active.
- Microstepping: evolution of half-step whereby the current and thus the intensity of the magnetic field from one phase is varied.
Unsurprisingly, each change to a simple wave mode requires a more complex controller, and also increases the chance of skipping a step. When picking a ready-made stepper motor driver, these can be controlled in a wide range of ways, from instructing it to step forwards/backwards, to controlling stator’s phases, or even using pulse-width modulation to control the gate signals of the FETs in a bipolar stepper motor driver.
Picking the correct driver is of course completely project-dependent, and reliant on how much control you need over the stepper motor, as well as your budget for said driver. It might even be that what you actually want is a servo motor, as also pointed out in Douglas W. Jones’ excellent tutorial on controlling stepper motors.
General Disadvantages
As useful as stepper motors are, they have a number of clear disadvantages, not the least of which is their constant current draw. As there is no mechanical mechanism to hold the stator in place, their ability to hold position and generate torque is purely determined by the powered coils and whatever magnetism the rotor may have.
This means that they are not a great choice for low-power applications, or where high load torque is a requirement. In the case of the 28BYJ-48 which we looked at in this article, that current is 240 mA typical at 5VDC, per the datasheet.
All of this has to be weighed up against the ease of driving them, their (often) low cost and lack of need for a closed feedback system. While having a decelerating gear train as in the 28BYJ-48 helps to increase the torque, ultimately stepper motors are primarily about what’s in their name: stepping in a (usually) deterministic fashion.
Featured image: Still from [Lauri Rantala]’s first steps into stepper driving.


One trick the article did not mention: By cutting the trace in the middle after take off the blue cover, the middle connection of the 2 coils will be broken and the motor can be used with bipolar driver.
Indeed. Plenty of writeups of how the 28BYJ-48 is easy to “convert” to bipolar.
Bipolar is much easier to drive these days. Instead of messin’ with an ULN2007, you just use any of the bipolar stepper motor IC’s, any 3D printer PCB, possibly with those “step stick” driver boards. And bipolar has many advantages:
1. You use all the copper instead of half of it. (Resulting in more motor power, less heating)
2. Proper stepper driver IC’s are common.
3. Those proper stepper driver IC’s use PWM and current limiting without user intervention. You can drive them at higher voltages, and the IC will keep the efficiency up. As a result max RPM (and output power) is greatly increased.
It’s also worth mentioning there are many different variants of the 28BYJ-48 By analyzing photographs of the externals, I saw at least 7 different versions in the metal stampings. There are also variants with different coil voltages (5V and 12V are common, always use the lowest coil voltage if you want to convert to bipolar) There are also versions with different gear ratios. Some variants also have an internal clutch, while others don’t. The original use for these is in air conditioners, where they control the flaps for air direction, and the direction is “calibrated” by just running the flaps into an end stop and slippage of the clutch, or over torquing the motor at the end stop.. But because these are made in such great masses, they are very cheap (cost effective, replace “cheap” with your favorite synonym)
If you short the coils (brake), you may find quite a lot of resistance when attempting to turn the shaft (varies by specific motor, of course, but I have some big ones that I can’t move by hand to next step if the wires touch). I’ve seen drivers that, when powered off, will have LEDs illuminated from power generated by turning the shaft…
With the printer turned off, the backlight on the display on my Prusa MK3S flickers on when I move the Y axis by hand.
Stepper motors work quite good as dynamo’s. I have Nema 23 motors on a CNC machine with 1605 ball spindles. If I push the table aside (with the machine unpowered) then the motors generate enough voltage and current (rectified by the H-Bridge FET’s) to power up the whole motor drives. The first thing they do is stop the motors (no step inputs) and then it all stops again. The Nema 23 motors with the 1605 spindles can push around 800N and that’s more then I can push manually.
a fun game i found to be remarkalby versatile and ignorance-friendly is just hook two stepper motors together…iirc it was straight through, connecting same colors. probably by coincidence this has worked on every pair i’ve tried…you move one, the other moves in lock-step with it. obviously with a little less torque but
Not a coincidence at all. You are making a simple two-phase synchro or selsyn system. One stepper is acting as a two phase generator and the other as the two phase motor it is.
A synchro needs AC excitation. A permanent magnet rotor doesn’t work as a synchro because it doesn’t induce any current at zero RPM. In a synchro pair, both rotors are AC excited by the same source, so when they point the same way it cancels the currents in the phase windings, and when they point different ways it generates opposing currents at both ends of the system and they both turn towards each other.
I’d be interested to know why the author thinks that microstepping/wave drive is more prone to lost steps… in my experience, other than shoddy electronics/wiring, the opposite is true because lower step resolutions result in higher torque demands and resonance issues.
It’s a complicated matter. Trying to hold the rotor in place between full steps is kinda “springy”, so unless you stop on a full step, you’re never quite sure where the rotor is actually pointing. Then when you stop driving the motor, it tends to naturally align with the nearest full step while your code won’t take that into account.
Something else to be aware of. Microstepping doesn’t automatically give you very accurate shaft position. You also have to have a motor that has its magnets and windings exactly at 90 degrees. An easy way to check this is to mount a 45 degree mirror on the shaft and send a laser pointer beam on it. Watching the laser dot as it traces across the ceiling will show any hesitation on the motors rotation. I was using microsteppers on sapphire crystal pullers along with quite good gearboxes and was able to choose combinations to reduce the error.
https://hackaday.com/2016/08/29/how-accurate-is-microstepping-really/