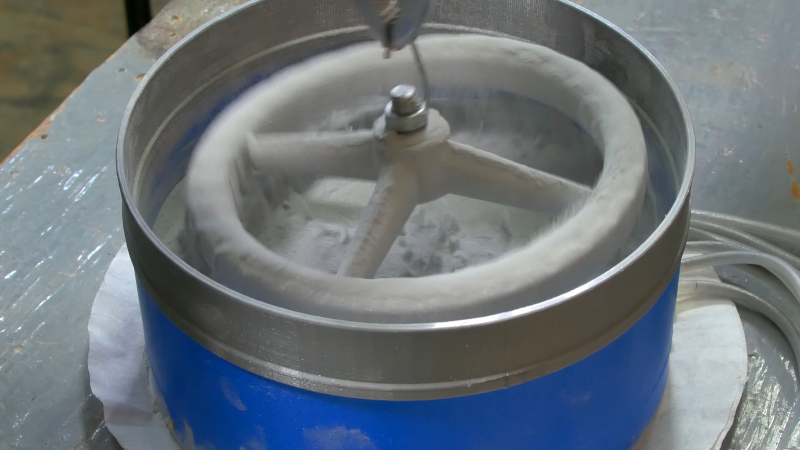
[Pete] had a friend who would powder coat metal parts for him, but when he needed 16 metal parts coated, he decided he needed to develop a way to do it himself. Some research turned up the fluid bed method and he decided to go that route. He 3D printed a holder and you can see how it all turned out in the video below.
A coffee filter holds the powder in place. The powder is “fluidized” by airflow, which, in this case, comes from an aquarium pump. The first few designs didn’t work out well. Eventually, though, he had a successful fluid bed. You preheat the part so the powder will stick and then, as usual, bake the part in an oven to cure the powder. You can expect to spend some time getting everything just right. [Pete] had to divert airflow and adjust the flow rate to get everything to work right.
With conventional powder coating, you usually charge the piece you want to coat, but that’s not necessary here. You could try a few other things as suggested in the video comments: some suggested ditching the coffee filter, while others think agitating the powder would make a difference. Let us know what you find out.
This seems neater than the powder coating guns we’ve seen. Of course, these wheels had a great shape for powder coating, but sometimes it is more challenging.


I researched the material used by our contracted powder coater and discovered the “coating” was similar to the toner in an office copier. I then offended the powder coat company owner by referring to powder coat as “the moral equivalent of a Xerox machine” because it was deposited on the metal by pulling a static charge on it before coating baking it on the part, and he didn’t understand what I was talking about.
Since then I wondered if it would be possible to “copy” or apply patterns or logos on powder coated items by pulling an electrostatic charge on a roller or the like to deposit and bake it on.
I don’t think the powder coating itself is as good a substrate as the metal it is applied to. I think if you tried making a powder coated decal in the manner you describe it would be very prone to chipping. You might be better off masking off the logo with paint, baking the rest of the part, unmask logo, mask around the logo and powder coat the bare metal.
Having had an entire motorcycle cerakoted and a custom antique machine powder coated as well as some other powder coated parts before, I’ve worked really closely with skilled coaters over the years. I can tell you the thing that makes the biggest difference on powder coating is the surface preparation, and secondarily the material type.
This is true typically for powder coat and cerakote- you get far more permanent results when you have what is called a “keying” surface for the coating to lock to. This is typically done with 100-150 grit aluminum oxide. Do not use glass bead, The bead creates a smoother surface that doesn’t lock the paint in place as well.
If you prep your surface like this, both powdercoat and cerakote hold really well, and bake on evenly much more resiliently.
The second thing I mentioned that makes coding difficult- the material substrate. And I mentioned this specifically because the most difficult material to powdercoat (without bubbles) is actually cast aluminum. Old cast aluminum is apparently harder. This is not an immediately obvious thing to a lot of people so let me explain.
Both powdercoat and some versions of cerakote require baking the coating to set it and finish it. But in that process of heating the object, trapped gases or oil or contaminants on the surface can create a vapor and out gas. This is most common with cast aluminum alloys, especially older ones from what I have been told, that have more contamination in the casting which upon heating will expand the pores and off gas slightly.
I’ve seen this result myself on some old cast aluminum watchmaker cleaning machine parts I’ve had powder coated. Some parts had to be recoated because they had gotten covered with pinhole bubbles. The people doing the work were really skilled and they told me it’s actually really difficult to get it to stop happening on some cast parts. It happens most on cast aluminum apparently.
If you ever have cast parts that you need to coat, often the pros will bake the part with no coating on it overnight at a specific temperature just to make sure it’s fully offgassed, so that it doesn’t ruin the finish when coating.
« I can tell you the thing that makes the biggest difference on powder coating is the surface preparation »
This is so true for much more processes than only powder coating. See paint, glue, welds, brazing,….
Regarding the hardness of aluminium. I have a collection of old two strokes. Some brands are very easy to polish because they have a very hard aluminium that takes a very good polish. Softer aluminium takes a polish but will never get a mirror surface on it. It will always stay a bit mushy, a bit dull looking. So it really depends on what manufacturer it was. You can also see it in welding. Since they are all old it can sometimes happen that the engine parts are cracked and you need to TIG weld them. Some of the engines are very easy to weld, some just end up bubbling. Even within brands it’s different als pre WW2 Puch motorcycles have more difficult to weld alu parts where post WW2 they have better to weld alu parts up to about 1970, when it went downhill again.
Yes I have looked into having my own antique motorcycle engine welded and found this to be the case. In my case it’s a BMW boxer from the ’70s.
There is something called an XREF gun that certain facilities have to do metal testing and it outputs the composition elements and percentages of the alloy you are scanning. I am told very large scrap yards have these for testing scrap. There may be other places that have them but that’s the only kind that I know of.
If you can find someone to test your item with an XREF gun, I am told you can look up the alloy makeup and compare it with known alloys in industry to see what is closest and then you can match rods for welding to the material better knowing that.
Now that’s something I would love to see a HaD article on, how XREF guns work
@Drew My simple understanding is they emit x rays, measure the spectrum of what comes back, and calculate that you could observe such a spectrum if your sample contained such-and-such percent of this element plus such-and-such percent of that. If you know about the radiacode and such, it’s a bit like if one of those had a very narrow FWHM at low energies (I think Lithium is only like 50eV or something although the heavier elements are significantly more and easier to detect) and came with a somewhat variable or broad spectrum x ray illuminator that was nevertheless filtered out from the sensor. Run a spectrum and instead of characteristic decay peaks, you get characteristic fluorescence peaks.
The one I saw someone using could tell you if a rock had a noticeable amount of valuable elements like rare earths, silver, or gold, but it struggled to get much reading from lighter elements like I said – I think figuring out e.g. the carbon content of steel could be a bit of a struggle. Also it was expensive and you had to pay extra to add the signatures of elements it didn’t include, or else you had to look at the graph yourself and figure it out.
We used vinyl stickers which were not expensive but only lasted so long on equipment. I was looking for a way to make a permanent logo for the equipment and avoid a second vendor.
I think your problem is that the substrate for powder coating is usually metal and, therefore, conductive. Same reason you can’t photocopy onto copper-clad kapton, much to the chagrin of people making flexible PCBs.
This was genuinely a really cool hack he came up with, I was surprised because I’ve seen these flowy bed things and didn’t realize what they were. I’ve paid to have things professionally powder coated, as well as cerakoted- I’m currently looking at a custom motorcycle that is mostly cerakoted.
I wonder if this process would work with cerakote as well. It’s much thinner than powder coat, but it can be far more durable in the right application comparatively. Being able to do something like this might actually take a lot of the skill away from the application on it.
I really appreciated this hack 🙌 I may end up doing a project in the future using this knowledge. Thanks Hackaday 💪
The first time I saw a fluid bed system working (the demonstrator was using nylon) I thought it was bloody magic. I never thought I could do it at home. Good stuff.
I’ve been doing powder coating for a while. You can get a power coating gun+HV power supply for <$100 . I believe Harbor Fright carries a decent kit. By creating a high voltage (ultra low current) charge on the metal object the power will cling to it.
I blogged about it here. Bonus hack is you can make labels with a laser. https://www.grbl.org/single-post/powdered-panels (don’t know if the HaD site makes them linkable.
The author was explicitly trying to avoid the problems that HV powder coating guns have.
But for general context it is still nice to know that it’s an affordable option (I would have expected it to be much more expensive)
The “wasted power” problem seems to be the only thing he cited. There is some “over spray” but it’s not that much. The nice thing about power is you can vacuum it all up. Way cleaner than spray paint for sure. I suspect his method wastes more powder than HV coating unless he stores it in the fluidizing chamber – the powder doesn’t pour easily.
But the advantage of his method is you can coat non-conductive objects. The spray approach is to heat the non-conductive object and then spray it – the dust clinging to the hot object. Hard to do a uniform coat, though.
FWIR it’s specifically NOT recommended to vacuum up the excess powder because of the possibility of one spark from the vacuum motor causing a fireball.
As you found, powder coating is fantastic.
As an aside, 20 minutes is too long, you only need 10 part outflow (some powders like metallic go down to 7).