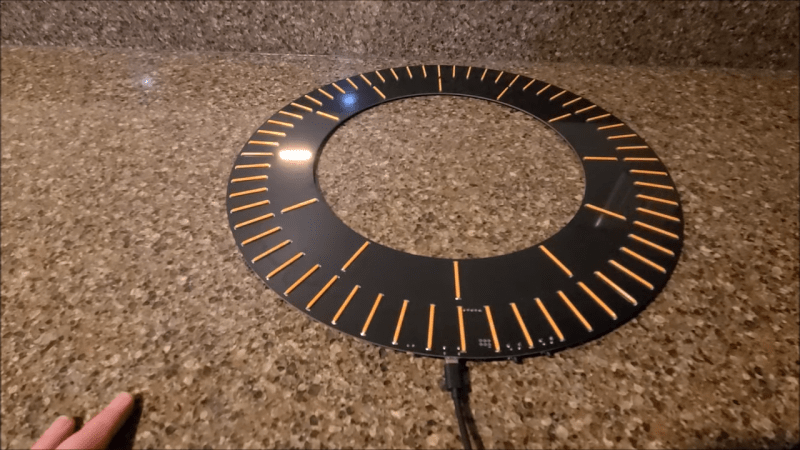
There are a million ways to use LEDs to make a clock. [sjm4306] chose to go a relatively conventional route, making something that approximates a traditional analog timepiece. However, he did it using LED filaments to create a striking and unique design. Thus the name—FilamenTIME!
LED filaments are still relatively new on the scene. They’re basically a bunch of tiny LEDs mounted in a single package to create a single “filament” of light that appears continuous. It’s great if you want to create a bar of light without messing around with populating tons of parts and having to figure out diffusion on your own.
[sjm4306] used them to create glowing bar elements in a clock for telling the time. The outer ring contains 60 filaments for the 60 minutes in an hour, while the inner ring contains 12 filaments to denote the hours themselves. To handle so many LEDs, there are 9 shift registers on board. They’re driven by an ATmega328P which runs the show, with a DS3232MZ real-time clock onboard for keeping time. As you might imagine, creating such a large circular clock required a large PCB—roughly a square foot in size. It doesn’t come cheap, though [sjm4306] was lucky enough to have sponsorship to cover the build. [sjm4306] is still working on the firmware, and hopes to build a smaller, more compact version, which should cut costs compared to the large single board.
It’s a neat clock, and we’d know, having seen many a timepiece around these parts. Video after the break.


Ok… That’s a cool clock. Never seen this idea before.
Too Long Didn’t Watch :v
I am here just for the pictures.
5v.
also: one could put glass in front of it ;-)
What do your questions even mean and how do they detract from the work or the video? It’s USB powered (clearly) using LED filaments. I didn’t have to watch a 30 minute video to figure that out. Are sure you even understand what the project is before attacking it?
You mean it is impossible to derive higher voltages from USB? Never knew that.
FYI:
The large number of LEDs (typically 28 per filament) simplifies the power supply compared to other LED lamps, as the voltage per blue LED is between 2.48 and 3.7 volts DC. Some types may additionally use red LEDs (1.63 V= to 2.03 V=). Two filaments with a mix of red and blue is thus close to 110 V=, and four are close to 220–240 V. (Wikipedia)
Led filament are available with the LEDs in parallel and series in different configurations, so a variety of voltages are possible, including 3 V.
Well don’t build one yourself and don’t touch it then. FFS.
Confirming the ones I used are 5V. They make 3V, 5V and ~70+V versions of these led filaments
LED filaments are 3v max but they can break when flexed or crushed so if you’re going to build one, do it carefully and consider adding plexi cover to protect the finished clock.
“The author gave me something for free and I can’t even be bothered to look at it in order to answer my questions.”
Why do people do this?
Curiously incurious.
I’m tempted to steal this one for myself. I love analog clock and the LED clock would be cool.
Perhaps check my ‘analog’ led clock https://github.com/ole00/tick-led
Ooh I like that one too. And kudos for the extensive documentation.
I’ve been trying to find a way to get extremely narrow strips of LEDs to provide edge lighting to some engraved acrylic, for a build that did not originally consider such a feature. These filaments seem perfect.
dig into old TFT panels from laptops. They have exactly what you need: sub-mm side LED strips.
^ this, TFT screens have some VERY thin LED strip inside. Also some very cool light-guide material sheets.
There are flexible ones too.
Dude just needs to learn how to use solder wick. Put a big blob on even an 0201, then suck it off with the wick and your done.
I was fresh out of wick lol. I need to pick some more up on my next digikey restock.
*you’re
I’ve never understood why people think some kinds of timepiece are analogue. Because no timepiece is analogue they all have discrete measurements of time. Even a Rolex second hand moves at four or 8 HZ meaning they are digital too.
Because the definition of analog clock and digital clock has nothing to do with their inner workings.
Clock has hands or resembles a clock with hands: analog.
Clock shows numbers that change or move: digital
But where is the constantly varying quantity that analogue would imply?
As mentioned a digital clock uses numbers, while an analog clock uses hands. It has nothing to do with the definition of digital and analog you’re thinking about.
Okay, if we were to look at quantum physics and quantum granularity. There is a point at which there is effectively a indivisible unit of time. Therefore all time in the universe is non-analog. But then again who really care?
Indeed. Consider: “digital” contains “digit.”
So I suppose an hourglass is digital because it uses grains of sand… nice!
Because clocks with hands started out using only mechanical components, that’s inherently analog. That said, I have a clock at home that doesn’t tick, the second hand moves continuously and smoothly. As do the other two hands.
I agree. Mechanical clock is a better term. Even escapement driven locks do not have continuous movement.
Nice! But why not going with NiCr instead? For a warmer color…
Because that would make a smelly mess.
Place a slice of bread on the clock, you’ll get toasted smell instead of roasted fiberglass smell
next up, using these to create a 7 segment LED display.
https://hackaday.com/2022/04/05/led-filaments-make-a-retro-clock-without-any-retro-parts/
https://hackaday.io/project/182655-led-filament-based-seven-segment-displays
https://hackaday.com/2018/08/01/old-led-light-bulbs-give-up-filaments-for-spider-web-clock/
Don’t forget this 144 x 7 segment LED clock: https://hackaday.com/2020/03/05/144-7-segment-displays-combine-to-form-a-mighty-clock/
Amazing coincidence that a couple of weeks AliExpress randomly presented these to me and bought a packet of 10 out of sheer curiosity.
Of course up until now I had no idea what I might actually use them for! Nice one 👍
Shift registers? I use cheap (pennies each), tiny neopixel driver boards, without the LEDs, in projects where I want to control lots of little things with minimal wiring. Three addressable PWM outputs per board. A transistor or whatever can handle situations where you need more current (or a different voltage) than the driver chip can directly output. Versatile and easy to program. For example, for one project I wanted to fill a room with “fireflies”, so I found a bunch of tiny yellow-green LEDs and, using almost-invisible 32-gauge wire a few inches long, connected three to each of the little driver boards then interconnected them all with (somewhat-heavier) three-conductor wire. Then, I just dangled them around the room. In reduced light the wiring is virtually invisible, so the resulting effect is gorgeous. On my list of projects is to change the programming from random flashing for each LED to patterns that replicate those of various firefly species. Anyway, after watching this video and seeing all the effort that sjm4306 put into constructing the electronics, it seems to me that using the driver boards (which could be piggybacked onto a vastly-simpler clock PCB) would have significantly simplified the clock. Or, if you don’t mind soldering tiny stuff, use the driver chips bare (without their carrier boards) soldered directly onto the clock PCB. Since the whole thing would then need only a three-wire connection (power, ground, signal), the Arduino (or whatever) controller could be remote from the clock if desired, or just tacked onto it. I have buckets of these little driver boards, purchased by the thousands from the usual source, and the bare chips are, of course, also available for people with better vision and more patience than I have.