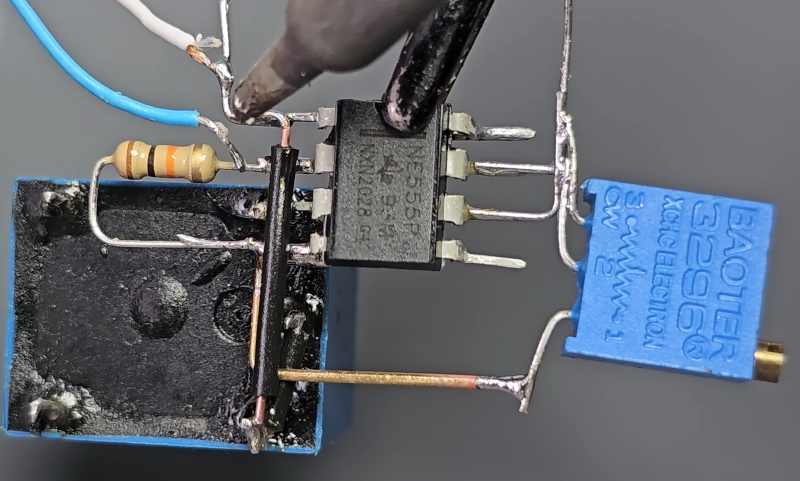
We often marvel at the many things a 555 can do. But [Zafer Yildiz] shows us that it can even take the place of a PCB. You’ll see what we mean in the video below. The timer relay circuit is built “dead bug” style with the 555 leads bent out to provide wiring terminals.
Honestly, these kinds of circuits are fun, but we would be reticent to use this type of construction for anything that had to survive in the real world. Solder joints aren’t known for being mechanically stable, so this is good for experiments, but maybe not something you want to do all the time.

That said, the workmanship is neat. We would probably have grabbed a little universal PCB instead. Or, some people use Manhattan-style construction, where you glue little bits of PCB material down to make terminals.
Honestly, our favorites were some little boards we used to get at Radio Shack (see image of one we found on some random project). If you know where we can still find these, mention it in the comments. And, sure, it would be easy enough to make a batch or two.
Still, if you just need quick and dirty, deadbug construction does work. We will warn you, though. Deadbug construction can make you go nuts.


I’ve always thought that deadbug construction would be helped by the occasional use of small crimp size steel tubing that could enhance the stability. you could even crimp then solder the connection to make it more rigid.
“Solder joints aren’t known for being mechanically stable” what? A decent joint can handle up to 500G.
With emphasis on “decent”.
Have a look at the solder joint @01:45 where the 555 is soldered on top of a relay pin (with apparently even not enough solder)
For the rest, I did not see the whole video, the editing annoys me. He’s showing the parts multiple seconds (boring) and when he’s soldering (more interesting) he speeds up the video.
Good joints… maybe. A lot of the joints typically shown in vids of this type of construction don’t look particularly good.
I have re-flowed more joints then I can remember, especially inside automotive modules.
Solder is not a good mechanical connection if exposed to any movement, vibration, or thermal cycling.
Solder alloy matters. It’s hard to make a sweeping generalization without knowing what inter-metallic compound you are dealing with. And the type of crystallization that occurs at the interfacing material. Just a lot of variables that can lead to wildly different definitions of a “good mechanical connection”.
Point-to-point construction, or the related tag board or terminal strip, is almost as low-tech as dead bug and you can make the board yourself out of any heat resistance insulator and some rivets (or screws if you’ve not got the tools for rivets, but I recommend rivets because you can get them in solder friendly materials like copper or brass and they are fast and cheap to install)
If using a PtP board you can wrap components down with kapton tape if you want it to be robust enough to launch into space, not that I recommend taking your aerospace technology back 60 years. But it is good enough for a guitar amp that gets knocked about.
True
I have used that sort of construction to make specific car timer relays. (A bit more compactly & over the relay base). Works exceptionally well if after testing you dribble 5 minute epoxy over the components. Maybe leaving pot screw unstuck.
If the circuit isn’t going to generate too much heat and if you aren’t worried about needing to modify it later you could always encase it in resin.
“Or, some people use Manhattan-style construction,”
Sure. But you aren’t likely going to make islands small enough to fit individual pins of an IC. So.. you end up with the IC on a breakout board among your manhattan style passives or dead -bug.`
Use whichever combination of techniques and components works for your current project.
I tend to use manhattan techniques, with a spherical dental bur to cut tracks. That is perfectly fine for 0.1″ (and smaller) components.
With manhattan, frequently it is only necessary to connect a couple of pins to the substrate, and use deadbug for the other pins. That reduces the number of pads and precision required.
You can glue a small piece of wood (match or piece of plastic, PCB whatever) on top of the PCB, and then glue the IC on top of that. Bend most pin outwards, but leave the GND pin straight to solder it directly to your manhatten GND pin.
30 years ago I tried the dead bug style, but I got so confused by both the mirroring and the inability to see part numbers (especially with multiple IC’s) that I quickly dropped that method.
However, bending pins outward and gluing it to a GND plane (with or without an extra distance holder) seems sensible. The biggest concern is the effort needed to replace the IC if it released the magic smoke (This is for prototypes).
The closest match to the old radio shack prototype PCB I found is Electronix Express PB-12. Also see a slightly different 12-607 board by Philmore Datak.
I fondly remember the radio shack PCB, I think I was using it with Atmega8 and the old USB library to make gamepads, or convert them to USB. Maybe even a chording keyboard out of a serial trackball, I cut the lid of the square case to make a 4th button and attached some pushbuttons for my thumb with angle alum’ stock XD.
IC boards like the picture are available on Amazon, and at least in the us, there are brands like schmartboard that aren’t Chinese stuff.
Adafruit has several ProtoBoards – not like your picture but put the IC in the middle and then areas to solder – like being able to solder on a solder-less breadboard – even matches the breadboard for ease of use – I have used them on several projects and worked nice
https://www.adafruit.com/category/124
Here’s some way better for prototyping than what’s in your picture. Page two has DIP 8 versions.
Here’s some way better for prototyping than what’s in your picture. Page two has DIP 8 versions.
https://czh-labs.com/collections/dip-breakout-board-643/2.html?&srsltid=AfmBOop4Sjy_dbeOAQji4bxd84YGDMiazRk5MYw2qL_mMKjIYajEOKbB&_gl=1*kqrj3*_up*MQ..*_ga*MjUyODczMTUxLjE3NTYxNzA3MzQ.*_ga_QC9MEGCBS3*czE3NTYxNzA3MzMkbzEkZzAkdDE3NTYxNzA3MzMkajYwJGwwJGg2NzUzNjk5Mjg.
I don’t see any back EMF protection diode on that relay. The output transistor in the 555 won’t be very happy without one.