Barrier-grid animations (also called scanimations) are a thing most people would recognize on sight, even if they didn’t know what they were called. Move a set of opaque strips over a pattern, and watch as different slices of that image are alternately hidden and revealed, resulting in a simple animation. The tricky part is designing the whole thing — but researchers at MIT designed FabObscura as a design tool capable not only of creating the patterned sheets, but doing so in a way that allows for complex designs.
 The barrier grid need not consist of simple straight lines, and movement of the grid can just as easily be a rotation instead of a slide. The system simply takes in the desired frames, a mathematical function describing how the display should behave, and creates the necessary design automatically.
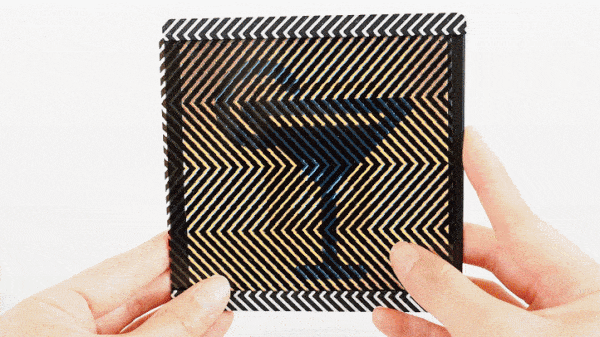
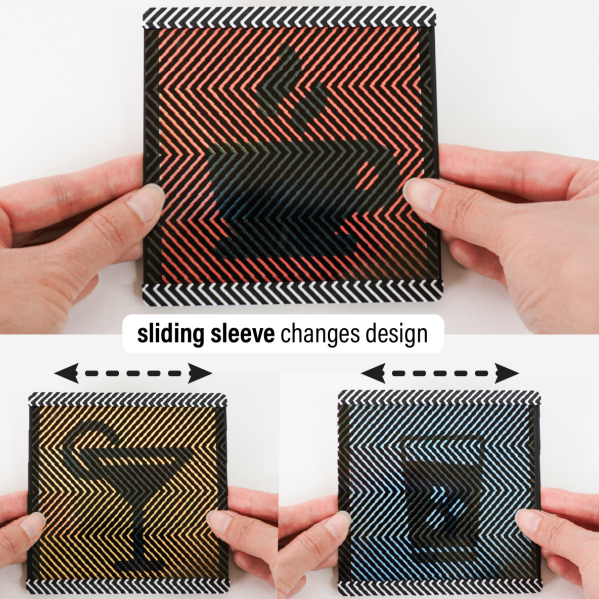
The paper (PDF) has more details, and while it is possible to make highly complex animations with this system, the more frames and the more complex the design, the more prominent the barrier grid and therefore the harder it is to see what’s going on. Still, there are some very nice results, such as the example in the image up top, which shows a coaster that can represent three different drink orders.
We recommend checking out the video (embedded below) which shows off other possibilities like a clock that looks like a hamster wheel, complete with running rodent. It’s reminiscent of this incredibly clever clock that uses a Moiré pattern (a kind of interference pattern between two elements) to reveal numerals as time passes.
We couldn’t find any online demo or repository for FabObscura, but if you know of one, please share it in the comments.


Probably a fun little weekend programming puzzle.
I hope the tool is made public at some point. Seems very handy to create artworks.
It’s trivial to make the masks in any reasonable graphics program.
So trivial they wrote a 16 page paper about it and wrote a “novel parameterization and computational design tool for systematically designing new barrier-grid
animations without domain expertise”
That’s kind of the new MIT schtick, ever since Negroponte.
Some parts of the school still are worthy of respect, but the brand has been diluted by this sort of schlock, IMO. (speaking as one with family members holding degrees from said school).
The paper points out some simple rules and requirements that the mask has to satisfy in order to work as a barrier grid animation, such as being periodic in the direction of motion. Besides that, you can pretty much just wing it any way you like. You don’t need special mathematical formulas or python scripts to do it.
Once you’ve drawn the mask in your graphics program, you can use the mask itself to selectively erase the pictures you intend to show. You just move it around and press “delete” for the parts of the pictures that are in the wrong position.
For each animation frame/position of the mask grid compute the displayed pixels of the frame that are not covered by the grid, then add them to the final image. Next frame/position. Easy.
Difficult is to find transparent film that works with inkjet printers and a way to unclog my CISS printer.
More fun will be a software to help with the moire patterns.
Looks like the research will be presented at UIST 2025 (Sept 28 – Oct 1), so maybe the source code will be released after that.
Before I read the article and saw the pictures, I thought this was done by a 3D printer. But come to think of it, why not do this with a 3D printer instead of a screen printer? Larger would be more durable, it could have a thick frame which could have tiny holes in it where a motor could drive it back and forth, animating. Just need to convert 2D grid to SVG then STL – might be any easier way even than that to accomplish.
In the linked article there is a link to pinterest, amazing stuff, who the hell doesn’t have pinterest blocked? Students are insane in such a special way eh.