The various Raspberry Pi camera modules have become the default digital camera hacker’s tool, and have appeared in a huge number of designs over the past decade. They’re versatile and affordable, and while the software can sometimes be a little slow, they’re also of decent enough quality for the investment. Making a Pi camera can be annoying though, because different screens, lenses, and modules have their own mounting requirements. [Jacob David C Cunningham] has a solution here, with a modular Raspberry Pi camera, as an experimentation platform for different screens and lenses.
It takes the form of a central unit that holds the Pi and its support components, and front and rear modules for the screens or displays. Examples are given using the HQ and non-HQ modules, as well as with round or rectangular displays.
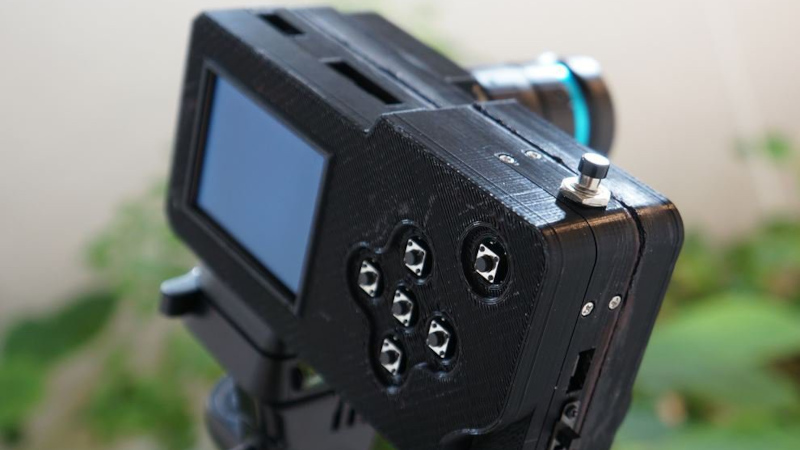
When designing a camera for 3D printing it’s a very difficult task, to replicate or exceed the industrial design of commercial cameras. Few succeed, and we’d include ourselves among that number. But this one comes close; it looks like a camera we’d like to use. We like it.


But always with the bare tact switches in these types of projects…. Is it really so hard to make or source button caps to finish it off?
button caps are a weak point of 3d printing because little stray bits of knurl here or there make them very unsatisfying. you want interfaces to match and dimensions to be precise. A good result is (barely) achievable if you dial in your printer and post-process your prints (trim / sand). I’m of two minds about the little switches in this project but i’ve used them in the past several times and they’ve been satisfactory for me. Since they’re usually used for like soft buttons or arrow keys to traverse a menu hierarchy. Obviously, they’d be unsuitable for touch typing a novel :)
I was interested to see how the tripod mounting is done, but failed to find any pictures of it.
It looks like it uses the standard approach of a mounting plate, secured to the camera by its 1/4-20 screw. (it also looks like it’s mounted 90 degrees rotated, so the video alignment pin is to the side instead of front, but that’s no biggie).
It’s trivial to embed or epoxy a 1/4-40 nut into the print.
If you want some strength an easy solution is a Tee nut — those 4-pronged flanged nuts intended for plywood. You can design a suitable cavity in the print to epoxy it in, or just be an expedient caveman and heat-set it into place.
i have not seen those tee nuts before! thank you i will be thinking about them for future projects. i might even sink one into plywood :)
Creator here, funny seeing my camera in my Android phone Google feed.
This particular camera actually uses the Raspberry Pi HQ cam’s original tripod mount, it’s just detached and glued into the center body see the cad model although it’s hard to see.
Other cameras do use a 1/4″-20 nut as mentioned.
https://github.com/jdc-cunningham/modular-pi-cam/blob/master/cameras/pi-zero/large-display/body/modular-pi-cam-cad.JPG