
Keeping your filament safely away from moisture exposure is one of the most crucial aspects of getting a good 3D print, with equipment like a filament dryer a standard piece of equipment to help drive accumulated moisture out of filament prior to printing or storage. Generally such filament dryers use hot air to accomplish this task over the course of a few hours, but this is not very efficient for a number of reasons. Increasing the vaporization rate of water without significantly more power use should namely be quite straightforward.
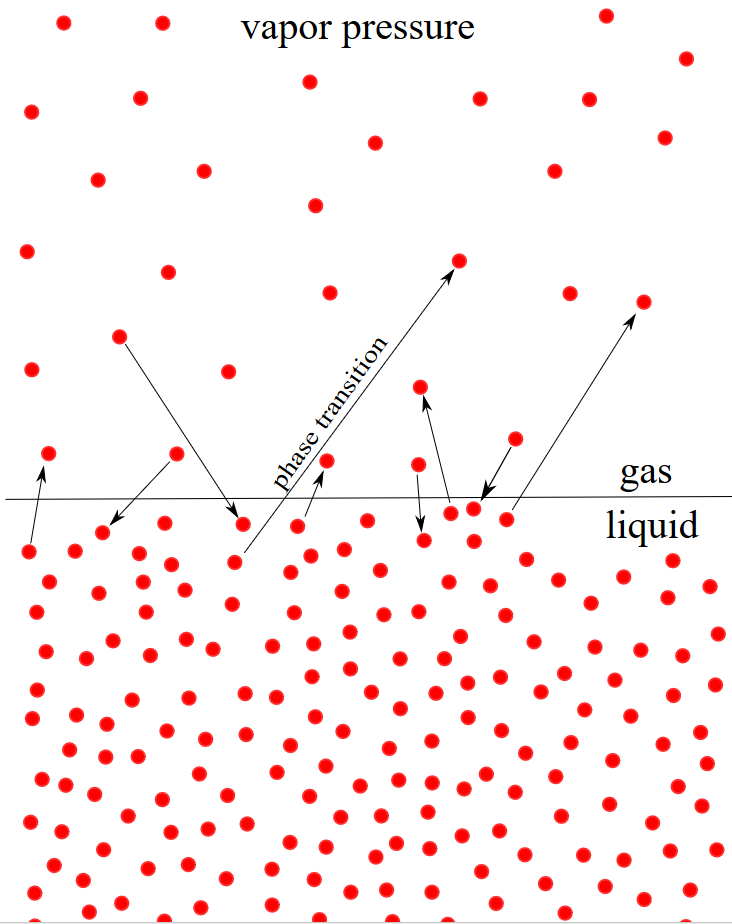
The key here is the vapor pressure of a liquid, specifically the point at which it begins to transition between its liquid and gaseous phases, also known as the boiling point. This point is defined by both temperature and atmospheric pressure, with either factor being adjustable. In a pressure cooker this principle is for example used to increase the boiling temperature of water, while for our drying purposes we can instead reduce the pressure in order to lower the boiling point.
Although a lower pressure is naturally more effective, we can investigate the best balance between convenience and effectiveness.
Vapor Pressure Of Water
 The main thing that determines whether or not a substance is in a liquid or gaseous state is pressure from the surrounding gas, specifically the surrounding air or equivalent. Although some of the liquid’s molecules will gradually make their way into these surroundings, at e.g. atmospheric pressure at sea level you do not expect to see water instantly boil-off, whereas nitrogen and oxygen are fortunately all in a gaseous state until either very high pressures, very low temperatures or both.
How easy it is for a liquid to transition to a gas depends on its volatility, which itself is related to the strength of its intermolecular interactions. If these are rather weak then a liquid will transition into a gaseous state relatively easily, meaning at lower temperatures and lower pressures. For water this transition point at sea level is at about 100°C, but for people who live a km or more above sea level, this boiling point starts dropping rapidly.
These principles are used in a variety of ways, with many kitchens featuring a pressure cooker: this is a special pressurized pan that increases the boiling point of water by increasing the pressure inside the vessel, thus speeding up cooking times.
Increasing pressure of a gas can also turn it back into a liquid, as is the case with for example liquefied petroleum gas (LPG) which is generally stored in pressurized containers. Similarly, in the case of liquefied natural gas (LNG), natural gas is gaseous at atmospheric pressure and room temperature, but is a liquid at -162°C, with some level of pressure above that atmospheric pressure also required. LNG superseded purely pressure-based storage methods in the form of CNG, which requires pressures over 200 bar (>20 MPa).
What we’re trying to do with heating up 3D printer filament and bags of forbidden candy is thus to increase the energy in the system, bringing it closer to the point where the trapped moisture can overcome the vapor pressure of the surrounding air and escape. Logically this means that if we can reduce the surrounding pressure by removing as much of the atmospheric gas as possible, this moisture can escape significantly easier.
Essentially what we need is a pressure cooker, just one that reduces pressure.
Inverted Pressure Cooker
The relation between pressure and temperature as far as the vapor pressure of water is concerned is well-documented. Intuitively at 0 Pa water will boil off practically instantaneously, as there is no vapor pressure from a surrounding atmosphere. The question for our purposes is however just how much we need to reduce the pressure to make a difference, i.e. how deep of a vacuum we need.
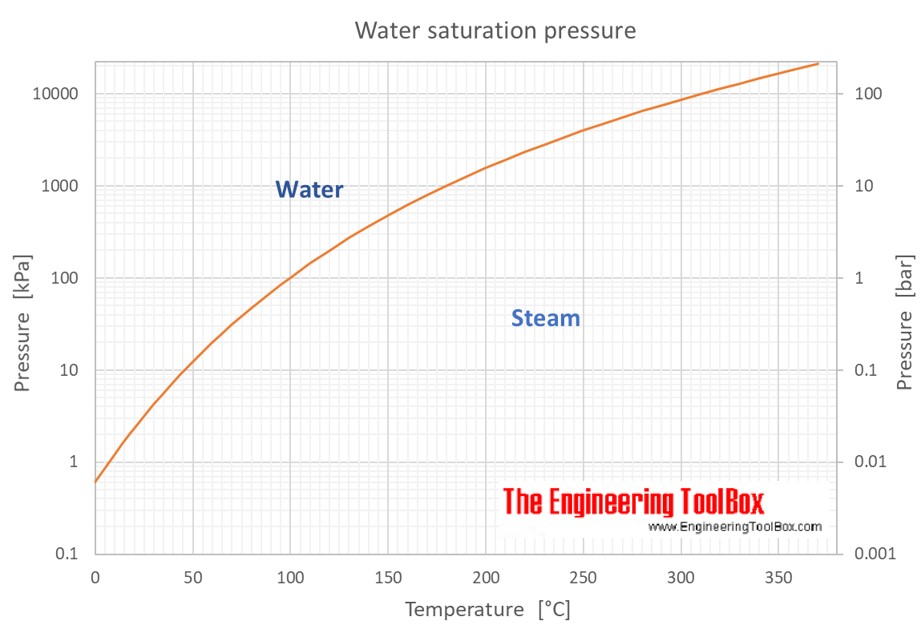
Looking at a relevant graph, such as this one from the Engineering Toolbox site, we can see that the relationship between pressure and temperature is fairly linear below atmospheric pressure at sea level at 100 kPa (1 bar). Rather than trying to hit some arbitrary point on this curve, we should instead look at what off-the-shelf options we have available that may work for us here.
Since there’s no need for us to hit some kind of ultra-high vacuum, it would be plenty to hit something below 1 kPa, which is absolutely achievable with even a consumer-grade roughing pump like a rotary vane pump. This type of pump is commonly used for silicone and resins in hobbyist applications, making it a solid first target. Theoretically these can vacuum dry filament and more at room temperature.
Another option we have are diaphragm pumps, which come in piston- and eccentric variants. These have the advantage of not requiring oil, and do not produce vaporized oil on their output that has to be captured or vented. They do not hit quite the same vacuum levels as rotary vane pumps, but they can be quite easily staged to improve the final vacuum.
Hot Or Not
Even with most of the gases evacuated around the material that we’re trying to extract moisture from, we still have the option to add thermal energy to hurry the water molecules along. If, for example, we can only hit a pressure of around 100 mbar, we would still need to raise the temperature significantly above room temperature to get the intended effect.
Even with the same PTC-type heater as used in off-the-shelf filament dryers, we could still save significant power and time as now the boiling temperature of the trapped water is less than 50°C. Whether or not this is a very significant difference is something which can be ascertained experimentally after we first get a baseline on what difference just changing the environmental pressure makes.
Thus, all that remains is obtaining some data by firing up a gaggle of vacuum pumps and writing down the results.
Running Experiments
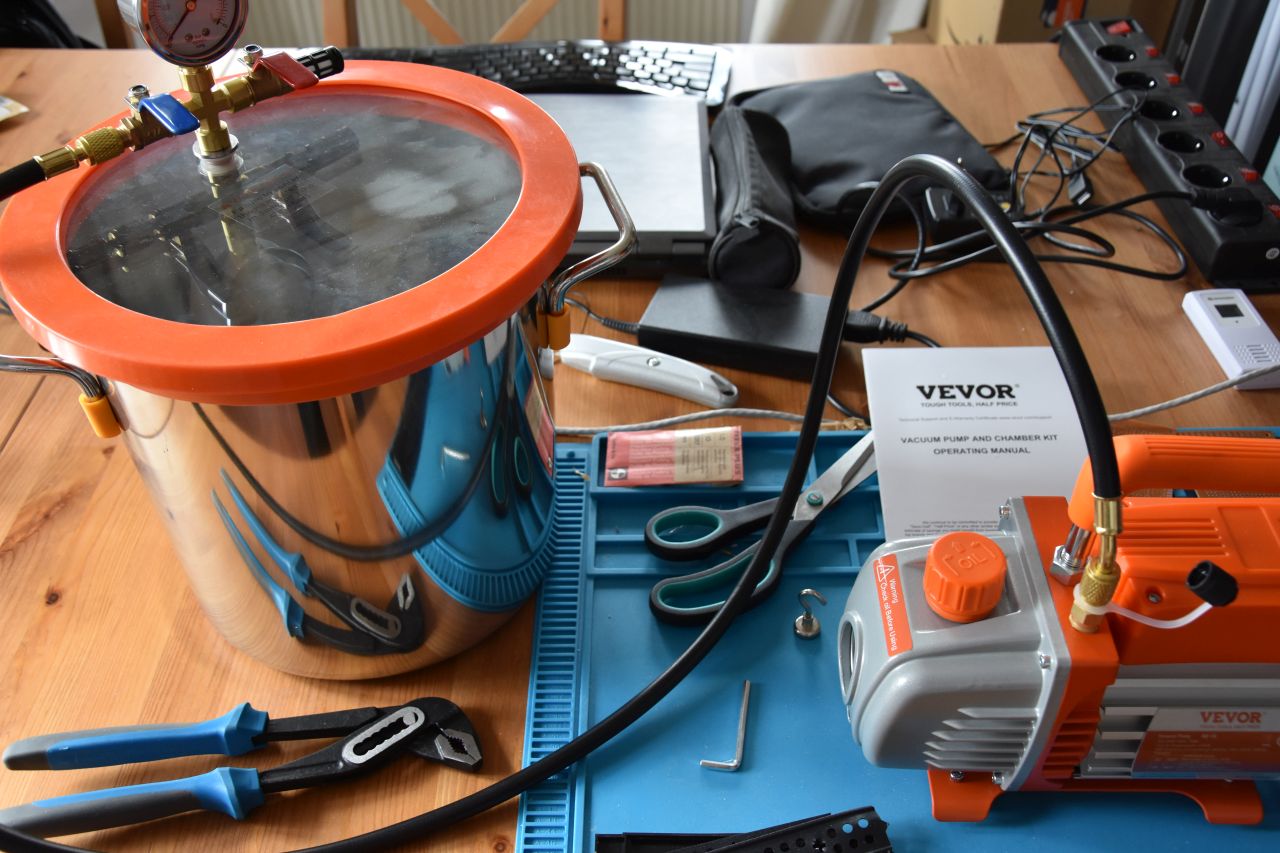
The most straightforward experiment involves the use of a budget rotary vane pump and associated vacuum chamber. Here I picked up a Vevor 3.5 CFM single-stage rotary vane pump (model KQ-1K) rated for 150 Watt along with an 11 L vacuum chamber. Unfortunately the first pump that I received was defective and sounded like someone had lost a bag of spanners inside it while running, while only hitting a sad final vacuum of ~400 mbar.
Fortunately the replacement unit seemed to work a lot better and hit -1 bar on the chamber’s vacuum gauge along with a happy burst of nebulized oil from the pump’s air-oil separator. It was finally time to load up the chamber with some wet things.
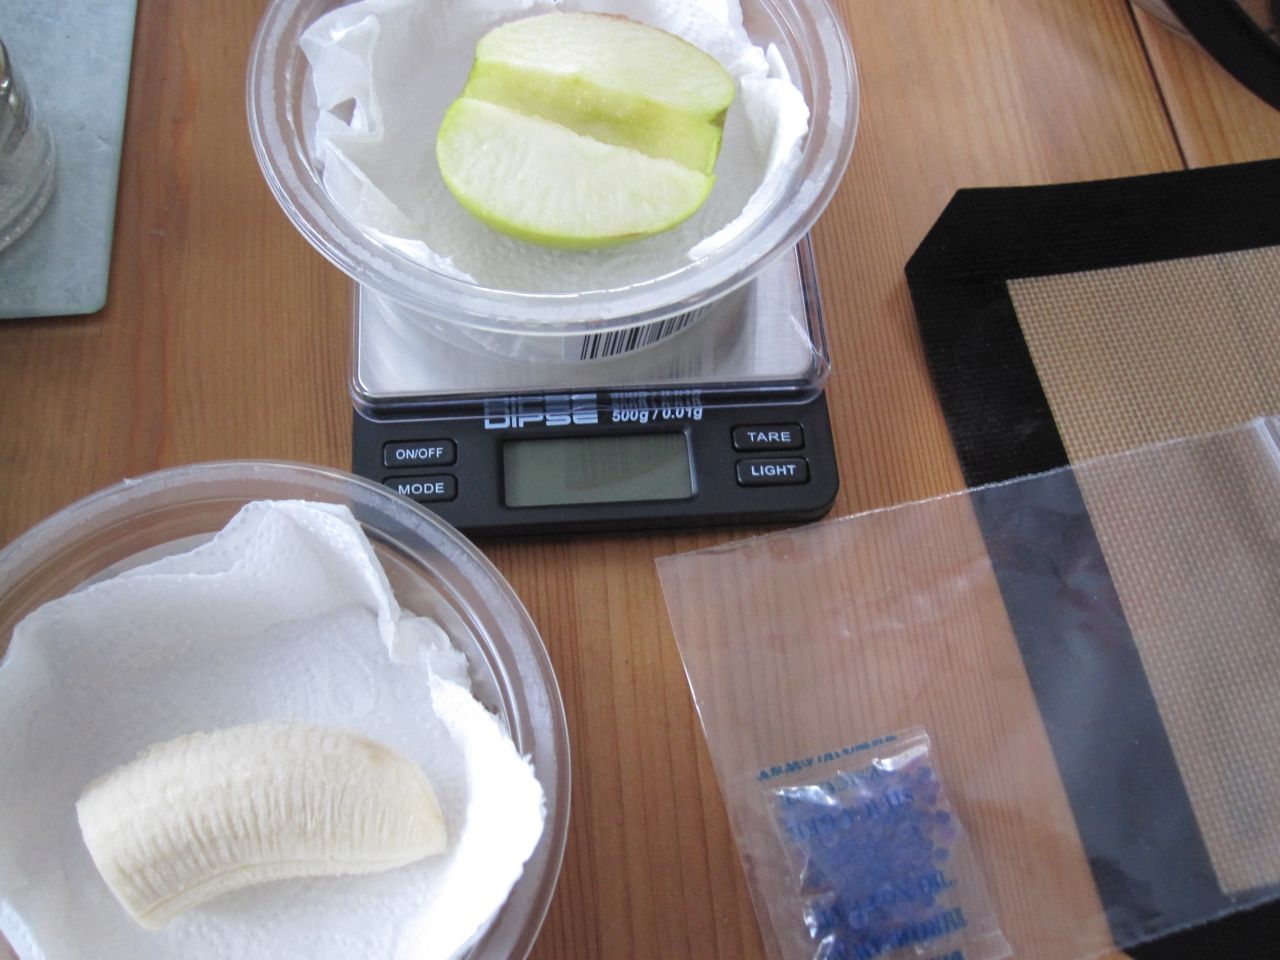
As testing the moisture content in a spool of filament is tricky at best, I instead opted for two much easier indicators of vacuum drying chops: a bag of color-changing (cobalt(ii) chloride-containing) silica desiccant and juicy pieces of fruit (apple and banana). The latter items being mostly because it’s a fun experiment and dried fruit is tasty, plus it’s another way to judge drying capacity.
After loading in the samples, the chamber had a vacuum pulled, with the pump managing 10-20 mbar. This is approximately one light-year away from the advertised 5 Pa, but then nobody trusts marketing on non-laboratory equipment. Other than there being clear bubbling/boiling of fluids being visible on the apple piece as the vacuum formed there was little to observe.
After letting it rest for approximately 24 hours the chamber was checked and confirmed to have retained its vacuum level. Ignoring physical changes, the samples’ weight were compared to their pre-vacuum exposure. This gave the following results:
- Apple: originally 53.23 grams, final weight 51.76 grams. Decreased 1.76 grams.
- Banana: from 41.64 grams to 40.58 grams. Decreased 1.06 grams.
- Desiccant: from 3.12 grams to 3.78 grams. Gained 0.66 grams.
This shows that the fruit definitely lost some moisture, while the silica desiccant wasn’t saturated yet and kept doing its thing. As for the effect on the fruit, the apple looked fresh and other than a slightly dryer outer layer was still moist and tasty. The piece of banana had however turned gooey and was not very appetizing any more.
As an aside, the Vevor pump also got rather hot after a few minutes, with cloudy oil in the reservoir, so the best way forward here might be to invest in a second-hand twin-stage lab-level pump instead.
Diaphragm Time
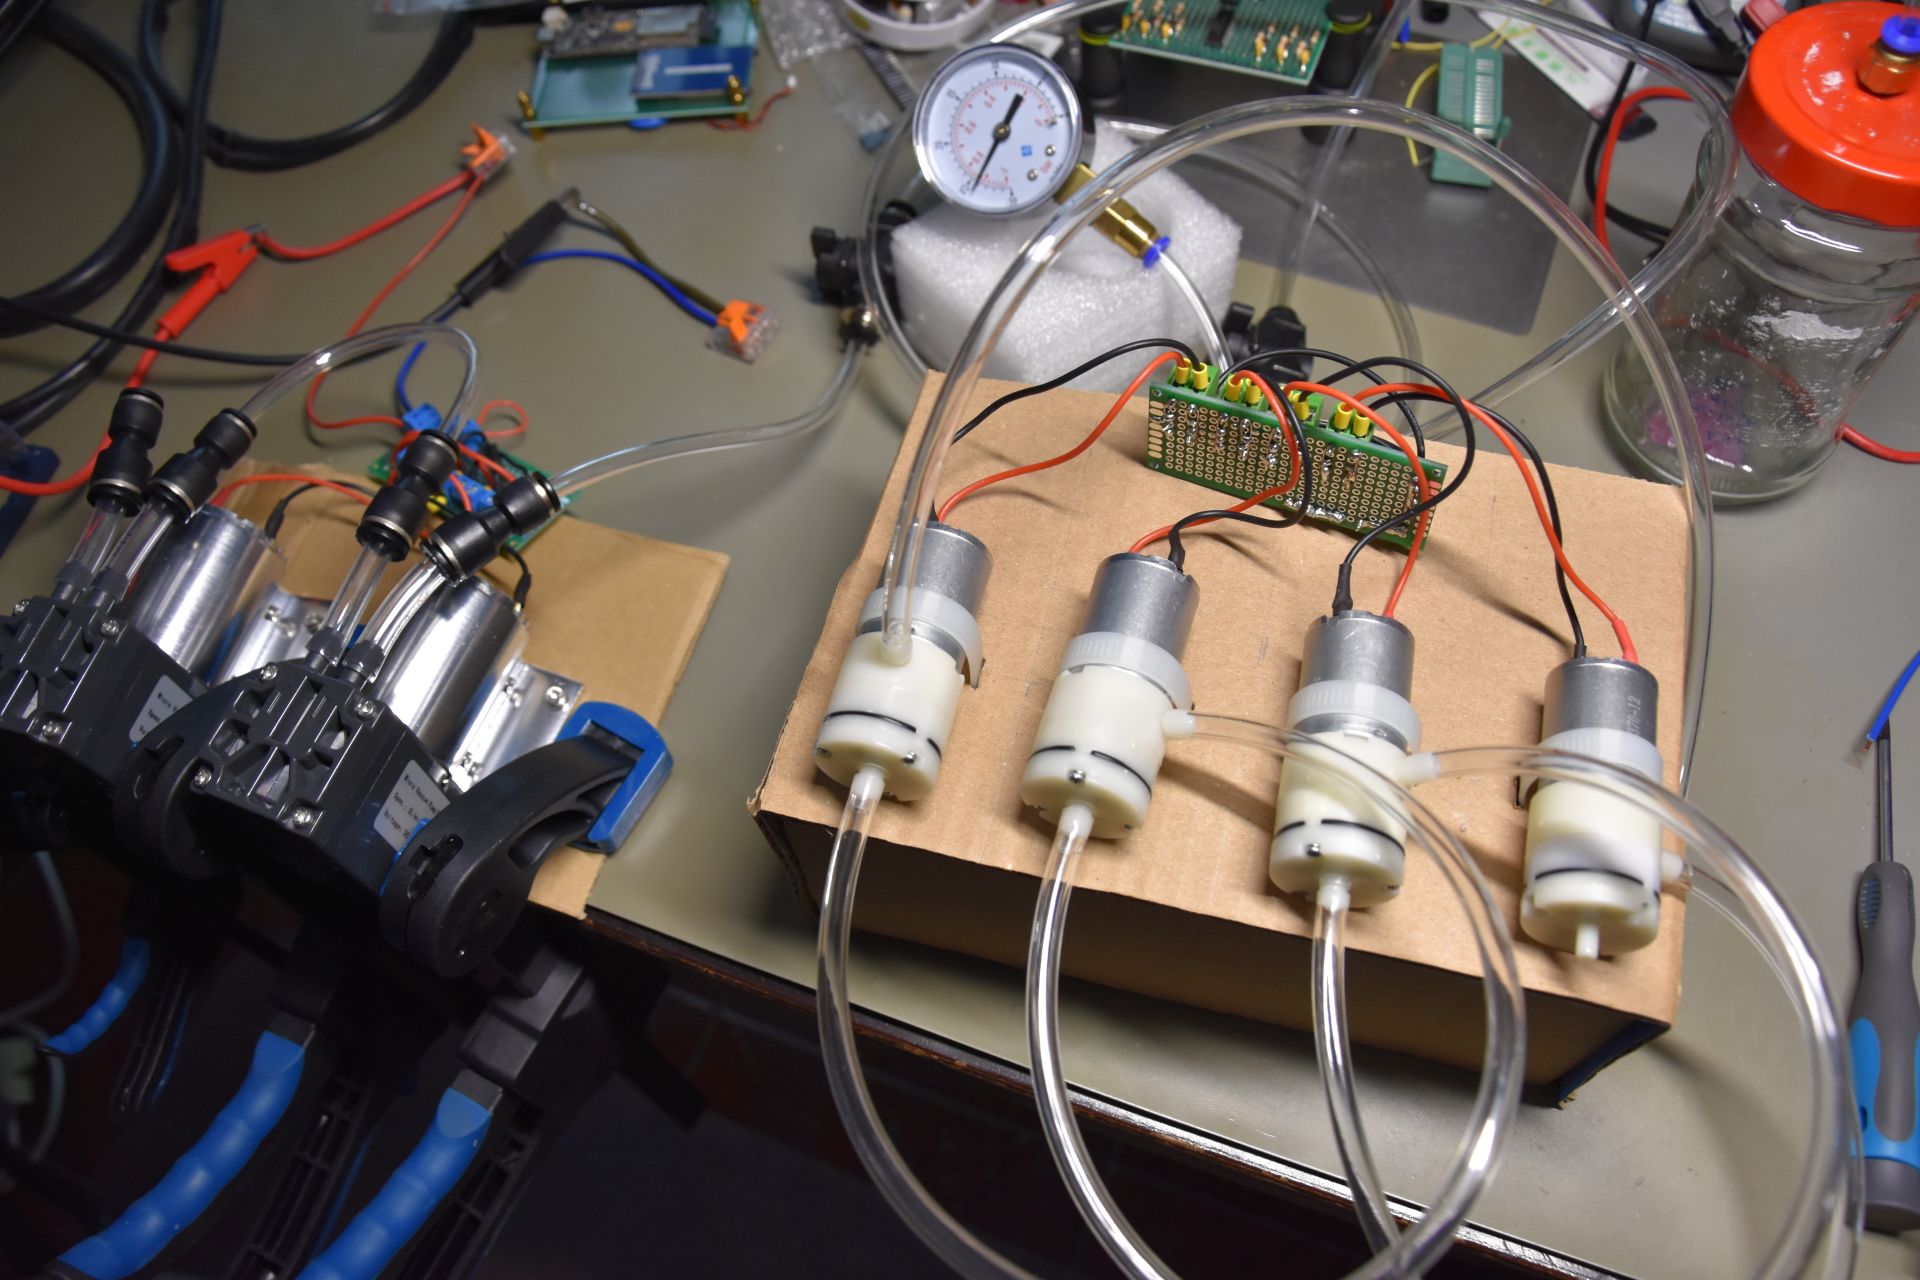
With those results in hand, we still got two more vacuum setups: the two types of diaphragm pumps. Both are readily available via any online shopping platform, with the micropumps available for about $5 a pop, as they’re commonly used in e.g. vacuum packaging devices. The larger eccentric pumps are also found everywhere, but come in significantly pricier, even if they can pump a much larger volume per minute.
Here the micropumps are connected in a four-stage configuration, while the eccentric pumps feature a two-stage configuration. Both use the same vacuum chamber, being a repurposed glass jam container. Not only is jam rather tasty, their glass jars are also designed to maintain a vacuum for extended periods of time as part of the preservation process, making them excellent small vacuum chambers.
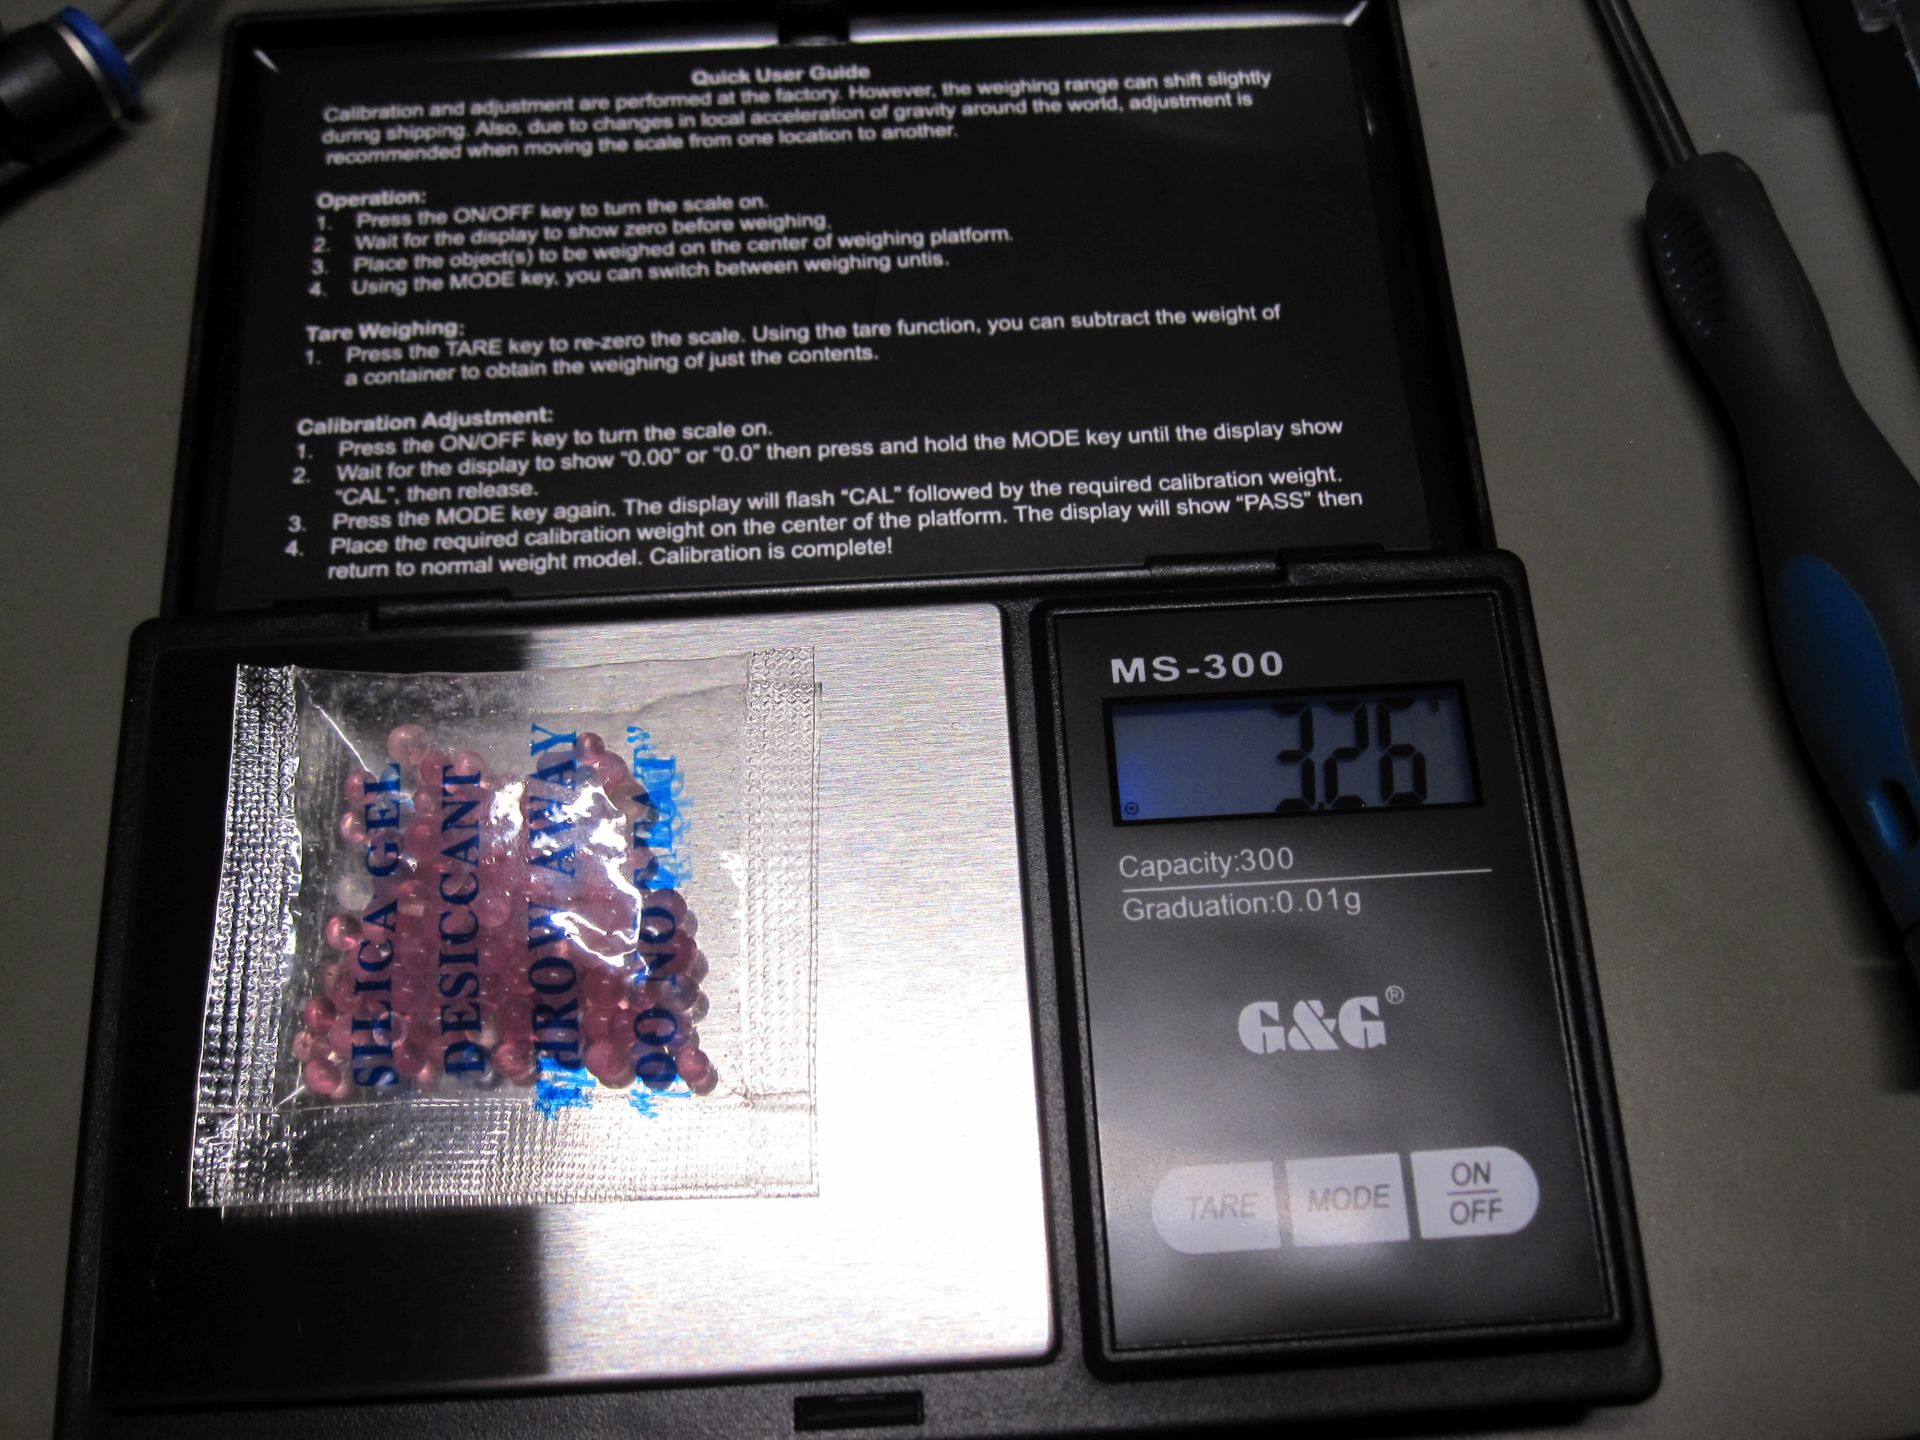
We run the same experiment as before, but only with the silica desiccant. This shows a rather similar outcome, just with these pumps not hitting quite the same final vacuum. For the twin-stage eccentric pump setup the final vacuum was about 100 mbar, and the quad-stage micropump system hit 60 mbar.
Much like with the rotary vane pump experiment, there was no clearly visible color change to the desiccant. The weight remained unchanged from an initial 3.26 grams, taking into account the variability of those cheap ‘precision’ scales, even after calibration.
Discussion
What these experiments make clear is that merely having a low vapor pressure isn’t a silver bullet when you want to remove moisture from silica desiccant or unsuspecting pieces of fruit. It also shows why vacuum packing foodstuffs is a good way to keep them fresh for longer, as leaving a piece of apple lying around on a kitchen counter for a day would result in a far less tasty result.
The application of thermal energy is thus apparently not just a good idea, but might be the best way to make moisture hurry up in evacuating from a sample, especially when water is bound to e.g. a desiccant. For the next stage of this vacuum drying adventure we’ll thus be looking at putting vacuum chambers into some kind of thermal chamber, like a confused mixture of an autoclave and pressure cooker. Here the main question is the selection of the optimal heating solution, which is where again there are many choices.
This should reveal whether the <100 mbar of the cheaper, 12 VDC-powered diaphragm pump setup is enough to make it a competitor to the mains-powered rotary vane pump for this purpose. Beyond this there is also the question in how far existing filament dryers could be retrofitted to support some level of vacuum, as well as potential vacuum storage.
Any thoughts, notes, references and more on this topic are most welcome.


Is there any concern about what pulling vacuum might do to the material being dried? Lower pressure lowers the vapor point of water; wouldn’t it also lower the vapor points of various constituents of the plastics? Any air bubbles inside a filament might expand, and some of the things that need drying are already kindof aggregates instead of a chemically bonded compound.
At best the pressure chamber might save some time but how much? How much does your time have to be valued at to balance the expense of the chamber?
See also those “home freeze drying” appliances that have been selling recently. They look to be nifty hacker bait machines but who needs the fuss?
Going purely from mechanics, atmospheric pressure is not that high. If you pull on a chunk of filament with more than an ounce of force, the internal stress will already be higher than putting it in vacuum. It might already have that much stress just from being wound onto the spool.
RE: Home freeze drying appliances.
Not really that recent of an occurrence. Harvest right has been on the market for ~13 years. Weve bought one new in 2015.
Weve bought 2 used ones since. We didnt really need the third, but it was so cheap (<$1k) and close to us we couldnt turn it down.
Last year we bought a small used Ultra Freezer. It can take 48 trays down to -40 in under 2 hours. The harvest rights take 9-12 hours to get to -20c but will kick the vacuum on and start drying within 5 minutes of starting if we load them from the ultrafreezer. We only have 18 trays capacity between our 3 HR’s so we dont run more than that in the ultrafreezer. The drying cycle is so long we would be wasting a ton of power keeping a full freezer of trays cold while we waited for a HR to become available.
a few hours?
more like 8 hours minimum. why are your guy’s 3d printing articles so uncharacteristically rough compared to your other ones?
I mean, that really depends. Do you have a high accuracy scale to tell when your filaments are actually dry?
If you are going to nitpick about stupid stuff, maybe actually have something worthwhile to add?
I just had a thought, has anyone tried storing their unused filament in those cheap vacuum seal bags, like they sell for clothes and pillows?
It’s not a hard vacuum, but maybe less moisture ingress and less need for filament dryers.
Vacuum bags for filament have been on the market for years.
I just store my filament in a big snap-top rubbermaid tub with 1.6kg of calcium chloride in the bottom and I’ve never seen a need for a filament dryer.
No power, no waiting, filament is always dry and reqdy to go. Low tech is sometimes the best tech.
Where I live, the humidity is high enough that a day or two outside the box (ie, on the printer being used) can start to show effects in the print quality. I do what you do for sure, but I do have to dry my more-frequently used spools quite often because of this.
I use the vacuum-seal bags for storage of less-frequently used spools that don’t justify space in my desiccator box. Pop a 50 g bag of desiccant in the spool center hole, seal, pull vacuum, store indefinitely.
One issue is that a nearly-empty spool walls will crumple inward under the load of the vacuum. Depending on the spool it stays that way when removed from the vacuum. After all, that’s a third of a ton of force on it. Doesn’t functionally harm them, just looks like an “oops”.
Thanks for the first-hand account of why you should generally use a foretrap with a rotary vane compressor. What comes out of the chamber goes into the pump oil as contamination. That cloudy oil is an oil-water emulsion. That style of pump is often not the right choice for removing condensable vapors.
It would help the hacking along to separate the design into two processes: (1) how does the water get out, and (2) where does the water go?
As to (1), higher temperatures and lower vapor pressures yield higher rates of water exit. Even at ambient temperature and pressure, a sealed cabinet with nonsaturated dessicant inside has a vapor pressure that’s lower than what the equilibrium vapor pressure would be, which can be true because such a system is not in vapor equilibrium. Also beware of diminishing returns with increasing vacuum; the first half of pressure removal causes more rate change in vapor release than the second half.
As to (2), you can either trap the water or exhaust it. Desiccants and cold fingers are both traps, as is rotary vane pump oil. Diaphragm pumps can exhaust. An easy foretrap can be made with a tube full of dessicant with openings on each end.
Thank you for those insights, EH. You’re right that the cloudiness is probably an oil-water emulsion, as the moisture will come into contact with said oil at the vanes. I’ll see about adding a moisture trap there. Obviously I’m not an expert here, but I welcome the learning experience :)
As you note the rotary vane pump may indeed be overkill in terms of final vacuum, and is also a bit of a bother with the need to both trap moisture and ideally the nebulised oil.
Foretrap is a sensible approach. Using a more appropriate pump — one that doesn’t trap the water vapor — is even better.
Another approach is simply to use “ballast gas”: Bleed a little ambient air continuously into the vacuum. As much as possible without losing your desired vacuum. This evaporates the water out of the oil.
You still have the oil mist issue, but a decent self-draining filter will capture most of that.
Also, no matter the pressure, it still requires energy to evaporate the water out of the filament. Water takes a few kilojoules per gram to turn into vapor. That heat must come from somewhere.
No matter what you do you still need to inject heat. For small water loads and lots of time available you can just rely on ambient room temperature to radiate in. For non-trivial water extraction you probably want to explicitly heat it.
50 watts of heat can remove about a gram of water per minute.
A gram per minute of contaminant is going to load a vane pump pretty heavily, even with ballast bleed. A cheaper, quieter diaphragm pump is a much better choice.
I’m not convinced vacuum drying is going to be more energetically efficient. Water is a notoriously sticky molecule – anyone who’s worked with high-vac systems knows that you have to pump and bake to get the water out. This isn’t a high-vac kind of operation, true, but water is still water, without additional thermal energy a molecule is less likely to jump ship. While pumping may reduce the amount of baking necessary, I think per watt you’ll get better results with just heating rather than heating and pumping. I’d be interested to see a careful study in how effective the application of pumping is in this application, I’m basing this mainly on vibes and about a decade of experience with high-vac systems.
I wonder how you efficiently heat under a vacuum, normal convection will work way less. I suggest you need to either heat first, then vacuum, or use infrared heating.
Attach a silicone 3D printer bed heater to the bottom of the vacuum chamber. The radiant heat produced will heat the contents. Put it on a PID loop to set the desired temp.
Convection loss aside, might a hot surface, say the steel housing of a refrigeration compressor or cast aluminum/iron cylinder head, radiate any meaningful amount of heat into the contained material if said metal surface were incorporated directly as an interior surface of a vacuum chamber?
(In my mind, I was specifically picturing the surface as being the domed shell of a hermetically sealed refrigeration compressor.)
In the light of making this contraption energy friendly: the heat generated by the vacuum pump, might be repurposed here.
Heating element under tray holding filament inside vacuum chamber, IR thermometer to monitor
I think one of the major challenges with using pure vacuum is that most of the moisture in the filament is actually fully absorbed, not just adsorbed. Just like how the apple skinned over and was relatively unaffected on the inside, without any heating the interior water probably won’t be able to diffuse through the plastic quickly enough to see the difference that vacuum makes.
IMO the fastest way to dry filament would probably be to ditch recirculation in favor of a constant stream of hot air that gets vented from the container. This way you’re actively removing water from the system and letting Le Chatelier’s principle drive evaporation to near completion. Obviously this would be way worse by pretty much every other metric (noise, power consumption, etc), but it would be fast!
Thanks for the great article!
i just want a better cycle to dry the desiccant balls in my commercially-produced filament dryer. it’s such a pathetically small amount of desiccant, the end-of-summer dry out has multiple 8 hour stages of alternately drying the filament and desiccant. seems like a real design flaw of my dryer but i wonder if i’m not just being dumb about how i use it.
on the bright side, PETG still prints clean (enough, by my low standards) even when my ‘dry box’ gets pretty humid. knock on wood.
CNC Kitchen evaluating use of a vacuum chamber vs food dehydrator: https://www.youtube.com/watch?v=eqQRN9TUw08&t=299s
Drying silica beads in a microwave FTW: https://www.youtube.com/watch?v=kIG_dmJBD_w&t=232s
I always wondered, why the conventional dryers only have a thin plastic wall. No insulation whatsoever.
Then they run the fan permanently inside the dryer. Heat up, then run a fan for a minute that moves hot and moist air out of the system, ideally through a simple couterflow heat exchanger. Repeat every 10 Minutes or so.
I also thought about adding vaccum. I’d still heat the spools by conductive heating from the inside of the spool. Or heat them up first with air, as soon as they’re hot, pull vacuum…
I think there is still a lot of untapped potential for energy efficient drying.
I see you too have made the mistake of buying Vevor.
I made that mistake twice – I survived their PCP compressor that ruptured parts at 4000psi and their combo laser/”CNC” mill that has zero safety features.
My scathing product review on their website, however, did not survive. Deleted along with any other review below four stars.
I worked in polymer and composite research on my industrial placement. We used to have a vacuum oven in the lab for drying materials before moulding or extruding them. It was a pretty simple affair with around 10 trays which held loose polymer, heating element and vacuum pump. It was typical to dry at around 80-90 Celsius for 24 hours before we used the polymer.
I’m sure a used vacuum oven could be found for anyone serious about it.
Did this in my distant past. Used the small vacuum chamber I normally used for impregnating small transformers. Dried it out, but is ok only if the filament was quickly used. Dunno if it was the material I was using at the time, but subjecting the filament to a vacuum seemed to make it even more hygroscopic.
Just store the stuff correctly to avoid these semi-exotic methods.
The key issue is water diffusion across the boundary layer. Vapor pressure is independent of the ambient pressure so pulling a vacuum doesn’t change the vapor pressure but it does mean that water that has left the filament diffuses away from the boundary more quickly. The fan does the same thing, the movement of the air effectively reduces the boundary thickness so water can diffuse out of the material more quickly. This is why if you want to dry something quickly just put it in front of a fan. In any event, water diffusion. With in the filament itself in is the limiting factor. Even in if you could pin the moisture outside of the filament to zero it would still take a while for the filament to dry. The other only thing that will modify the diffusion in the filament is heat! Heat also shifts equilibrium in favor of the gas phase.
This has been tested many times. The gains compared to the amount of effort for using vacuum to dry filaments is not worth the effort.
I print with PA-CF and PPA-CF almost exclusively, for functional prints as engineering prototypes. PPA is notorious for needing to be very dry in order to print well. This is an even greater, more essential requirement with PA-CF.
16 hours in a blast oven at 85 deg C gets these thoroughly dry to where a Polymaker dry box with them will hold at less than 10% humidity for as long as the spool lasts — in one case that was up to 1 year for a deliberate test. You don’t even need a hermetic seal at the top (such as around the feed tube opening) as dry air is heavier than moist air and will sink with gravity and stay in there displacing any moist air — as long as the container below the lid has no breaches in it.
Thus means that 16 hours in the blast oven was enough to cause virtually all the moisture to sublimate out of the filament. Here’s the thing I’ve found: from the factory, there never really is that much moisture in the filament — it is those cardboard spools that all the makers are using now that hold huge amounts of moisture.
At least 10 of the 16 hours is to get the moisture out of the cardboard spools.
The really funny thing is that if you completely dry out the cardboard spools, they will actually act as a desiccant and absorb moisture from the air inside the container.
So, bake your filaments and their cardboard spools in a blast oven (you can buy a good, lab grade one for around $500 — buy once, cry once) just below the glass transition temp for 15 hours and if you use a decent dry box to hold them after, you’ll be able to maintain exceptionally dry humidity levels (10% or less) in there with very little additional desiccant for a long, long time even in a box with a little aperture at the top.
Vacuums are great for longer-term storage because if you keep air away from your filament, well, any moisture in the air will be kept away also. But you don’t need a vacuum to get most of the moisture out.
You can also bake a single roll of filament at a time in a small reflow oven like a Controleo3. 130C is nothing compared to 250C.
The total vapour pressure of water is lower at low temperatures than the additional from a modest increase of temperature. Hot air beats vacuum as well as being simpler. Regenerative heat exchange to recover waste heat is where you want to focus optimisation. Filament, even in high vacuum, will evaporatively cool until ambient heats it significantly. Given vacuum prevents convection and most conduction, radiative heat dominates, which is proportional to T^4 so won’t be high from ambient even after your filament freezes. This means vacuum is a waste of time unless you have high vacuum and radiant heating (even then you’ll damage your filament if the water boils in situ unless you are careful to pre-freeze and sublime the water). The reason freeze drying is done at vacuum isn’t to accelerate heating, it is to sublime the moisture away to avoid glass formation of solubles changing the texture (or for coffee, slowing dissolution). Freeze drying only works with porous media (foamed in the case of coffee) or material that is high water content such that it becomes porous once the water is removed. If you don’t need to worry about that spray drying is far cheaper for coffee etc. If you want to optimise fast filament drying you should flow warm air through to bring both moisture capacity in the air and heat for latent heat of evaporation. Vacuum, while fun, is a waste of time.
For hydrogels?
https://phys.org/news/2026-04-dual-network-chapter-3d-printable.html
As already noted a few times here, vacuum for drying only works if there is a direct boundary-layer between the air (or lack thereof) and the water. The same applies to the idea of blasting the filament with dry air, which I have seen suggested elsewhere.
I believe it’s our human intuition tricking us here – most other things can be dried this way. But with hygroscopic polymers, we need to let the moisture diffuse out to the surface first – and that process is driven by temperature and time, not vacuum, air-velocity or -humidity.
I have made some experimental simulations on the drying behavior of filaments recently, including a tool for interactively calculating the drying behavior in an inline-dryer: https://github.com/SDI8/IFDM and https://inline-dryer.streamlit.app/ . But it can be used for simulating any drying technique.
“After letting it rest for approximately 24 hours the chamber was checked and confirmed to have retained its vacuum level.” In other words no further moisture had come out of the specimen, and all the vapour that had been removed had accumulated in your vacuum oil with the potential to damage your pump.