Tesla Door Handle Improvements

Automotive engineer and former Tesla employee [SuperfastMatt] takes at look at the notorious Tesla door handle design and how it’s changed over the years (see the video below the break). The original handle design consisted of many moving parts, switches and wires which were prone to failure.  Strictly speaking, the door handle is located on the outside of the car’s interior. While it’s sheltered from direct exposure to the elements, it still experiences the extremes of temperature, humidity, and condensation. The handles were so prone to failure that a cottage industry sprang up to provide improved parts and replacements.

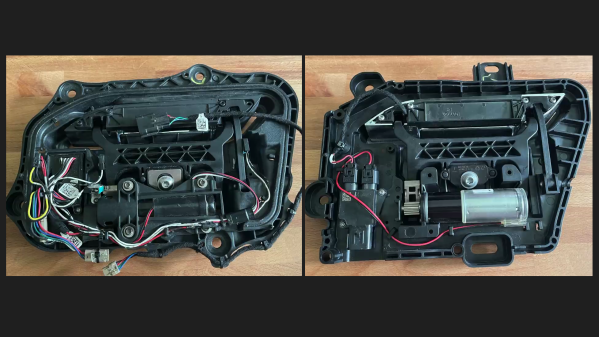
Tesla made various improvements over the years, culminating in the latest version which [Matt] reviews in this video. Nearly all the failure points have been eliminated, and the only moving parts, other than the handle itself, is a magnetic sensor to detect handle motion (previously this was sensed by microswitches). [Matt] indelicately opens up the control module, and discovers an NXP programmable angle sensor ( KMA215 ). This all-in-one sensor detects the angle of a magnetic field, and reports it over an automotive communications bus that’s become more and more common over the last ten years: Single Edge Nibble Transmission (SENT) aka SAE J2716. SENT is a low-cost, transmit-only protocol designed for sensors to send data to the ECU. Check out [Matt] decoding it on the oscilloscope and Raspberry Pi in the video — it looks pretty simple at first glance.

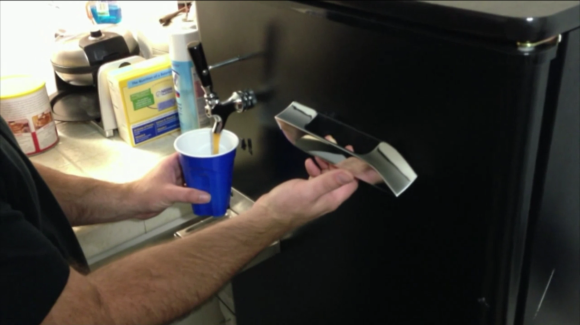
We agree with [Matt]’s conclusion that the door handle design has been significantly improved with this latest iteration, questions of whether one needs a retracting door handle aside. If you’d like to learn more about SENT, here is a tutorial written by IDT (now Renasas) applications engineer Tim White. This isn’t [Matt]’s first encounter with a Tesla door handle — back in 2012 we covered his project which used one to dispense beer. Thanks to [JohnU] for sending in this tip.

Continue reading “Tesla Door Handle Improvements”

Tesla Model S Handle Dispenses Beer; Hides When Done

tesla-model-s-beer-dispenser

Let’s face it, sometimes you need to take time out from engineering cutting-edge electric vehicles to over-engineer a beer fridge. And to tell you the truth, after seeing what [Matt Brown] managed to pull off we now have a gut-felt yearning for one of our own. He took a beer fridge and added a vanishing dispenser handle from a Tesla Model S.

You might be thinking that this an expensive part, and you’ve be more correct than you realize. It’s not even a stock part. This is a prototype that someone threw in the trash. [Matt] plucked it from oblivion and milled a spot for it in the door of the fridge. Your average [Joe] probably doesn’t know that the Model S comes with handles that pull themselves flush with the body of the vehicle.

[Matt] dug out insulation on the inside of the door until there was room to cut a hole for the handle. The clamped the assembly in place and used spray foam to re-insulate as well as glue it in place. An Arduino monitors the area below the tap. When you put your glass under the spout the handle extends. When you pull on it a solenoid drives the tap handle forward. This sounds pretty dry, but we think the demo after the break will have you lusting after one as well.

Continue reading “Tesla Model S Handle Dispenses Beer; Hides When Done”

Color Changing Door Handles

This color changing door handle was made using a very simple manufacturing process. [Barmak] already had experience working with polyester resins when making passive component filled drawer pulls (he included a couple of pictures at the end of his post). The same process was used here except that instead making it from one solid chunk of clear resin he decided to use alternating layers of dyed resin.

The build begins with a mold made out of MDF. This material has a very smooth surface finish which will help with the final look of the door handle. Threaded rod is inserted through carefully placed holes in the side of the mold — these will serve as the mounting hardware when complete. He then pours thin coats of resin to build up the complete handle.

An RGB LED strip is incorporated in the side of the handle that will go toward the door. It seems like the wires to control the device pass through a hollow spacer surrounding the threaded rod. He makes some mention of using a 555 timer to control the colors, but there’s not much more information than that. Still, the reflected light is a unique feature if you’ve got a place in your home that needs to be spiced up.

Once you’re done, you can use any leftover resin to make your own project boxes.