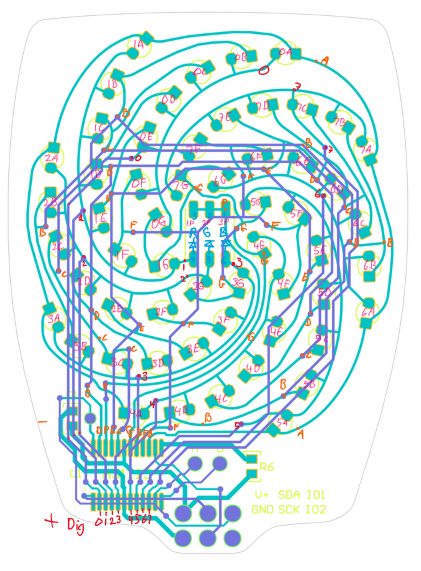
RP2040 Boot Loader Is A Worm

[Hunter Adams] has written a secondary bootloader for the RP2040 that uses an IR link and can be extended to behave like a polite worm virus. This allows the easy updating of a large cluster of co-located RP2040-based controllers. This could be handy in applications like swarm robotics or virtual cattle fencing. The project he demonstrates in the two videos ( below the break ) uses a pair of IR transmitters/receivers. But he purposely wrote the boot loader to be independent of the serial link, which could be infrared, radio, audio, or just wires.

Not only did [Hunter] make a boot loader, but he documented the entire boot process of the RP2040 chip. Whether or not you need a secondary bootloader, this is an excellent resource for understanding how the RP2040 responds to power cycling and resets. The boot loader code is available at his GitHub repository.

You may recall that [Hunter] is the lecturer of Cornell University’s Designing with Microcontroller classes, whom we’ve mentioned before. We’ve also covered some of his students’ projects as well, like these air drums and this CoreXY pen plotter.

Continue reading “RP2040 Boot Loader Is A Worm”

Arctic Adventures With A Data General Nova II — The Equipment

As I walked into the huge high bay that was to be my part-time office for the next couple of years, I was greeted by all manner of abandoned equipment haphazardly scattered around the room. As I later learned, this place was a graveyard for old research projects, cast aside to be later gutted for parts or forgotten entirely. This was my first day on the job as a co-op student at the Georgia Tech Engineering Experiment Station (EES, since renamed to GTRI). The engineer who gave me the orientation tour that day pointed to a dusty electronic rack in one corner of the room. Steve said my job would be to bring that old minicomputer back to life. Once running, I would operate it as directed by the radar researchers and scientists in our group. Thus began a journey that resulted in an Arctic adventure two years later.

The Equipment

The computer in question was a Data General (DG) mini computer. DG was founded by former Digital Equipment Corporation (DEC) employees in the 1960s. They introduced the 16-bit Nova computer in 1969 to compete with DEC’s PDP-8. I was gawking at a fully-equipped Nova 2 system which had been introduced in 1975. This machine and its accessories occupied two full racks, with an adjacent printer and a table with a terminal and pen plotter. There was little to no documentation. Just to turn it on, I had to pester engineers until I found one who could teach me the necessary front-panel switch incantation to boot it up. Continue reading “Arctic Adventures With A Data General Nova II — The Equipment”

Simon Says With An RP2040

The team of [Michael] and [Chimdi] from Cornell’s Designing with Microcontrollers (ECE 4760) Fall 2023 session designed a version of Simon Says on an RP2040 which they call Pico Says. It uses UDP packets over WiFi to communicate between the players, and supports VGA graphics for output. Each player’s hardware consists of a Pico W module plus a control panel containing the four LEDs and buttons ( red, green, yellow, and blue ) plus send and reset buttons.

For purposes of this lab, the modules were build on a solderless breadboard and used perfboard for the control panels. They weren’t entirely happy with their choice of UDP because they experienced frequent datagram dropouts in the noisy environment of the microcontroller lab. They also planned to implement sound effects, but ran out of time after spending too much time on the WiFi implementation, and had to drop that feature. In the end, however, they wrapped up their project and demonstrated a working game. We can only speculate whether this bonus lesson in resource management was intended by [Dr. Hunter Adams] or not.

Two ECE 4760 course references are highlighted in the write-up that helped them jump-start the project: the UDP and VGA examples for the Pico. These are good links to put in your RP2020 toolbox for future projects, in addition to the ECE 4760 course home page itself. We’ve covered several of these projects recently, as well as the curriculum switch from the Microchip PIC32MX-based Microstick II to the RP2040 last Spring.

Continue reading “Simon Says With An RP2040”

Vectorscope KiCad Redrawing Project

When I saw this year’s Supercon Vectorscope badge, I decided that I had to build one for myself. Since I couldn’t attend in-person, I immediately got the PCBs and parts on order. Noting that the GitHub repository only had the KiCad PCB file and not the associated schematics and project file, I assumed this was because everyone was in a rush during the days leading up to Supercon weekend. I later learned, however, that there really wasn’t a KiCad project — the original design was done in Circuit Maker and the PCB was converted into KiCad. I thought, “how hard can this be?” and decided to try my hand at completing the KiCad project.

Fortunately I didn’t have to start from scratch. The PCB schematics were provided, although only as image files. They are nicely laid out and fortunately don’t suffer the scourge of many schematics these days — “visual net lists” that are neither good schematics nor useful net lists. To the contrary, these schematics, while having a slightly unorthodox top to bottom flow, are an example of good schematic design. Continue reading “Vectorscope KiCad Redrawing Project”

Nixie Tube RPN Calculator Project

If you like Nixie tubes and/or DIY calculators, checkout this interesting talk from the HP Handheld Conference in Orlando last month by [Eric Smith] from Brouhaha and [John Doran] from Time Fracture. For 20-some years, [Eric] and the late [Richard Ottosen] have been incrementally developing various DIY calculators — this paper from the 2005 HHC conference is an excellent overview of the early project. [John] got one of those early DIY calculators and set about modifying it to use Nixie tubes. However, he got distracted by other things and set it aside — until reviving it earlier this year and enlisting [Eric]’s aid.

This presentation goes over the hardware aspects of the design. Unlike the earlier PIC-based DIY calculators, they decided to use a WCH RISC-V processor this time around. The calculator’s architecture is intentionally modular, with the display and keyboard housed in completely separate enclosures communicating by a serial interface. If the bulkiness alone doesn’t exclude it from being pocket-sized, the 170 VDC power supply and 1/2 W per digit power consumption certainly does. This modularity does lend itself to DIYers replacing the display, or the keyboard, with something different. [Eric] wants to build a mechanical flip-digit display for his unit. As for the software, [Eric] reviews the firmware approach and some future upgrades, such as making it programmable and emulating other flavors of HP calculators.

If you’re embarking on a similar project yourself, check out this talk and take notes — there are a lot of interesting tidbits on using Nixie tubes in the 21st century. If [Eric]’s name sounds familiar, you may know him from the Nonpareil calculator software used on many emulators and DIY calculator projects, one of which we covered some years ago. [John] is also a long-time tinkerer, and we wrote about his gorgeous D16/M HCMOS computer system back in 2012. Thanks to [Stephen Walters] for sending in the tip.

Continue reading “Nixie Tube RPN Calculator Project”

Keypad Interface Module Reverse Engineers Pinouts So You Don’t Have To

If you’ve scavenged some random keypads and want to reuse them in a project without the hassle of figuring out the pinouts, then [Cliff Biffle] has an interface module for you. The Keypad Go connects to the mystery keypad via an 8-pin 0.1 inch header, and talks to your own project using I2C and/or serial.

You could categorize the mechanism at work as machine learning of a sort, though it’s stretching definitions a bit, as there is no ChatGPT or GitHub Copilot wizardry going on here. But you must teach the module during an initial calibration sequence, assigning a 7-bit ASCII character to each key as you press it. Once trained, it responds to key presses by sending the pre-assigned character over the interface. Likewise, key releases send the same character but with the 8th bit set.

The heart of the board is either an STM32G030 or STM32C011/31, depending on parts availability we presume. I2C connectivity is over a four-pin STEMMA connector, and logic-level serial UART data is over a four-pin 0.1 inch pin header. [Cliff] plans to release the firmware and schematics as open source soon, after cleaning up the code a bit. The device is also for sale on Tindie, though it looks like they won’t be back in stock until later on in the month.

Longtime readers might recognize [Cliff] from his impressive m4vga project which we covered back in 2015, where he manages to generate 800×600 VGA signals at 60 Hz from an STM32F4-family microcontroller.

Continue reading “Keypad Interface Module Reverse Engineers Pinouts So You Don’t Have To”