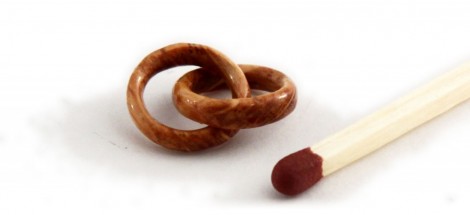
[Johan von Konow] wanted to make something special as a wedding gift to his wife. He decided a pair of interlocking miniature rings would be the perfect keepsake. He started his search for a way to mill the wooden rings from a solid piece of wood, and documented his journey for our enjoyment.
This project poses an interesting challenge. Most CNC mills offer three axes of freedom, but he only had a 2D mill meant for routing PCBs. This means the cuts can only be made from the top down at one depth. In order to fabricate the rings he needed to cut from more than one side. With more study, [Johan] discovered that it would be necessary to cut the wood stock from eight different angles before the rings would be complete.
The solution to the problem was to first mill a jig to hold the wood stock. It has positions to hold the stock at each different angle. The final step before starting the cut was to mill the stock itself to perfectly fit his custom jig. We think it turned out great, thanks in part to hand filing, sanding, and polishing to smooth the marks left from milling.


Holy crap! This is awesome.
Wow! I hope that’s a really big match…
I can assure you that the match is standard size. The rings are used as a pendant for a necklace. The ring diameter is less than half an inch (11.6mm)
Very impressive workmanship in a tiny package. I don’t have the patience nor dexterity for something that delicate.
This was a standard project, back in the days when “whittling” was a right of passage for young boys who ALWAYS carried a pen-knife (even in school).
Another more difficult project was a “ball in cage”.
I remember sitting in church(when I still believed in such things) whittling one of those windmill rubby things you see in old gift stores from time to time where when you rubbed the stick one way, the “propeller” went one direction, and when you rubbed it another way, it went the other direction.(the real secret was how you held the stick, not how you rubbed it)…nobody even looked at me twice for having a knife….
I’ve never seen this before. I *have* seen the ball/cage carving before. Yeah, and carrying a pocket knife/can opener/awl is just what boys did..
and we got the kids in the neighborhood together in a local field and did pickup games of baseball. and rode in the back of the pickup after we picked apples from the orchard in the fall. damn, I am feeling nostalgic.
I wonder what my daughter is going to say about her younger years when she hits middle age?
She’s gonna say remember when there used to be animals on earth before half of the human population died off, and the oceans became inoxic? Man, those were the days!
Oh puhleeze. Step away from CNN.
Very cool,
By the way if any one else is interested I found a place to get some rare/odd wood blanks (small)
http://www.penmakingsupplies.com/Blanks/index.shtml
I saw instructions for the ball-in-cage-attached-to-a-chain in Boys Life magazine circa 1977. I carved one for art class, and it was stolen from our school’s art show. :-/ I used a coping saw blade and a pocket knife. It was a great deal of fun, and not that difficult.
You cheated! My ball-in-cage was made with only a Boy Scout pocket knife. ;-)
I cheated the most (lol) I 3D printed mine but it was just a test to check my support material
Back on topic, these interlocking rings, along with ball-in-cage, and wooden chains, are GREAT first projects for honing your skills with machine tools too.
if making rings helps your **** in a vice feel better more power to you. welcome to the last stage of your life man…
What?
If making internet comments helps your… … … I truly suggest surfing to this one great page I found and follow the suggestions found in there.
http://www.internetlastpage.com/
For the ringmaker, keep up the nice work :)
Sorry, pocketknife, skill, and craftsmanship >> CNC mill, cash, more cash, and a few lines of code.
Sooo, whats a guy gotta do to buy a set?
@Velifer.
That wouldnt make it onto hackaday though would it? And I would like to see your pocketknife skills apply to your CNC programming skills.
Different skillset, not less skilled.
Actually I’d be impressed if anyone made a robot capable of so much as sharpening a pencil with a pocket knife…. as a first stage for a whittle bot, not a specialist arduino containing electric pencil sharpener.