Heating A Woodshop With Sawdust

Most carpenters and woodworkers find themselves with the problem of disposing of all the sawdust they create when performing their craft. There are lots of creative solutions to this problem, such as adding it compost, using it as groundcover in a garden, adding it as filler in a composting toilet, or pressing it into bricks to burn in a stove. All of these have their uses, but involve either transporting the sawdust somewhere or performing some intermediate step to process it. [Greenhill Forge] wanted to make more direct use of it so he built this stove which can burn the sawdust directly and which provides enough heat for his woodshop.

The design is based on one which is somewhat common in Japan and involves building a vessel with a central tube for airflow, with the sawdust packed around it. The tube is made from a hardware cloth or screen to allow air to reach the sawdust. The fire is lit from the top, closed, and then allowed to burn through the stack. [Greenhill Forge] welded the entire stove from various pieces of sheet metal and bar stock, with a glass plate at the top of the stove to close off the fire and a baffle to control the airflow and rate of burn.

Initially, [Greenhill Forge] thought that the fire would burn from the top down, but this turned out to create a smoldery, messy fire instead of a hot, clean burn. Eventually, though, an ember fell down to the bottom and let the stack burn from the top up, and then it started generating serious heat. He estimates that with around 5 kg of sawdust burning for three hours that it’s about equivalent to a 6 kW stove. While a woodworker might not have enough sawdust to run this stove every day, it could be good to have on hand to use once every few weeks when the sawdust builds up enough. [Greenhill Forge] has been hard at work building unique wood burning stoves lately, like this one we recently featured which generates and then uses charcoal as fuel.

Continue reading “Heating A Woodshop With Sawdust”

Off-Grid Electricity And Hot Water From Scrap Wood

Cooking with charcoal is a fairly common human activity, as much as others have come to prefer fuels like propane and propane accessories for their outdoor, summertime grilling. Although it’s made from wood, it has properties that make it much more useful for cooking — including burning at a higher temperature and with more consistent burn rates. It can also be used as a fuel for generating heat and electricity, but since it’s not typically found lying around in the forest it has to be produced, which [Greenhill Forge] has demonstrated his charcoal production system in one of his latest videos.

The process for creating charcoal is fairly simple. All that needs to happen is for wood to be heated beyond a certain temperature in the absence of oxygen. At this point it will off-gas the water stored in it as well as some of the volatile organic compounds, and what’s left behind is a flammable carbon residue. Those volatile organics are flammable as well, though, so [Greenhill Forge] uses them to heat the wood in a self-sustaining reaction. First, a metal retort is constructed from a metal ammo box, with a pipe extending from the side and then underneath the box. A few holes are drilled in this part, and the apparatus is mounted above a small fire on a metal stand. With the fire lit the wood begins heating, and as it heats these compounds exit the pipe and ignite, adding further fuel to the fire. Eventually the small fire will go out, allowing the retort to heat itself on the gasses released from the wood alone.

To generate the hot water, [Greenhill Forge] has taken an extra step and enclosed the retort in a double walled metal cylinder. Inside the cylinder is a copper tube packed in sand, which harvests the waste heat from the charcoal production for hot water. In his test runs, the water in a large drum was heated to the point that the tubing he used for the test began to melt, so it is certainly working better than he expected.

After the retort cools, [Greenhill Forge] uses the charcoal in another process that generates about a days’ worth of electricity and hot water. It’s part of a complete off-grid system that’s fairly carbon neutral, since trees are an abundant renewable resource compared to fossil fuels. Heating with wood directly is still common in many cold areas around the world, with the one major downside being the labor required to keep the stove running. But we’ve seen at least one project which solves this problem as well.

Continue reading “Off-Grid Electricity And Hot Water From Scrap Wood”

The Confusing World Of Wood Preservation Treatments

Wood is an amazing material to use around the house, both for its green credentials and the way it looks and feels. That said, as a natural product there are a lot of microorganisms and insects around that would love to take a few good nibbles out of said wood, no matter whether it’s used for fencing, garden furniture or something else. For fencing in particular wood treatments are therefore applied that seek to deter or actively inhibit these organisms, but as the UK bloke over at the [Rag ‘n’ Bone Brown] YouTube channel found out last year, merely slapping on a coating of wood preserver may actually make things worse.

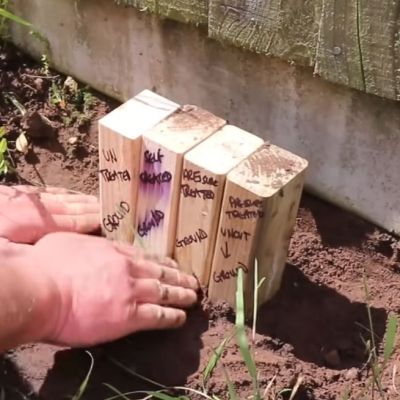
For the experiment three tests were set up, each with an untreated, self-treated and two pressure treated (tanalized) sections. Of the pressure treated wood one had a fresh cut on the exposed side, with each of the three tests focusing on a different scenario.

After three years of these wood cuts having been exposed to being either partially buried in soil, laid on the long side or tossed in a bucket, all while soaking up the splendid wonders of British weather, the results were rather surprising and somewhat confusing. The self-treated wood actually fared worse than the untreated wood, while the pressure treated wood did much better, but as a comment by [davidwx9285] on the video notes, there are many questions regarding how well the pressure treatment is performed.

While the self-treatment gets you generally only a surface coating of the – usually copper-based – compound, the vacuum pressure treatment’s effectiveness depends on how deep the preservative has penetrated, which renders some treated wood unsuitable for being buried in the ground. Along with these factors the video correctly identifies the issue of grain density, which is why hardwoods resist decay much better than e.g. pine. Ultimately it’s quite clear that ‘simply put on a wood preserver’ isn’t quite the magical bullet that it may have seemed to some.

Continue reading “The Confusing World Of Wood Preservation Treatments”

A Wood Chipper From First Principles

For whatever reason, certain pieces of technology can have a difficult time interacting with the physical world. Anyone who has ever used a printer or copier can attest to this, as can anyone whose robot vacuum failed to detect certain types of non-vacuumable waste in their path, making a simple problem much worse. Farm equipment often falls into this category as well, where often complex machinery needs an inordinate amount of maintenance and repair just to operate normally. Wood chippers specifically seem to always get jammed or not work at all, so [Homemade Inventions] took a shot at building one on their own.

To build this screw-based wood chipper, the first thing to fabricate is the screw mechanism itself. A number of circles of thick steel were cut out and then shaped into pieces resembling large lock washers. These were then installed on a shaft and welded end-to-end, creating the helical screw mechanism. With the “threads” of the screw sharpened it is placed into a cylinder with a port cut out to feed the wood into. Powering the screw is a 3 kW electric motor paired with a custom 7:1 gearbox, spinning the screw at around 200 rpm. With that, [Homemade Inventions] has been able to easily chip branches up to 5 centimeters thick, and theorizes that it could chip branches even thicker than that.

Of course, wood chippers are among the more dangerous tools that are easily available to anyone with enough money to buy one or enough skill to build one, along with chainsaws, angle grinders, and table saws, so make sure to take appropriate safety precautions when using or building any of these things. Of course, knowing the dangers of these tools have led to people attempting to make safer versions like this self-propelled chainsaw mill or the semi-controversial table saw safety standard.

Thanks to [Keith] for the tip!

Continue reading “A Wood Chipper From First Principles”

Drilling Rig Makes Accurate Holes In Seconds

Drilling holes can be quite time consuming work, particularly if you have to drill a lot of them. Think about all the hassle of grabbing a part, fixturing it in the drill press, lining it up, double checking, and then finally making the hole. That takes some time, and that’s no good if you’ve got lots of parts to drill. There’s an easy way around that, though. Build yourself a rad jig like [izzy swan] did.

The first jig we get to see is simple. It has a wooden platter, which hosts a fixture for a plastic enclosure to slot perfectly into place. Also on the platter is a regular old power drill. The platter also has a crank handle which, when pulled, pivots the platter, runs the power drill, and forces it through the enclosure in the exact right spot. It’s makes drilling a hole in the enclosure a repeatable operation that takes just a couple of seconds. The jig gets it right every time.

The video gets better from there, though. We get to see even niftier jigs that feature multiple drills, all doing their thing in concert with just one pull of a lever. [izzy] then shows us how these jigs are built from the ground up. It’s compelling stuff.

If you’re doing any sort of DIY manufacturing in real numbers, you’ve probably had to drill a lot of holes before. Jig making skills could really help you if that’s the case. Video after the break.

Continue reading “Drilling Rig Makes Accurate Holes In Seconds”

Producing An Exquisite Wooden Keyboard

Keyboards! They’ve been almost universally made out of plastic since the dawn of the microcomputer era. Meanwhile, wood is a rather desirable material and it lends itself rather well to touch-heavy human interface devices. As [ProcessX] shows us, though, it can take quite a bit of work to fabricate a keyboard entirely out of this material.

The video shows us the construction of a Japanese wooden keyboard from Hacoa, which retails for around $1000 USD. The video shows us how the wooden housing is produced from start to finish, beginning with the selection of some fine walnut. From there, we get to see how the frame is routed out and machined, along with the more delicate work to create all the keycaps out of wood, too. They’re laser engraved to give them high-quality markings that will last the test of time. What we don’t see is the construction of the electronics—it appears that’s handled separately, and the wooden frame and keycaps are then assembled around the otherwise complete existing keyboard.

It’s nice to see what it takes to produce commercial-quality parts like this out of wood. We’ve seen other wooden keyboard builds before, too.

Continue reading “Producing An Exquisite Wooden Keyboard”

Embossing Graphics By 3D Printing On Wood

Embossing (making raised shapes) and debossing (making sunken shapes) on 3D-printed surfaces is not a new idea; we do it all the time. [Cory] from Vancouver Hack Space was playing around with 3D printing on wood, and came up with the idea of creating raised tactile surfaces using a simple transfer process.

We don’t often try to print directly onto a wooden surface for various reasons, but [Cory] wanted to give it a go. They hoped to get some grain patterns to transfer to the surface, but as they say in the blog entry, the beauty of wood patterns is in the colouration, which doesn’t transfer. Next, they laser etched a logo into the wood surface to see how well that would transfer. It did create a discernable raised impression, but they forgot to mirror the image (oops!) and relevel the bed, so the results are less impressive than they could be. Still, it’s another useful technique to consider.

Embossing is the process by which braille sheets are made. This DIY braille encoder is pretty sweet. Of course, the process can simply be decorative. Here’s how to use a laser cutter to create your own embossing seals. The traditional way to emboss paper for a fancy effect was to use embossing powder to selectively change the properties of drying paper. But how can you make the stuff for cheap?