[Steve] has wanted a stereo microscope in his lab for years now. Since his eyesight is becoming progressively worse, he figured it was time to look around on ebay and see what he could dig up. He ended up buying a very cheap microscope without a stand, figuring he could build one rather easily. Well, the articulated stand was rather easy to put together, but it did take a whole lot of time to build.
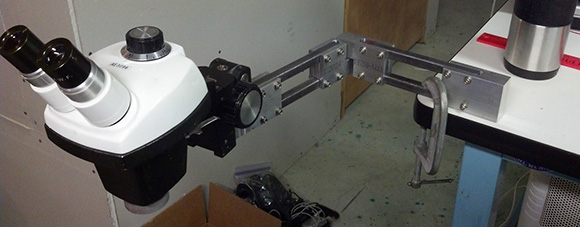
The main goal of [Steve]’s project was to have his microscope at the end of an articulated arm. With this setup, he could easily tuck the ‘scope against the back of his workbench when not in use and easily bring it out when necessary. This meant building a custom arm, though, and in the building process [Steve] used just about every machine tool he had at his disposal.
The end result is a fully articulated arm that can be moved to just about any point on his workbench and adjusted up and down for those really weird project. [Steve] says this may be a great introduction to home powder coating, and he really should build a small LED light source, but we’re loving the project so far.
[youtube=http://www.youtube.com/watch?v=TvZXjUfDOlQ&w=580]


don’t buy chinese microscopes, mine had it’s lens contaminated with radioactive isotopes, i had to dump it.
Wow! How did you find that out?
I’ve wanted a stereo microscope for my home shop for years, with the primary function to assist sliver removal…
I’ve bought a Geiger counter and started playing with it, found out accidentaly.
Uhh… many lenses contain thorium oxide; it’s a pretty standard thing.
You threw out a perfectly good microscope!
Uhh… thorium oxide is an integral component of many lenses. You threw out a perfectly good microscope!
That would make a pretty good superhero origin story.
Just because something is radioactive doesnt mean it will kill you. I have Tritium sights on my modern firearms, and Vaseline glass from the 1930s which was colored with Uranium Dioxide.
like other readers pointed out, what an epic fail!
Yeaaaah. I have two camera lenses that used mildly radioactive elements to provide a different refractive index than normal optical glass.
I think you may have goofed.
interesting that something like that got through checks in all the shipping hops.
You dumped a perfectly good scope. all of the good scopes do that.
You have a unique sense of humor
But interestingly a hundred years ago or so they actually put radioactive stuff around lenses because it prevented fungus and bacteria messing up the lens, and especially in some jungle travel stuff and such that was deemed a good idea.
What happened as a result you can find pictures on the internet of, tumors on the eye is not something I like to see though.
For your reading:
http://www.bnphoto.org/bnphoto/LostSites_MonaghanRadioactive.htm
That looks exactly like my B&L that I got for $40 @ my local machine tool vendor. Right down to the knurling on the left eyepiece tube.
Mine was used and I needed to fab a stand… But definitely obtainable!
That knurled knob is the diopter adjustment for the left eyepiece. I believe the idea is you get the scope in focus for your right eye with the rack (height) adjust, then turn that left eye adjuster to get the left eye in focus as well.
You got a heck of a deal for $40!
What I found that was just as important than a stand was a good light source. I ended up finding a decent circle fluorescent tube that was meant for macro photography. Still not ideal, but lots better. I find that my stereo microscope is my most used piece of lab equipment. It is also very useful for removing splinters.
Search EBay for “headlight LED ring” – you get them for car taillights , up to 5 or 6″ diameter, and running from a 12V source. Very nice!
Dont do that. get a photography ring light for less that is nicer and a better light. hacking a taillight or headlight will give you poor results when you can buy photography parts for the same price that deliver a cleaner light.
A photography ring light cheaper than £3.50 plus free postage from China? Well, if you find one, I’ll eat my hat ;-) All Chinese LED rings (bare PCBs) are around the £5-£10 mark, I doubt you’d find a “proper” ring light for less.
+1 on removing splinters :-)
Seems a rather laborious and expensive way of achieving this, surely you can use more off-the-shelf stuff and just mod it a bit.
And chunks of aluminum like that would cost quite a handful of pennies here.
Sure, you could put something functional together from parts from the hardware store or home center. I generally do favor function over form, but something about those kinds of cobbled together solutions really bugs me, especially when I know I can do better with some effort. And of course, I could have done any number of things that would have taken less time, but sometimes that just isn’t the point when you’re in the middle of an enjoyable project.
I was fortunate enough to have had most of the materials on the stock shelf already, so it didn’t really cost me very much in relative terms. But you’re right, it’s not inexpensively made.
Fair enough on the enjoyable part, it’s satisfying to make something yourself like that and the more elaborate and ‘pro’ the more it feels like that.
I was kinda thinking the arm was overly complex. There are 8 screws and two horizontal arms, that from the video anyway, don’t seem to have a functional purpose. That would be 8 holes you wouldn’t have had to drill and tap if you had a full block of aluminum or other material to take its place.
Not a criticism by any means, though. Sometimes you make do with what you have in the scrap bin :-)
There’s actually a reason for that… My original intent was to have much longer arms (as seen in the picture that HAD chose for the cover photo), but it was a bit too unwieldy when I put it together. So I shortened the arms to the current length. I also happened to have a bunch of the aluminum stock cut in shorter lengths, and I wanted to use that up before cutting into the longer bar stock.
At least the drilling wasn’t a big deal with the CNC mill, but I’m still tapping by hand… Would have been nice to avoid that!
Speaking of stereo microscopes, does anyone know how to align them? I have a very similar looking one from dumpster diving, but it has two swiveling periscope type attachments at the objective end and the objectives end up way too far apart. If I take off the periscope attachment, the left/right images go too far together, way past cross-eyed. The only adjustments I’ve found are on the eyepieces, and they don’t let you adjust left/right far enough to make either case aligned :( I have a feeling I need another objective to use it without the periscope attachment, but that doesn’t explain why the periscopes aren’t aligned, there is no place to add more optics in between it and the body of the microscope.
I found this info last week http://www.covingtoninnovations.com/stereozoom/
That page has some info on alignment, and also some links to manuals at the bottom. Hopefully it’s helpful.
Just 4 things:
1. Wow!
2. I wish I’ve a shop like that and the skills to use it. (I know that to most of you it’s, well, run-of-the-mill stuff, but to someone with zero skill like me this is practically alchemy.)
3. I’d have just hacked something out of an articulating TV mount and some Home Depot hardware, and end up with something that somewhat works and most probably a bit wobbly.
4. Wow!
The TV mount is actually a pretty good idea for something off-the-shelf to modify, though like you say, it may be wobbly.
First off… nice work! I really need to get a similar set-up, but I’ve been too busy with other projects to follow up on that need. This gives me something to think about.
Second… if attempting to powder coat aluminum, there are a few things to take into account to get the best finish. Surface contaminates are the powder coating’s worst enemy, That means you need to assure the surface is very clean, so use a good surfactant (a slightly acid solution will also help prepare the surface) then it should be thoroughly rinsed with deionized water. Another is aluminum is notorious for out-gassing during the heating process needed to cure powder coating, so you should preheat the pieces to cure temp (usually between 350 and 400 degrees F {177 to 204 C}) then keep the parts at that temp for 10 to 15 minutes to reduce the out gassing. This will help prevent pinholes and irregularities in the finish. Finally, make sure you shoot into acute areas first. This one holds true for any electrostatic coating application. If you don’t shoot into the tight corners first you risk the Faraday cage effect building up a charge in tight area on the part, causing the coating to be rejected by the static charge in those tight areas.
Thanks for the kind words, and for the powder coating tips! I ordered a one-piece powder gun, a cheap toaster oven, and a bunch of different powders from Columbia. I’ll definitely heed your advice. Is the pre-heating a one-time thing that could be done well in advance of final coating, or does it need to be done very close in time to the coating/curing?
Having a stereo microscope with a good boom stand, two high quality soldering irons, a hot air re-work station, assorted tweezers and picks, a pre-heating table and most of all, flux (I can’t emphasize that enough) has upped my nerd game tremendously.
Seriously. I can re-work or install anything.
Ditto…
Okay I mean a gameboy magnifier taped to a stick, a toaster oven, a single stove ring, a hot air gun rigged to a handdrill stand, one good iron, a couple of cheap ones, and dollar store sourced picks, bamboo skewers and needles pushed into dowels, some past flux, and I’m getting okay results using isopropyl alcohol for a liquid flux, but if you’ve got ideas for something good and widely available, my ears are a flapping.
Yes, I do want a binocular ‘scope though, this stuff is getting so small I’m burning my nose more than my fingers these days.
lol, that more ‘my nose than fingers’ one was good, made me chuckle
Well played.
PS,
I scored my really nice B&L on a heavy duty and very stable boom stand for $300 on e-bay. So, deals can be had. Check for frequent misspelled words, such as “stero” etc. or find a listing by someone who does not know what they have, like seller “MidwestFlowers” or something.
With that said, the low cost Chinese scopes aren’t bad in my experience, which is what we use at my job.
Yeah, even without looking too hard you can find stuff in the $350 range. The only caution I would add for buying from vendors who obviously don’t understand the product they are selling is that they may not pack it very well, or be able to give you any real idea of what shape the optics are in. I like to look for calibration/service/inventory stickers that give some clue as to where it came from and when it came out of service.
I also have an AmScope imported Chinese scope on my bench at work, and it’s fine for the money. Under 500 bucks for a brand new stereoscope, eyepieces, stand, and a fancy LED illuminator with variable patterns. I am pretty cheap when it comes to my own lab since “it’s only a hobby” (ha), and if I need to use better tools I can always go to work, or borrow something from work.
Deals can be made..
I found a Reichert stereostar zoom 570 for under $100,- (ex. IBM acc. to the inventory sticker).
The only downside was that “something was wrong” with it (it didn’t fully zoom, but was otherwise complete).
I had to take it apart, clean all parts and optics, refreshed all lubrication, and put it back together (according to the diagrams I found on the net).
Took me about 2 hours, but now it’s like new and works like a charm.
“Poor vision” -splutter! -did a USB microscope get considered ? Following a boat of painful conjunctivitis (which was in just my viewing eye & hence probably came from the eyepiece) I gave up using traditional types some time back! Although depth of field is not brilliant (& magnification best suites x10- x100) , the USB sourced screen image can be valuably audience viewed, saved, printed, emailed etc.
I find having the stereo view to give a sense of depth really helps me when doing fine rework. While I’ve never tried one of the USB microscopes, I’ve read that the affordable ones have pretty poor working distances (scope has to be too close to the work) and tend to be low resolution.
I do wish I had a trinocular microscope head, so I could have a camera attached as a supplemental tool. That would be handy not only for capturing images, but also sharing what’s under the microscope with an audience (I’m thinking in particular working shoulder-to-shoulder with someone when debugging). I could still rig up an adapter to replace one of the eye pieces for the occasional picture, I suppose, but it’s definitely not as convenient.
I have that setup at work. It is good for documenting things (QA, re-work, etc.) but the USB camera requires much, much more illumination than the eyepieces. When training someone I have to wear sunglasses. Seriously.
That is impressive. I was just talking with my professor today about getting something like this or making something like this (I have a Taig mill, sine plates, the works) for my watchmaking bench. I’m a watchmaking student, and we use microscopes for certain things, like checking watch gear depthing and escapement adjustments.
We have an amazing Leica setup- a trioptic tube with a double boom and a seondary output to both a 42″ LCD screen AND video recording capability. All with stereoscopic capability! In position 1- stereoscopic view for both viewer and a secondary observer on the second optic eyepieces at the end of a long boom. Second position, the main viewer gets secondary output in non-stereoscopic to either a HD videocamcorder with 650x zoom, or an HD 1080p LCD screen behind the scope. It is an amazing piece of equipment.
This setup is within my manufacturing capability- but I don’t have CNC. Mine is all manual- he cheated! A weekend’s worth of work drinking beer after he programmed it for and hour.
Of course, I could go to the fully outfitted CNC machine shop right below our watchmaking labs….Yeah, I’m lucky :) I think I will pick up a cheap stereoscopic setup and try making this myself- and to those wondering about the expensive stock, scrapyards, especially aeronautical scrapyards in aerospace towns like Witchita, have large stock in small quantity at reasonable pricing….
Do you have any links to blogs or other websites about watchmaking? This sound like the kind of manual yet high precision work that is fascinating to see.
Sure: http://www.tempered-online.com/forums/ is the best site for real independent watchmakers who actually make watches, and not just fix them. Google “PuristSpro” for another great site with all the latest watches, but more fluff than making.
My school is the OSUIT school in Okmulgee, OK- and we are always looking for new students. I think the crowd on Hackaday might have a few people with the skill and interest to join us here- but it’s not for everyone. Lots of stress, lots of patience, lots of handwork. We have videos on Youtube, and we are making school watches. Check us out.
Sorry for the shameless plug, but we have real trouble finding skilled people who are interested in the field- its good money, but not many can do it, and no one knows we are here!
Thanks for the info.
Really, really nice work! I’m curious, however, why you used a ball end mill for the channels that the bars go into rather than just a flat end mill.
The video is probably not very clear, but I only used the 5/8″ ball end mill to make the clamp part that holds the shaft of original E-Arm mount The channels that hold the square steel tubing were milled with a 1/2″ flat end mill.
This picture shows milling one of those channels for the steel tubes: http://bit.ly/Yda4Ds
And this shows both the clamp end and one of the channels: http://bit.ly/WYCSlj