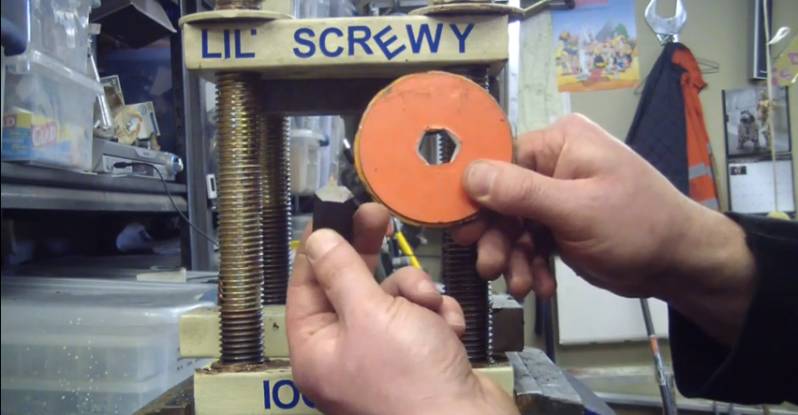
Here we have a magnificent example of the power of the inclined plane. [Chris] has built Lil’ Screwy, a 100-ton home-built press for about $35 plus scrap on hand. He demonstrates its frightening power by punching a 17-mm hole through 8mm-thick steel using an Allen key.
As [Chris] explains in his hilarious video waiting for you after the jump, the force comes from using really big screws. Lil’ Screwy uses four 1-inch L7-rated ready rods with eight threads to the inch. The bolts run between two 1″ steel plates to form the press. In the top plate, he drilled 1″ holes. The bottom holes are drilled out 7/8″ and tapped so the two plates clamp together with awesome crushing power when you twist the giant coupling nuts.
[Chris] milled a pocket in the underside of the top plate for a big neodymium magnet that will keep, for instance, a 17-mm Allen key in place while you punch a piece of steel with it. He has a ring of smaller ones embedded into the bottom plate to hold supports in place for broaching.
As a special bonus, [Chris] shows you how to stick it to the man when it comes to using that last bit of Never-Seez in the can, and also how to make your decals temporarily repositionable.


This video embodies the maker movement. Little bit of cursing, lot of “I should use X but since I don’t have one I’ll use Y instead”.
I’ve learned a bunch of technical stuff from HAD videos, but this is the first time I’ve heard some serious maker-nerd puckish humor: “I would like to use high pressure gear grease, black moly but…ever since the white couch debacle of `03 I haven’t been able to have it in the house…it’s actually contraband if it’s in here”. Not to mention several politically incorrect ones…love it!
…and the HN comments saying how it would be better with gears and how he should have 3d printered ,etc.
Lol, so much drilling and things. You could just 3D print this.
Or carve it out of EPS.
or hang an arduino off of it?
Clearly it needs and Arduino to tell it to go down and go up.
…an arduino controlled by a raspi… :P
Timed with a TI Launchpad.
Or press your atmega328 through the arduino with it.
3D printing + 100 tons force = great success.
fact.
Not sure if droolies or troll…
Would be cool to have some gearing at the top that make all four rods turn together. Funny Video. I would be scared of the socket collapsing/shattering at the end of the video and sharp shards shooting out at incredible speeds. I’ve broken too many sockets to ever trust them.
Then it would be 4 times as hard to turn.
Not if you did a 4:1 gearing system.
Then your lever needs to be 4 times as long
No, you’d just have to turn it 4 times as often, just like you do now. You just wouldn’t have to alternate between rods all the time. A set of gears fit for this kind of torque would take the appeal of this being only 35 bucks away, though.
Probably wouldn’t need gears – just a set of sprockets and some chain (and maybe an idler sprocket and spring). One sprocket on each threaded rod, with the chain wrapped around (this assumes that the threaded rods are all the same handedness); it would be a fairly cheap upgrade, too.
The problem is to find a cheap mechanism that can handle that amount of torque, and thinking a scaled one, you could add a motor to turn it, and than for the total cost it would be best to choose a pro system.
Why does he call this thing an hydraulic press in the video???
@Chamb Onz because people are 70% water? :)
Good one!
Laughed so much at this :D
:-)
+1
NICE!
$30 eh, plus $400 of drills and taps. He said he got the screws for $30 and the total spent was $37, but who the hell has such large drills and taps and what not already in the shop? Maybe a railroad engineer or somebody who builds skyscrapers I guess.
Might be cheaper and easier for the average joe to just get a pneumatic car-jack and rig that in a holder.
Quick youtube search and voila, a 8 ton press using a car jack https://www.youtube.com/watch?v=wqtdfb1dJ5I&hd=1 and there are many more like it on youtube.
8 ton != 100 ton. Slightly different.
Well true but it’s about the base plates too, if you use solid plates and perhaps a jack suited for larger vehicles I bet you can up it significantly. They even make jacks to lift houses for when they are crooked.
There is no such thing as a 100 ton car jack since there are no 100 ton cars.
Yeah there are, google 100 ton bottle jack. They aren’t cheap though, $3,500 for a hydraulic or $1,300 for a pneumatic model, or $5,000 for a press based on a hydraulic jack. Also regarding 100 ton cars, think of heavy machinery which need wheels replaced in the field.
I have an old 25 ton bottle jack; the 25 ton rating is what it was designed to lift safely, so there would probably be a fair margin on that. Not quite 100 tons though.
If you want to count the drill bits and other tools, you should also count the Bridgeport mill. I’m guessing he didn’t count those because he already had them, and assuming you don’t break them you can use them again like any other tool, although you could argue drills and mill bits are consumables.
For the most part, I don’t count the cost of tools and machines to this kind of build. I have all of the tools and bits required for this from other projects. If some one hires me to make something I build the cost of any required tool I don’t have into the quote. I paied for my mill from ONE JOB.
Anyone with a decent workshop who would put a 100 ton press to good use will have these tools already… You’re not going to build a 100 ton press just for the hell of it, you build it because you need it for a (or several) project(s). That said, I have most of the tools and materials shown in the video already, I’d only be missing the magnets to build this, I already have plenty of Gr 8 threaded rods (which are even stronger than what he’s using in the video) leftover from another project, so my cost would be even less than his, depending on the price of the magnets of course.
as someone recently robbed of $50 for a 3mm tap, i can totally say $400 in taps is in the lower estimate range.
A much easier and cheaper way is with a bottle jack as mentioned above – I have made many of these of various sizes. There is a benefit to a screw press, though – You have a much closer control over the pressure vs. travel aspect of the press. You may need to build up considerable pressure to push through a metal material with a hydraulic press. When the metal is finally sheared, the residual hydraulic pressure will sometimes result in more travel than is desired.
The primary disadvantage here is needing to turn each screw individually. The screws should be coupled together by some sort of gear or chain. I would prefer a cheap hydraulic solution over this solution.
Yeah and if you ever worked with hydraulic die punches or presses, you know that when that final shear happens, and the excess force releases, the whole damn thing can jump a few inches.. not to mention a git of a bang. Shocking and potentially dangerious if unprepared for it. Screw presses, while tedious, have MUCH more control over how that excess force is released.
How did he calculate the “100 ton” value?
It says “100 ton” right on it. No calculations required.
LOL :)
That’s exactly what I was thinking.
If you know the torque you’re applying and the threadcount (which he does) you can easily get a rough estimate (accounting for friction of course) of what you *have* pressed. Though my guess is he just quadruple the compression rating of the ready-rod.
If you used a two-foot bar, you’d need about forty lbs of force to crank up 25 tons on each screw. That’s roughly 80 kpsi on the screws, if they’re all pulling their weight. Fortunately, there are magnets to keep things from shooting out into space.
probably the data sheet for the steel plate he punched. Yield strength* area of punch = force applied
To leave a mark the size of a 250mm² (17mm) Allen wrench in a 520 N/mm² steel, at least 13 tons are required if calculated from the ultimate tensile strength.
To punch a hole out, it is probably circumference (59mm) x thickness (8mm) as cross sectional area (472mm²) to be broken, which equates to a minimum of 25 tons of force and an extra amount to really punch it. The shape of the punch obviously does matter a lot to keep the cross sectional area and therefore the force required low enough.
Could this be adapted to press HTSC pellets?
That is an interesting idea! The screw press will fit nicely inside a pottery kiln. Home brew sintering oven?
Temp required to sinter metal powder would soften the steel to its plastic yield point, and take the temper out of the threaded rods.
Once the pellet is pressed you can bake the pellet. You do not need to keep it under pressure while cooking. In fact, this may be detrimental as it may inhibit the reaction you need to occur during the bake.
GREAT video. I was amazed that socket didn’t explode under that pressure while punching that hole.
not to worry; socket blowout is imminent. Stay tuned.
I worry the same thing — really, only 0.125 inches of thread? How does that tolerate a 100 ton force under mechanical advantage without catastrophic failure?
I’m stupid. He meant diameter. LOL
That’s because Super-Magnets hold everything together.
With a hydraulic press you can easily calculate the force from knowledge of the fluid pressure and the area of the piston. The better quality hydraulic presses have pressure gauges for this purpose. With a screw jack you have to estimate the friction losses which depend on thread quality and lubrication or use a load cell.
Estimating the actual capacity of this press would require knowing information about the materials, thread pitch, tolerances, etc. 100 tons seems rather optimistic. The square thread screws on my 25 ton screw jacks are a good bit larger.
It would work a lit easier if you use the right kind of threads, ACME. V threads are intended to lock. Then use a chain sprocket on each nut and tie together with a common chain.
This guy could do build breakdowns for enchiladas and a collection screwdriver turning tutorials and I would listen intently. He has very good hacker stylized comedic delivery. Also, I’ve really needed something like this myself. This is the perfect embodiment of what this site represents to me.
Video was hilarious. Makes me want to go make my own – seriously. I’d have to by the mill first, though.
With sufficient heat and a couple of days, he could make carbon into diamonds with that thing (according to this reliable site, and my knowledge of the maths).
http://www.chacha.com/question/how-many-pounds-of-pressure-does-it-take-to-make-a-diamond
What would you make the anvils out of? 850kpsi will crush steel.
Unobtainium sintered pixie dust, DUH.
I think it’s a great hack, and if he has uses for it then it’s wonderful that he created it. I like creating my own tools as well, but I’ve never worked metals that thick. I think it’s cute that he says ‘neodynium’ in spite of being obviously really good and experienced at machining.
Please for the love of god don’t wear gloves when operating a mill or lathe.. Go buy a fine tip tweezer and some bandaids for the splinters before you get wrapped up like latheaccident.jpg
And a guard for that grinder. Wonder why he’s taken it off. Gloves won’t do much to save an artery when that disc kicks back.
HA! Guards are for sissies.
Like the accent …sounds like he is from up north in Fargo Country
Fun video
superglue trick, its designed to set with moisture, so after getting everything wehre you want it, douse with water, it will set the glue.
press: $36, bridgeport mill: pricele$$$$$
Water makes cyanoacrylate turn milky white. There are spray on accelerators that don’t. However, making it set faster makes it weaker.
Baking soda works for an accelerator as well. Glue then sprinkle some on. People at work used a squeeze bottle with a little in it and is would blow it out mixed with air onto the joint.
LOL $35 + $2000 worth of scrap… oh and $100,000 worth of machinery…
You really think there’s $2,000 worth of steel, nuts, and paint in that project?
No multiple arduinos used = worthless project
How tremendously original of you, well done.
That’s one manly hack
Think you could us this as a track pin press for excavator or dozer?
I’ve used something very similar to disassemble track adjusters to cage the huge spring and remove retaining bolt then release the spring