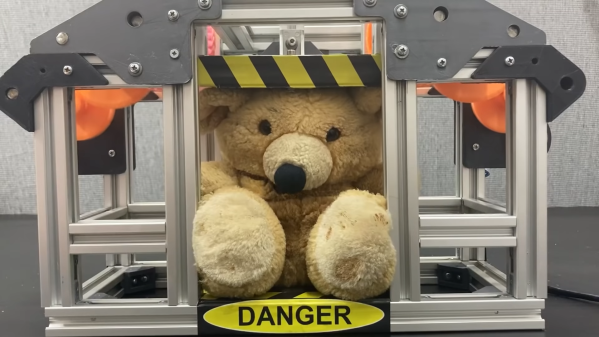
A press is a useful thing to have, whether you like destroying stuff or you simply want to properly install some bearings. [Retsetman] decided to build one from scratch, eschewing the typical hydraulic method for a geared design instead.
The benefit of going with a gear press design is that [Retsetman] was able to 3D print the required gears himself. The design uses a series of herringbone gears to step down the output of two brushed DC motors. This is then turned into linear motion via a rack and pinion setup. Naturally, the strength of the gears and rack is key to the performance of the press. As you might expect, a fair few of the printed gears suffered failures during the development process.
The final press is demonstrated by smooshing various objects, in true YouTube style. It’s not really able to destroy stuff like a proper hydraulic press, but it can kind of crush a can and amusingly squash a teddy bear. If you’re really keen on making a gear press, though, you’re probably best served by going with a metal geartrain. Video after the break.
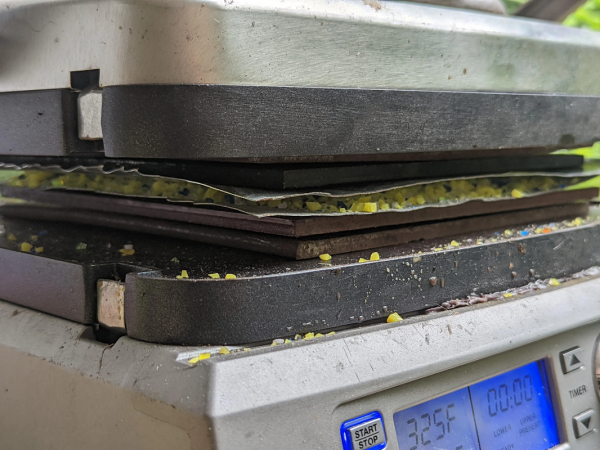
Living and working in a remote rain forest may sound idyllic to those currently stuck in bland suburbia, and to be sure it does have plenty of perks. One of the downsides, though, is getting new materials and equipment to that remote location. For that reason, [Digital Naturalism Laboratories], also known as [Dinalab], has to reuse or recycle as much as they can, including their scraps of acrylic leftover from their laser cutter.
The process might seem straightforward, but getting it to actually work and not burn the acrylic took more than a few tries. Acrylic isn’t as thermoplastic as other plastics so it is much harder to work with, and it took some refining of the process. But once the details were ironed out, essentially the acrylic scraps are gently heated between two steel plates (they use a sandwich press) and then squeezed with a jack until they stick back together in one cohesive sheet. The key to this process is to heat it and press it for a long time, typically a half hour or more.
With this process finally sorted, [Dinalab] can make much more use of their available resources thanks to recycling a material that most of us would end up tossing out. It also helps to keep waste out of the landfill that would otherwise exist in the environment indefinitely. And, if this seems familiar to you, it’s because this same lab has already perfected methods to recycle other types of plastic as well.
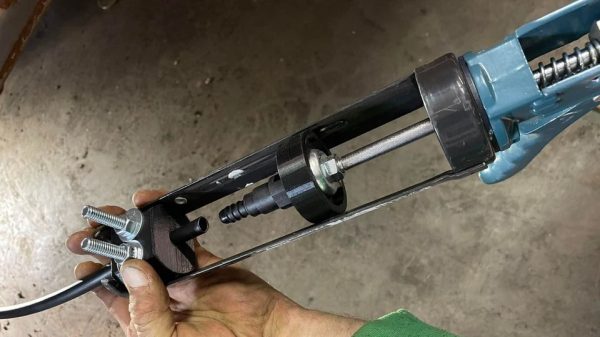
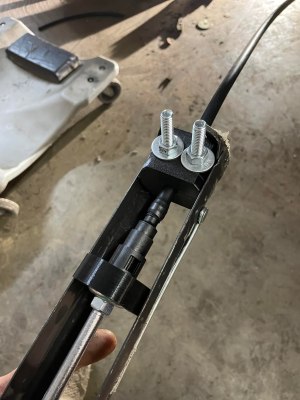
It’s a great tool for cleanly pushing fittings into nylon fuel line.
This build consists of a series of 3D-printed parts that can readily be adapted to a garden-variety caulking gun. First up are a pair of fuel line clamps which are fastened together with nuts and bolts, The nylon fuel line is inserted between these, and the bolts are tightened up to hold the line firmly in place at the end of the caulking gun. The fitting to be installed into the line is then placed on the caulking gun’s plunger. It’s then a simple matter of pulling the trigger on the caulking gun to slowly press the fitting into the nylon line.
It’s a great hack which creates a useful linear press with just a few cents of PETG filament. If you find yourself doing a one-off fuel line job on a modern car, this could be just the tool you need. Parts are available on Thingiverse for those eager to print their own. The design is made for 3/8ths inch line, but could readily be modified or recreated to suit other diameters.
3D-printed tools can be useful in all kinds of ways, even in heavy-duty applications like press tooling. It often doesn’t have the same longevity of traditional metal tooling, but for small one-off jobs, the price saving is often more important than the hardiness of the tooling itself. If you’ve whipped up some great 3D-printed tools of your own, don’t hesitate to drop us a line!
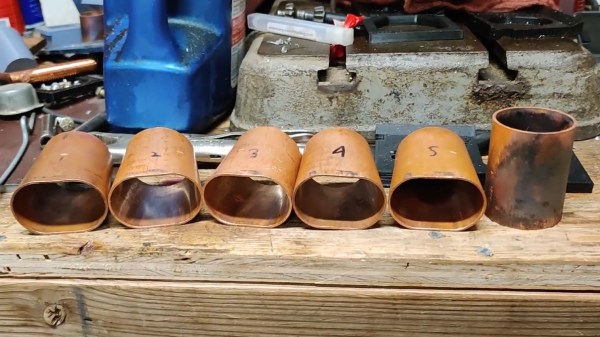
When we think of using a press to form metal we think of large stamps with custom made metal dies under unimaginable hydraulic pressure. It’s unlikely we’d e think of anything 3D printed. And in a commercial environment we’d be right. But your average garage hacker is far more likely to have access to a bench vise and a 3D printer. It’s in this context that [The Shipping Container Garage] has spent considerable time, effort, and money perfecting a process for pressing copper parts with 3D printed dies, which you can watch below the break.
In the quest to make a custom intake manifold for his project car, [The Shipping Container Garage] first made 3D printed jigs for cutting out a manifold flange that bolts to the cylinder head. It’s a process he calls Analog CNC, as all the cutting is done by hand.
Buoyed by his success, he proceeded with the next step: making manifold runners. His metal of choice was copper. While softer than many metals such as steel, he found it too hard. In the video, he describes his method for annealing the copper. Once cooled, two 3D printed dies are pressed into the copper tubes to progressively shape them. Watch the video to find out one of the neatest details of the die itself: how he gets it out!
Of course no matter how clever this all is, it’s useless if it produces poor results. And that’s where the most astounding part of the build is: The parts are all the same within 0.006 inches (0.15mm) of each other, and the parts fit the manifold flange they were made for. Additionally, the die can be used for the duration of the project at hand. For low volume production, this appears to be a viable method. It’ll be interesting to see what others do to iterate these processes to even more advanced stages.
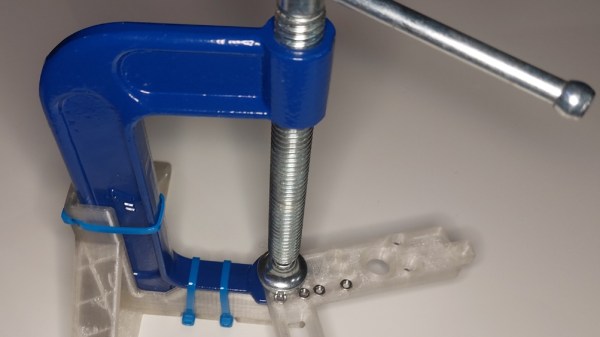
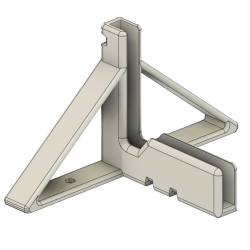
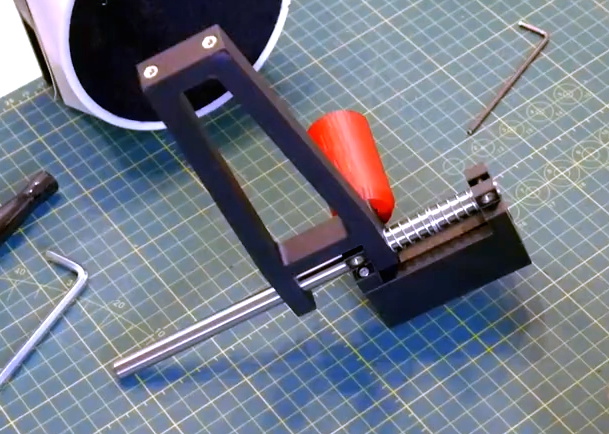
[ThingaUser] made a tool to solve a specific problem of theirs, but the design also happens to be a pretty good way to turn a c-clamp into a poor man’s light duty arbor press.
The frame is made for a common 4-inch c-clamp.
The problem they had was a frequent need to press nuts and occasionally bearings into other parts. Some kind of press is really the best tool for the job, but rather than buy a press, they opted to make their own solution. By designing and 3D printing an adapter for a common 4-inch c-clamp, a simple kind of light duty press was born.
Sure, one has to turn the handle on the clamp to raise and lower the moveable jaw, and that’s not the fastest operation. But the real value in the design is that the clamp can now stand by itself on a tabletop, leaving the operator to dedicate one hand to manipulating the part to be pressed, while twisting the clamp’s handle with the other hand. There’s no need for a third hand to keep the clamp itself stable in the process. As a bonus, it can print without supports and the clamp secures with zip ties; no other fasteners or glue needed.
Not all c-clamps are the same, so there is a risk that this frame that fits [ThingaUser]’s clamp might not fit someone else’s. In those cases, it’s best to have access to not just the STL file, but also to a version in a portable CAD format like STEP to make it easy to modify. But there are still ways to make changes to an STL that isn’t quite right.
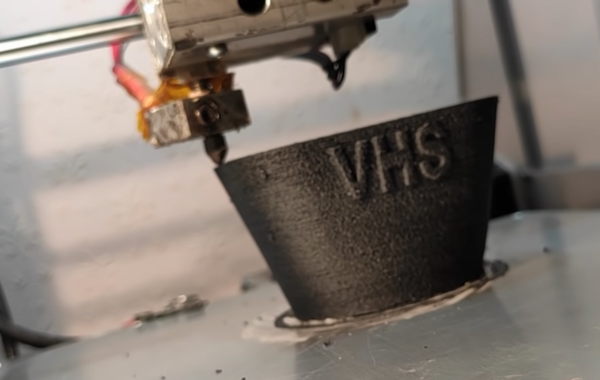
If you have a pile of old VHS tapes collecting dust in your attic or basement that you know you’ll never watch again, either because all of those movies are available on DVD or a streaming service, or because you haven’t had a working VCR since 2003, there might be a way of putting them to good use in another way. With the miles of tape available in just a few cassettes, [brtv-z] shows us how to use that tape as filament for a 3D printer.
The first step of the build is to actually create the filament. He uses a purpose-built homemade press to spin several tapes into one filament similar to how cotton or flax is spun into yarn. From there the filament is simply fed into the 3D printer and put to work. The tape filament needs to be heated higher than a standard 3D printer filament so he prints at a much slower rate, but the resulting product is indistinguishable from a normal print except for the color. It has some other interesting properties as well, such as retaining its magnetism from the magnetic tape, and being a little more brittle than PET plastic although it seems to be a little stronger.
While the VHS filament might not be a replacement for all plastic 3D prints, it’s still a great use for something that would likely otherwise head straight to the landfill. There are some other uses for this magnetic tape as well, like if you wanted to build a DIY particle accelerator.
If you’re building mechanical assemblies with 3D printed parts, you’ll quickly realize that driving machine screws into thermoplastic isn’t exactly an ideal solution. It can work in a pinch, but you can easily strip the threads if you crank down too hard. The plastic holes can also get worn down from repeated use, which is a problem if you’re working on something that needs to be taken apart and reassembled frequently. In those situations, using brass heat set inserts gives the fasteners something stronger to bite into.
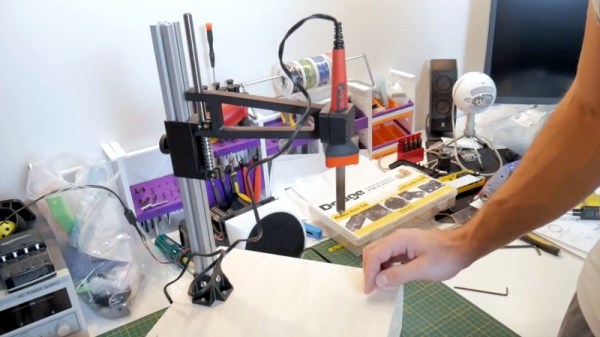
You can install these inserts by hand, but if you plan on doing a lot of them, a dedicated press station like the one [Chris Chimienti] recently put together will save you a lot of aggravation in the long run. In the video after the break he walks viewers through the design and use of the device, which itself relies on a number of 3D printed parts using the very same inserts it’s designed to install.
The spring-loaded arm can slide up and down the extrusion to adjust for height.
To build this tool you’ll need a piece of aluminum extrusion, some smooth rod, a couple springs, and an assortment of fasteners. Nothing that wouldn’t likely be in the parts bin of anyone who’s been tinkering with 3D printers for awhile, though even if you had to buy everything, the Bill of Materials will hardly break the bank. For the base you can use a piece of scrap wood, though [Chris] has opted to make it a storage compartment where he can store the inserts themselves. We really like this approach, but obviously you’ll need to have access to woodworking tools in that case.
Clearly shopping on the top shelf, [Chris] purchased a kit that actually came with a Weller soldering iron and the appropriate tips for the various sized inserts. If you’re like us and just buy the inserts that come in a plastic baggie, you may need to adapt the arm to fit your iron of choice. That said, the idea of having a dedicated iron that you can leave mounted in the press makes a lot of sense to us if you can swing it.