You can’t argue that Arduinos are extremely popular with the maker/hacker community. Some would say that there is certainly no shortage of projects to make using them. [Milen] thought otherwise and felt it was time to create an Arduino-based multimeter.
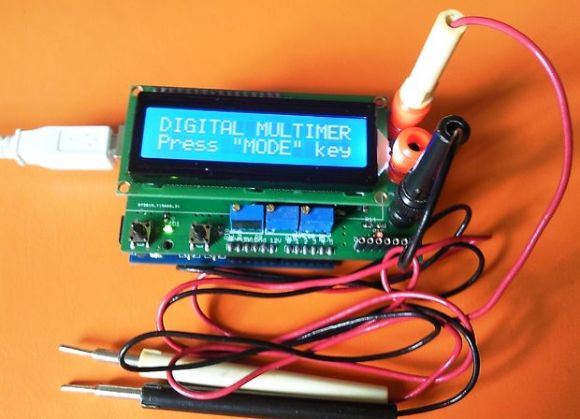
At the heart of this project is a common Arduino Uno. The additional parts were kept to a minimum in order to keep down the overall cost and project complexity. The finished product can measure voltage from 0-100v, amperage up to 500mA and resistance between 0-250 kohm. If you need to check for continuity, it can do that too.
All of the parts required to make the multimeter fit on a shield that plugs directly into the Arduino. Banana plugs allow for attaching test leads. The measurement values are displayed on an LCD screen and/or (if connected) to the Arduino IDE Serial Monitor. If only using the serial monitor, the LCD screen can be omitted to save a few bucks.
If you would like to build one for yourself, the above link has detailed instructions, schematics and a bill of material. The best bang-for-the-buck multimeter available is still the Harbor Freight Special that you can usually get for free with purchase.
[Thanks Karl]


Separately…
Good ol’ HaD spelling errors. I guess they don’t use Firefox or its “Check Spelling as I Type” feature or Chrome’s spell check. =p
Pretty cool. I think i’d just buy a cheapo usb multimeter off ebay but this is certainly a fun project.
I like this project because you could build a meter to fit your specific needs. It wouldn’t be too hard to add a transistor tester, frequency counter/tuner, signal generator, mini power supply, etc.all in one unit. Add one of Gabotronic’s mini o-scopes and your all set. I have all the parts sitting here so I may have to add this to my project list.
You might be more interested in this: http://alturl.com/kjapp AVR Transistor Testor. I think that link takes you to the original. It does resistance and capacitance as well. There is a lot of stuff out there based on it too, try googling AVR Transistor Testor. http://bit.ly/1icyrxL
these are looking pretty cheep on ebay http://goo.gl/jxU8vU
Not CAT III rated. I think I’ll stick with my Fluke 28.
Why would you want something rated 25 times over what it is specified to do? Are you that stupid that you would plug the meter into something that energetic?
…types the internet commenter on a 3GHz computer over cable modem.
What is that supposed to mean? I only have a 2.5GHz PC but I do have FiOS.
Gotta test those 120v/220v lines in the house from time to time. ;P
Not with a meter that tops out at 100V you don’t. I have a Wiggly for that. Well, the Ideal version. The scale goes up to 600V on it. It really wiggles on 460V let me tell you!
It’s been on my to do list to have a multiple channel voltmeter + ampere meter that I could use while developing some projects but I never got to do it… Anyone knows any design available?
A very big fault that I see with this design is that the input impedance of the volt meter is way too little. At least 1M should be used, of course the needs may be different.
Second, LM358 has way too much input offset, it’s not rail to rail and too much input current to be usable for such an application.
Third, all the MOS witches for the ranges are not really needed. You can connect the pin there directly. Make the pin input, there is a high Z and it simulates an open switch. make the pin output driven to GND or VDD and it will act like a closed swith to GND or VDD.
Maybe it’s just me, but if you’re going up to like 100volts then personally i would for see a tad more creepage space (mm or 4..5) around the input and any component that can have a high potential on the PCB so that in case of like a 400volt peak input things don’t spark over…
There need to be ground isolation between the “multimeter” and PC which is connected to its case and to your power outlet Neutral ground. It kinda make it difficult to measure some stuff without shorting things. e.g. current on your -12V power rail on a PC.
Oh I love this highly accurate instrument for my measurements, especially for input impedance and offset measurements in JFET-amplifiers. And it has an Arduino inside, so it can’t be shit
So much cheaper and more accurate than the extremely expensive Keithley or HP DVM/DMMs sold on ebay for 50$ sometimes. And resistance measurement beyond 250kOhm is overrated. I disposed all my high Ohm resistors after I got this nice multimeter, because I couldn’t measure them. Unfortunately it blew up after I tried to measure the voltage of my isolation transformer. I guess it’s the transformers fault.
You lost all credibility when you mentioned Fleabay.
lol no
With a bit love and repairwork, most stuff I buy on fleabay can be persuaded to work reliably. And it usually is of high quality and durability, compared to this crap, because it used to cost a lot of money and was bought by people who cared for it and knew the value of good test equipment. But feel free to buy this crap and maybe use it in dangerous conditions. Darwin will take care of you and more good stuff is left on ebay for people who know about the value of good test equipment.
I just don’t like to encourage the hucksters that sell on ebay, or the crooks that run ebay either. People who really know about the value of good test equipment are the ones that pay full price for it when they buy it new off of reputable dealers. Now as far as Darwin goes I suppose you made a conscience decision to join the ranks of the bottom feeders with your ebay love affair.
How does buying things at lower price due to depreciation constitute bad behavior? Would not the re-purposing of available materials and resources to benefit the least amount of expired energy and resources not be more practical, beneficial, logical, and thoughtful? Is it not better to be opportunistic than pessimistic?
yep i’m with you brother ! in fact I’m going to build my own
altimeter for my home built airplane.. and i’ll use my walmart
barometer as a reference standard when i calibrate it !
(we don’t need no stinkin’ NIST traceable precision references!)
A $5 buck made-in-china Harbor Freight reference is good
enough !
Awesome, makes me want to put a multimeter in everything!
the lack of isolation makes this very different from a typical multimeter which is inherently isolated by the fact that it’s in a nonconductive case and powered only by a battery inside that case.