[Jason] really wanted to build an RFID controlled garage door opener and decided to turn to Arduino to get the job done. For someone who’s never worked with an Arduino before, he really seemed to know what he was doing.
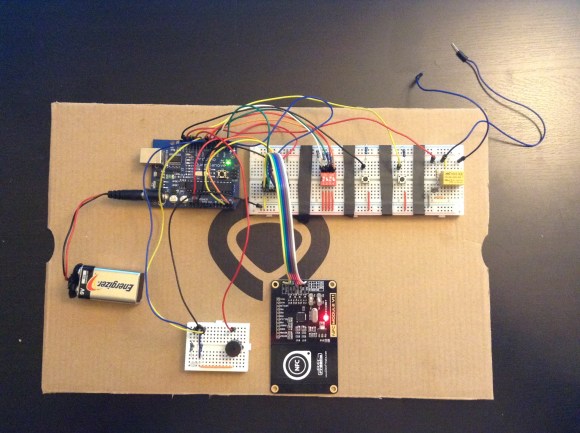
The Arduino acts as the brains of the operation while an off-the-shelf NFC/RFID reader module is used to read the RFID tags. To add new keys to the system, [Jason] simply swipes his “master” RFID key. An indicator LED lights up and a piezo speaker beeps, letting you know that the system is ready to read a new key. Once the new key is read, the address is stored on an EEPROM. From that point forward the new key is permitted to activate the system.
Whenever a valid key is swiped, the Arduino triggers a relay which can then be used to control just about anything. In this case, [Jason] plans to use it to control his garage door. The system also has a few manual controls. First is the reset button. If this button is held down for two seconds, all of the keys from the EEPROM are erased. This button would obviously only be available to people who are already inside the garage. There is also a DIP switch that allows the user to select how long the relay circuit should remain open. This is configurable in increments of 100ms.
For now the circuit is wired up on a couple of breadboards, but it might be a good idea to use something more permanent. [Jason] could always take it a step further and learn to etch his own PCB’s. Or he could even design a board in Eagle CAD and order a real printed board. Don’t miss the video description of the RFID system below.
[via Reddit]


I was going to do this, but then found complete systems are around $10 on eBay (they even toss in 10 tags).
(Yeah yeah….)
Just wondering, complete systems to activate a relay with rfid or just the rfid module?
Thanks,
Nick
ready to use systems:
* http://www.ebay.de/itm/RFID-Door-Lock-Access-Control-System-10-Kefobs-Cards-/190836280386
* http://www.ebay.de/itm/RFID-Key-Access-Control-with-relay-/251293660691
Thanks Mike!
http://www.ebay.com/itm/RFID-Key-Access-Control-with-relay-/251293660691?pt=US_Car_Keys_Transponders&hash=item3a8244f613
More secure version…
This is exactly what I have been looking for, thanks!
So I put this unit on my garage door, and all is well. What happens when someone takes the cover off and shorts the relay and my garage opens? Should this not have the RFID reader on the unsecure side and the logic to open the door on the secure side?
Teamed up with an electric strike, an 8 year old would think this is pretty cool on a bedroom door though.
That’s why I posted both low cost available versions. The better one concerning security is of course the one with the separate nfc reader.
That’s why I should read the whole story before I make a comment. ‘scuse me while I go put my foot in my mouth.
That one has the disadvantage of not being able to delete a tag if it gets lost, you need to wipe it clean and program all the good tags again.
As is the keypad one is rather crap as everything is on the outside – you can prise it off and trigger the strike. It does actually have a tamper switch, so it gets a point for that I suppose.
What I did was remove the coil (very easy) and put that outside, with the rest of the unit inside. (The coil is about 110mm square.) Open by tag only (no pin) of course.
It will read a tag from a few centimetres away, so you can put the entire unit behind the door in some cases.
That unit can assign a number to each tag, so it can be disabled if lost.
Can’t complain about the cost, either is $10-$15.
The price of the project was WAY more than I would ever spend on a RFID opener at the store. I guess it was more of a challenge to learn some different aspects of Arduino development (I2C, Button debouncing, EEPROM programming, Object Oriented C++, etc).
By the way… did you know that Chamberlain (aka sears) openers actually have a serial interface? -Ex-engineer at chamberlain
Want to share any more details on how to use it, or point to other documentation?
+1
Hey, that’s my project! I’m super excited that my first Arduino endeavor is featured here. I hope others can use it to learn as much as I did!
hi jason nice project im actually doing the same for a project at collage any chance i could pick your brains for some information on this
Hey, that’s my project! I’m really excited that my first Arduino endeavor was featured on this website. I hope everyone can learn as much as I did from it!