RTLSDR

Decoding Satellite-based Text Messages With RTL-SDR And Hacked GPS Antenna

[Carl] just found a yet another use for the RTL-SDR. He’s been decoding Inmarsat STD-C EGC messages with it. Inmarsat is a British satellite telecommunications company. They provide communications all over the world to places that do not have a reliable terrestrial communications network. STD-C is a text message communications channel used mostly by maritime operators. This channel contains Enhanced Group Call (EGC) messages which include information such as search and rescue, coast guard, weather, and more.

Not much equipment is required for this, just the RTL-SDR dongle, an antenna, a computer, and the cables to hook them all up together. Once all of the gear was collected, [Carl] used an Android app called Satellite AR to locate his nearest Inmarsat satellite. Since these satellites are geostationary, he won’t have to move his antenna once it’s pointed in the right direction.

Hacked GPS antenna
Hacked GPS antenna

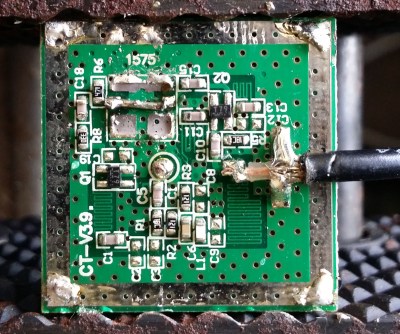
As far as antennas go, [Carl] recommends a dish or helix antenna. If you don’t want to fork over the money for something that fancy, he also explains how you can modify a $10 GPS antenna to work for this purpose. He admits that it’s not the best antenna for this, but it will get the job done. A typical GPS antenna will be tuned for 1575 MHz and will contain a band pass filter that prevents the antenna from picking up signals 1-2MHz away from that frequency.

To remove the filter, the plastic case must first be removed. Then a metal reflector needs to be removed from the bottom of the antenna using a soldering iron. The actual antenna circuit is hiding under the reflector. The filter is typically the largest component on the board. After desoldering, the IN and OUT pads are bridged together. The whole thing can then be put back together for use with this project.

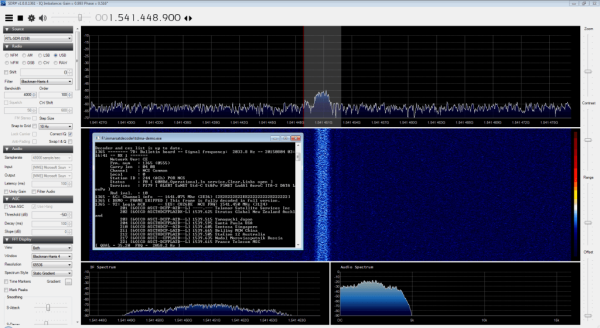
Once everything was hooked up and the antenna was pointed in the right place, the audio output from the dongle was piped into the SDR# tuner software. After tuning to the correct frequency and setting all of the audio parameters, the audio was then decoded with another program called tdma-demo.exe. If everything is tuned just right, the software will be able to decode the audio signal and it will start to display messages. [Carl] posted some interesting examples including a couple of pirate warnings.

If you can’t get enough RTL-SDR hacks, be sure to check out some of the others we’ve featured in the past. And don’t forget to send in links to your own hacking!

Cat Feeder

Hack Your Cat’s Brain To Hunt For Food

This cat feeder project by [Ben Millam] is fascinating. It all started when he read about a possible explanation for why house cats seem to needlessly explore the same areas around the home. One possibility is that the cat is practicing its mobile hunting skills. The cat is sniffing around, hoping to startle its prey and catch something for dinner. Unfortunately, house cats don’t often get to fulfill this primal desire. [Ben] thought about this problem and came up with a very interesting solution. One that involves hacking an electronic cat feeder, and also hacking his cat’s brain.

First thing’s first. Click past the break to take a look at the demo video and watch [Ben’s] cat hunt for prey. Then watch in amazement as the cat carries its bounty back to the cat feeder to exchange it for some real food.

Continue reading “Hack Your Cat’s Brain To Hunt For Food”

Aurora Painting

“Arduino Borealis” Combines LEDs And Paint

[Stef Cohen] decided to combine three different artistic mediums for her latest project. Those are painting, electronics, and software. The end goal was to recreate the aurora borealis, also known as the northern lights, in a painting.

The first step was to make the painting. [Stef] began with a shadow box. A shadow box is sort of like a picture frame that is extra deep. A snowy scene was painted directly onto the front side of the glass plate of the shadow box using acrylic paint. [Stef] painted the white, snowy ground along with some pine trees. The sky was left unpainted, in order to allow light to shine through from inside of the shadow box. A sheet of vellum paper was fixed to the inside of the glass pane. This serves to diffuse the light from the LEDs that would eventually be placed inside the box.

Next it was time to install the electronics. [Stef] used an off-the-shelf RGB LED matrix from Adafruit. The matrix is configured with 16 rows of 32 LEDs each. This was controlled with an Arduino Uno. The LED matrix was mounted inside the shadow box, behind the vellum paper. The Arduino code was easily written using Adafruit’s RGB Matrix Panel library.

To get the aurora effect just right, [Stef] used a clever trick. She took real world photographs of the aurora and pixelated them using Photoshop. She could then sample the color of each pixel to ensure that each LED was the appropriate color. Various functions from the Adafruit library were used to digitally paint the aurora into the LED matrix. Some subtle animations were also included to give it an extra kick.

Saving An Alarm System Remote And $100

[Simon] has been using his home alarm system for over six years now. The system originally came with a small RF remote control, but after years of use and abuse it was finally falling apart. After searching for replacement parts online, he found that his alarm system is the “old” model and remotes are no longer available for purchase. The new system had similar RF remotes, but supposedly they were not compatible. He decided to dig in and fix his remote himself.

He cracked open the remote’s case and found an 8-pin chip labeled HCS300. This chip handles all of the remote’s functions, including reading the buttons, flashing the LED, and providing encoded output to the 433MHz transmitter. The HCS300 also uses KeeLoq technology to protect the data transmission with a rolling code. [Simon] did some research online and found the thew new alarm system’s remotes also use the same KeeLoq technology. On a hunch, he went ahead and ordered two of the newer model remotes.

He tried pairing them up with his receiver but of course it couldn’t be that simple. After opening up the new remote he found that it also used the HCS300 chip. That was a good sign. The manufacturer states that each remote is programmed with a secret 64-bit manufacturer’s code. This acts as the encryption key, so [Simon] would have to somehow crack the key on his original chip and re-program the new chip with the old key. Or he could take the simpler path and swap chips.

A hot air gun made short work of the de-soldering and soon enough the chips were in place. Unfortunately, the chips have different pinouts, so [Simon] had to cut a few traces and fix them with jumper wire. With the case back together and the buttons in place, he gave it a test. It worked. Who needs to upgrade their entire alarm system when you can just hack the remote?

Control Nest Devices With Amazon Echo

[ZPriddy] was looking for a way to control his Nest thermostats with Amazon Echo. He didn’t want to settle for using AWS or some other hosted service. [ZPriddy] wanted something that he could host and manage completely on his own. The end result is what he calls EchoNestPy.

[ZPriddy] started by learning how to use the Alexa Skills Kit (ASK). ASK is the official SDK that allows enthusiasts to add functionality to their Amazon Echo. Unfortunately for [ZPriddy], most of the example code he found was designed to be used on Amazon Lambda, but that didn’t stop him. After finding a few examples of Amazon Echo requests and responses, he was on his way.

[ZPriddy] chose to implement a simple web server using Flask. The web server listens for the Amazon requests and responds appropriately. It also Oauth2 authentication to ensure some level of security. The server is capable of synchronizing the temperature of multiple Nest devices in the same home, but it can also increment or increment the temperature across the board. This is accomplished with some simple voice commands such as “Tell Nest that I’m a little bit chilly”. If you like Amazon Echo hacks, be sure to check out this other one for controlling WeMo devices. Continue reading “Control Nest Devices With Amazon Echo”

Coffee Alarm

Alarm Notifies The Office When The Coffee Is Ready

[Stian] thought it would be nice if his coworkers could be electronically notified when the latest batch of coffee is ready. He ended up building an inexpensive coffee alarm system to do exactly that. When the coffee is done, the brewer can press a giant button to notify the rest of the office that it’s time for a cuppa joe.

[Stian’s] first project requirement was to activate the system using a big physical button. He chose a button from Sparkfun, although he ended up modifying it to better suit his needs. The original button came with a single LED built-in. This wasn’t enough for [Stian], so he added two more LEDs. All three LEDs are driven by a ULN2003A NPN transistor array. Now he can flash them in sequence to make a simple animation.

This momentary push button supplies power to a ESP8266 microcontroller using a soft latch power switch. When the momentary switch is pressed, it supplies power to the latch. The latch then powers up the main circuit and continues supplying power even when the push button is released. The reason for this power trickery is to conserve power from the 18650 li-on battery.

The core functionality of the alarm uses a combination of physical hardware and two cloud-based services. The ESP8266 was chosen because it includes a built-in WiFi chip and it only costs five dollars. The microcontroller is configured to connect to the WiFi network with the push of a button. The device also monitors the giant alarm button.

When the button is pressed, it sends an HTTP request to a custom clojure app running on a cloud service called Heroku. The clojure app then stores brewing information in a database and sends a notification to the Slack cloud service. Slack is a sort of project management app that allows multiple users to work on projects and communicate easier over the internet. [Stian] has tapped into it in order to send the actual text notification to his coworkers to let them know that the coffee is ready. Be sure to watch the demo video below. Continue reading “Alarm Notifies The Office When The Coffee Is Ready”

Puzzle Box

Puzzle Box Is Rigged To Blow

[Sande24] needed a gift for his father’s birthday. He decided that rather than simply give his father the gifts, he would present his father with a unique challenge. The gifts are locked inside of a multi-stage puzzle box. This isn’t your average puzzle box though. This one is rigged to blow.

The puzzle box was designed to test his father’s reflexes, mind, and luck. The finished product looks sort of like a wooden crate made from particle board. The box contains three levels, each with its own gift and its own task to be completed.

With the lid opened, the first compartment and puzzle is revealed. Inside of the compartment were a new pair of gloves, meant to protect the father’s hands when working on the puzzles. The first puzzle is built into a sheet of wood with several custom-made levers. The levers must be moved into position in order to remove the wooden sheet and reveal the next level.

The first lever triggers a home-made detonator that eventually lights a series of fireworks placed around the box. You need to solve the puzzle box fast enough to prevent the fireworks from destroying the gifts that lay inside. [Sande24] was unable to legally purchase fuses where he lived, so he had to make his own.

The second level held a gas mask, also meant to protect the father from the booby traps of this mysterious box. This level, also made from a sheet of wood, has nine squares drawn on it. Each square is labeled with a different number which goes into solving a mathematical function (x^5-25x^4+233x^3-995x^2+1866x-1080 = 0). The solution to the function would reveal the safe path to be used to cut the wooden platform in half. Unfortunately [Sande24’s] father cut the wrong squares and released a huge amount of vinegar into the box. Oops.

The bottom level contained the final puzzle and the locked treasure compartment locked with an ordinary padlock. To find the key, another puzzle had to be solved based on a series of wooden levers labeled with different shapes. The shapes provided clues to the order in which the levers should be pulled. Once the levers were moved into position, two compartments were unlocked. One of them contained the key to the treasure box. The other contained another booby trap which would set off more fireworks, destroying the final gift of four cans of Kuld beer. That’s a lot of work to get a a few cans of frothy beverage!

[Thanks Ellery]