We’re interested in any device that can make a PCB out of a copper-clad board, and this entry for the Hackaday Prize might be the simplest machine for PCB fabrication yet. It’s called the Projecta, and it’s a simple way to turn Eagle and KiCad files into a real circuit board.
For the home PCB fabricator, there are two ways to go about the process of turning a copper clad board into a real circuit board. The first is a CNC machine. Drop a piece of FR4 under a cutter, and you’ll get a circuit board and a lot of fiberglass dust. The Othermill is great for this, but it is a bit pricey for all but the most ambitious weekend warrior.
The second method of home PCB fabrication chemically etches the copper away. The etch resist mask can be laid down with dry film resist, or with the ever-popular laser printer, magazine, and laminator trick. Either way, the result is an acid-proof covering over the copper you don’t want to get rid of.
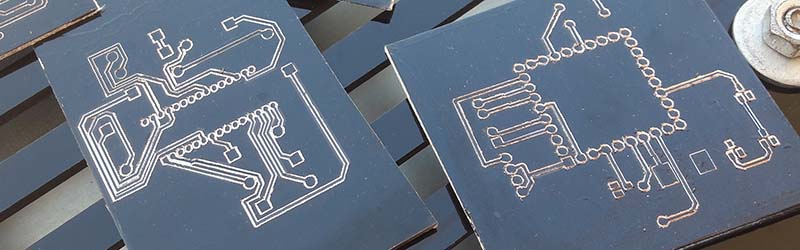
While the Projecta looks and sounds like a miniature CNC machine, it doesn’t chew through copper and produce a ton of fiberglass dust. The Projecta scribes the pattern of a circuit board after the copper has been masked off with a sharpie, marker, or other ink-based resist. When the board comes out of the Projecta, there’s a perfect pattern of circuits on a board, ready for the etch tank.
This technique of putting a copper clad board into a CNC machine and etching it later is something we haven’t seen before. There’s a good reason for that – if you’re putting a board under a cutter already, you might as well just chew away the copper while you’re at it.
Just because we haven’t seen this technique before doesn’t mean it’s a bad idea. Because the Projecta is only scribing a bit of ink off a board, the CNC mechanism doesn’t need to be that complex. It doesn’t need to throw a spindle around, and the Projecta can be built down to a price rather easily.
The Projecta is on Kickstarter right now, with the Kickstarter non-early bird price of $600. You can check out the video demo of the Projecta in action below.


making money from old ideas, he deservers a kick into face, go stole another people
https://www.youtube.com/watch?v=sNh0ubRcTYU
It is not because he had the same idea as someone else that he stoled it. Many can have the same idea independandly. Ideas are not important, making it is.
And now the fun begins. Drilling the holes and making the via. Much better off with a CNC router – cuts and drills.
That’s gotta be one of the most tedious videos ever made.
That weighted scribe mechanism is pretty ingenious…
So you say if someone comes up with an idea, no-one else is allowed to commercialize it? I bet the person in the video wouldn’t even have that 3D-printer if same criteria was applied to it.
http://reprap.org/wiki/Scratch_n'_Etch_PCBs
why have a dedicated machine, Just attach a scriber to a reprap and u have the same thing. Am i missing something? Since you are just scribing the repraps mechanism is good enough?
You can get a reprap kit for half the price too.
Don’t they want like 1800 for their “product”. I can get a low cost 3d printer for what, under $200 from AliExpress and mod it for another handful of dollars?
Absolutely. Any 3D printer should be able to do this, you just need to make a spring loaded scribe holder and then generate the proper G-code to drive it. Same goes if you have a CNC carver.
I made a attachement for our hackerspace Ultimaker Original. it can hold a pen or scriber along the normal hotend. I also made a small clamp to put over the vertical support so the end switch is clear of the hotend.
I think they do it the opposite way. Not painting black with a CNC driven pen, but making everything black before, then cleaning the insulation traces to be etched with a CNC driven scratcher.
Not new, but I wish them well. We were already doing this with old pen plotters, with a carbide or diamond tipped scribe in a modified pen.
http://groups.yahoo.com/group/Homebrew_PCBs
We called it Scratch & Etch or Scratch and Etch.
https://groups.yahoo.com/neo/groups/Homebrew_PCBs/search/messages?query=%22Scratch%20%26%20Etch%22
Or just whip out the old dremel I suppose.
If you have a pen plotter, it won’t carry a cutting bit of any kind. Members of Homebrew_PCBs tried various things including air powered dental drills to put only a light load on the pen plotter.
But if you are building a CNC controlled machine to do this, it is actually difficult to make it so weak that it can’t move a Dremel-like cutter around. I would not use a Dremel, though… not well suited, too much runout, plastic flexes.
https://groups.yahoo.com/neo/groups/Homebrew_PCBs/search/messages?query=%22Scratch%20%26%20Etch%22
I wish them luck, but the method is at least 14 years old. On the Homebrew_PCBs list we called it Scratch & Etch. Coat the board with Dykem Metal Marking Fluid, put a carbide or diamond tipped etching tip in a plotter pen, and scratch it in an old pen plotter.
https://groups.yahoo.com/neo/groups/Homebrew_PCBs/conversations/topics/261
Umm…I was doing this in 1990, I still have the scribe point that mounted in an HP pen plotter.
Hence why I said “at least 14 years old…”
Then there is the opposite method, a CNC controlled Sharpie (actually a Staedtler Lumocolor permanent S pen).
https://www.youtube.com/watch?v=QPSfblHRvac
That is awesome so simple
Only works with presensitized pcbs though (and you have to do the uv + NaOH based bath before etching). Also, I’m not sure how well it would work with ground planes…
No, you don’t need that: you can use a classic permanent marker over non-sensitive board and put it directly on the acid bath.
Yes ground planes could be a bit dubious – the scratch method would work better – but you could make the ground plane a cross hatch rather than solid – though even if it was solid and didn’t get 100% coverage – for most applications that would be adequate – if you were doing something particularly critical conventional photographic technique would be a better system. I can’t think of any boards I’ve made in recent years where the ground plan has been necessary. I usually do a complete ground fill to minimize etching.
Back to the 80’s with automation!
Sorry but PCB made this way were shi*ty at best. Automation will not fix it.
Shitty in what way?
I assume he’s referring to the resolution of a Sharpie marker tip, and it’s true you probably won’t be drawing any PCBs with fine-pitched surface-mount ICs with this method.
OTOH, with a little work you could replace the marker with a scribe and have a cheap knockoff of a $600 Kickstarter project.
I tried this in an HP pen plotter with the same ink, the Staedler Lumocolor 313 red seems to work best.
A problem is that each time the marker changes direction or crosses itself, it tends to leave thin areas of ink that tend to etch through.
600$ seems a bit pricey to me too. But hey, we don’t have to pay an unknown entity hundreds of dollars upfront for something not even in production and pray for on time delivery, if we don’t want to. I would probably go buy a 3D printer that is available right now for that money, and hack up some scratchy-tool addon. It even comes with the added benefit of having yet another tool for prototyping the case for the electronics on the same machine…
But then you miss out on the “double intelligence” and “triple threat” offers ;)
Apart from that the whole “Why we are better?” section seems a bit made up:
– They keep saying their device is only $499, which might have been true for the first 10 backers, but not for anyone else.
– Other machines are just “extremely expensive”, “expensive” or “could be lost in [sic] the way”.
– “Projecta VS 3d printers and Voltera” compares “actual” prices, but only for Voltera, 3d printers aren’t even mentioned. Also, we learn that you don’t even need copper clad laminate or ink for the Projecta – the machine and a $1 “metallic marker” are enough.
I’m sorry, but they should have had someone proof read everything before launching the campaign. While I do believe that they can definitely deliver their product for the price they are asking, the whole page makes me not trust them.
Too right, not paying $600 for a one trick pony that only does half the trick, since you still have to etch the board.
If I currently owned a 3D printer, I’d be experimenting with a low powered engraving pen, and making multiple passes with it to actually cut through the copper.
Uhm, Kickstarter is dedicated to projects not yet in production, isn’t it? If they’d sell the thing already they couldn’t do a Kickstarter.
A similar idea was shown with a laser cutter. I am pretty sure it was in the same video that talked about high proof hydrogen peroxide which was covered by HaD a year or so back.
http://hackaday.com/2012/04/30/etching-your-own-boards-really-really-fast/
I was only off by about 3 years.
We tried this with a blue-box 40W Chinese laser engraver using various surface coatings. It basically turned everything to gunk. The idea was the same, to vaporize the surface coating then etch directly. Maybe there’s now a proper coating for doing this with a laser, but if so, I haven’t run into it yet.
I’ve been thinking about trying it using something like CerMark (creating the resist rather than burning it off, of course), but haven’t gotten around to it yet. There are lots of laser metal marking materials out there, and surely at least one of them will adequately resist the etchant.
Can you laser fuse printer toner straight onto the copper clad? Skip the whole shiny paper part…
https://hackaday.io/project/10747-mini-pcb-printer
>Mini PCB printer: Melting toner (as etch resist) directly onto copper clad board using a laser moved by a DVD drive XY system.
Not gonna get fine detail or neat traces that way.
You could do this with a cheap, versatile craft cutter like a Cricut. Creating a dedicated $600 machine is ridiculous!
Well the hardware is capable, the software is locked up on that particular one, it’s competitors might be better.
I know–I have a different one myself. I was just using “Cricut” like “coke” for soda because of the name recognition.
Avoid Cricut. I once had a machine of theirs then they got all legalistic on anyone using their own machines. There are still places on the internet that describe how to program it, but no programs that I’m aware of.
It seems the crappier the machines, the more they try to lock you into them.
Fortunately, you can buy a swiveling blade holder and with a bit of work, use your CNC carver or 3D printer as a vinyl cutter. Or just put a scribe in it, spray your boards with metal marking fluid, and scratch the resist off without spending an extra $600.
There are lots of other “vinyl cutter” machines that are much more open. I have a Silver Bullet 24″, and I don’t think it would have any trouble doing this project (though I haven’t yet tried it).
Well while you people saying this is just an old process or a ripoff you’re right, but that’s not the point, the point is is makes the process easier for the masses, so more people can make their own circuit boards. The fact is we can all write things longhand but don’t because using a printer is quicker and easier, this thing is the same idea, taking an old idea and making it quick and easy(er), I like it.
Sure. As someone else pointed out, if this is wrong, then all the 3D printers we are buying are also wrong.
At one time, you could lay your hands on an old pen plotter for less than $100. Sometimes for free. The biggest hassle was that many of them use a special parallel port interface that requires a card that cost at least $400, if you could find it. So you had to find a pen plotter with a serial port on it.
Ignoring the fact that this is an old idea, why isn’t anyone pointing out that he’s entered this in the Hackaday prize, yet posts no source files, no github or repository listed, no BOM, nothing.
Mr. Benchoff, take another look at their Hackaday.io page. It’s a blatant advertisement to a (at this moment) closed-source project. From an editor’s perspective, this kind of ‘project’ should be filtered out of any Hackaday Prize mention, because they’ve not done any real work required by the rules, other than tagging their project. It’s a slap in the face to others that are actually posting their code but not getting front page mention(s).
Done before, many times. And here we are after many years, still no off-the-shelf Affordable(!) and rapid ways to make (at-least) single sided PCB’s from the the likes or Phenolic-based or FR4 stock PCB’s…
I’m in the middle of re-purposing an old epson inkjet printer for this scratch function.
The Othermachine folks specifically recommend NOT using FR-4 to avoid fiberglass dust.
Haven’t heard of this method before… Seems like it’d get finer-resolution than using a permanent-marker directly (how fine do they come, anyways?), and seems like it’d be finer than using a router as well (those router-tips can’t be *that* tiny, can they?).
On the Homebrew_PCBs list on Yahoogroups, we were doing this about 14 years ago. So it is difficult for me to find those old messages. But I seem to recall something like 0.1mm etched line width, using Dykem brand metal marking fluid and a carbide tip in a plotter pen. Make sure the metal marking fluid is very dry before scratching, or it tends to tear and get rough edges.
A couple of images here, note that the person who created these set up many lines outlining the traces to get better width for better isolation. It isn’t perfect, you can see tiny slivers of copper along the left side.
https://groups.yahoo.com/neo/groups/Homebrew_PCBs/files/Scratch_And_Etch/
This isn’t well suited to clearing large areas, but on the other hand it -is- well suited to leaving large ground areas. And it saves etchant.
clever it can etch under a holdown washer
http://imgur.com/a/SV3x2
also…. from the kickstarter it has the biggest list of products… looks to be powered by everything, I reckon they have part of sputnik in there
look out for the jump cut at 3:25 in the video
How funny. You’re right, the demo is fake. Take a look at the washer at 3:33
https://youtu.be/Q6FM_nffH1o?t=3m33s
But I guess in the context of stand-up comics lengo, this could easily get a prize for being a “hack”.