Part smoothing for 3D printed parts, especially parts printed in ABS, has been around for a while. The process of exposing an ABS part to acetone vapor turns even low-resolution prints into smooth, glossy 3D renderings that are stronger than ever. The latest improvement in part smoothing for 3D printed parts is now here: use a brush. Published in Nature‘s Scientific Reports, researchers at Waseda University have improved the ABS + acetone part smoothing process with a brush.
According to the authors of the paper, traditional filament-based printing with ABS has its drawbacks. The grooves formed by each layer forms a porous surface with a poor appearance and low rigidity. This can be fixed by exposing an ABS part to acetone vapor, a process we’ve seen about a million times before. The acetone vapor smoothing process is indiscriminate, though; it smooths and over-smooths everything, and the process involves possible explosions.
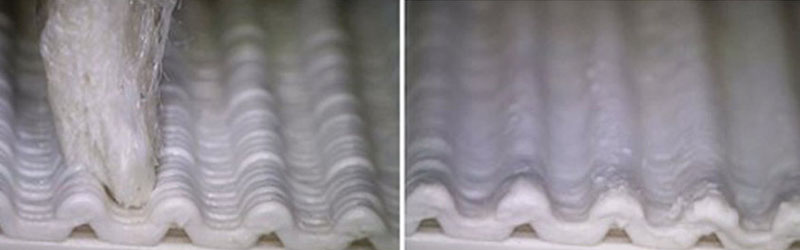
The researcher’s solution is a felt tip pen-like device that selectively applies acetone to a 3D printed part. Compared to the print over-smoothed in a vat of acetone vapor, more detail is retained. Also, there’s a ready market for felt tip pens and there isn’t one for crock pots able to contain explosive vapor. This is, therefore, research that can be easily commercialized.


I was doing this two years ago with a $0.99 pen from Walmart.
me too!
my imagination is faltering…what product doubles as an acetone pen?
Nail polish remover.
Kids toy where you can make your own marker. put in acetone and go.
Perfect for where they ban the sale of markers to minors, there isn’t enough scribbles to look at. Latex, just as hard as most anything to get off.
nice to see some research on the subject, proper data is always appreciated.
but this method is very well known and might very well have been the first smoothing method, isn’t it a bit disingenuous to call it the latest?
there is plenty of exotic ways of doing it, non heated vapour smoothing is also a great method and more controllable than hot vapour, the reason people raved about acetone vapour smoothing was that it would be uniform, something this method has trouble with, being done by hand and all.
abs slurry can also easily be used to build up weak parts, if it is too thin to build up put in more abs, it is also a great way of fixing multi part prints together.
I’m with @oodain. I was brushing and gluing with acetone before anyone started doing the vapor stuff. I had a hell of a time getting nice consistent results, but maybe that’s just my a) level of patience or b) painterliness, or lack thereof. Use too little acetone, and the brush sticks to the model. Too much, and it’s a sloppy mess.
Vapor came second, because the brush technique was a PITA. Maybe we just had the wrong brushes?
Why cant an acetone spray be incorporated to the nozzle? Could have on demand and various degrees of smoothing.
Because acetone (flashpoint -20C) + spark (such as found in an activating limit switch) equals BOOOM!
Activating a limit switch @3,3V or 5V and probably 450°C) down to T6 (>85°C), acetone being also in the highest.
This does still not mean, that I think it would make sense to install an acetone spray in the 3D printer :-) Because the smoothing has to be done on the finished workpiece not during the printing of the layers.
Fire?
details!
You were faster..
(Didn’t saw your coment when i posted mine : ) )
Details….
If the model is going to be painted, I think it’s hard to beat a little thinned plastic putty. I’ve refined an intricate technique that involves smearing a dab on the model, licking my finger, and smoothing it out. Follow that with a bit of the old fashioned mark 1 sandpaper (to borrow a phrase).
However, I’m dying to hear about this fire pen. That sounds like it would be great at parties.
A shot glass and some [fiber] artist brushes is a common sight with my printer.
Avoids all the vapors. Lets you go over and focus on areas and avoid parts you don’t care about.
I do a lot of mold making using ABS, so I don’t care about the asthetic finish(Acetone brushing tends to make coloured ABS go white as the base material comes out different than the colourants) but the finish is great.
Never liked the vapor method except for the ‘shiney and melted’ look.
Oh come on! Not a single “Not a Hack” post yet? Are you guys getting soft? ;)
Nah, just smoothed.
Should not be too hard to get an old felttip pen, wash out the remaining color with water or acetone and then refill that pen with your solvent of choice. I’m pretty shure there are even some refillable pens out there that you could “abuse” for some testing at home. You just have to have a plan as to how and where to store that pen if you leave it with solvents inside.
I kinda like the idea of easy manual application of the smoothing, as the vapour technique takes out or distorts a lot of fine details too easily.
Leaving the solvent inside is not that problem as many felt tip pens (whitboard marker, Edding marker) are solvent based anyway. Just don’t forget and wonder why you keep an old marker which does not write any more because it has no ink. And do not mistake it with the flux-pen. :-)
Embrace the print lines, its a badge of honor. In fact, is there any way I can post process my G code to give the outer skin a grit blast finish?
not sure if you’re serious, but this is actually a thing with Prusa slicer. https://blog.prusaprinters.org/model-with-prusaslicer-modifier-meshes-tutorial/
well, I remembered which slicer completely wrong. It was an option in Cura. Here’s the correct link:
https://www.youtube.com/watch?v=gh5wC4Ti95s
Put it in a dusty environment after acetone-bathing it.
The rigid-Ink blog uses wet-and-dry to rough-out and then get to a polish, which they then finish off with Brasso. Different legislations list the solvents as IPA 3-5%, ammonia 5-10%, oxalic acid 0-3%. It might be worth looking at vapour of some of these.