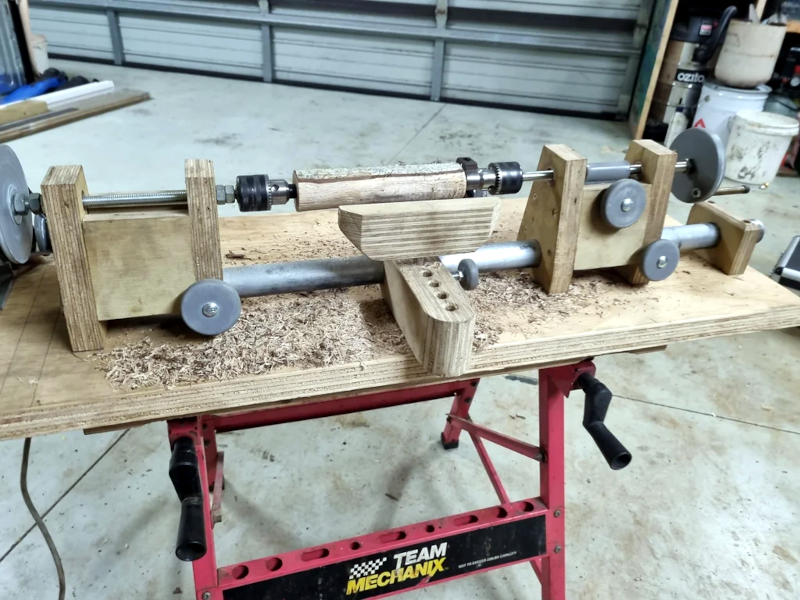
If you need to make round things, you probably need a lathe. Can you build one as nice as one you can buy? Probably not. But can you build one that will work and allow you to do more things than having no lathe at all? [Mikeandmertle] say absolutely! You can see the contraption in operation in the video below.
The build is decidedly functional-looking and only requires a few parts. Most of the components are unremarkable, save for a threaded bar, a metal pipe, some bearings, and a few threaded inserts. Well, there’s also a drill chuck and two lathe centers. Those don’t have to be very expensive, but they may well be the bulk of what you have to spend to make this project.
The optional drilling of the wrong-size holes and subsequent repair made us laugh, but we suggest you skip that step. We thought this lathe would be like many we’ve seen and use an electric drill as a motor. Instead, this lathe uses an angle grinder. It does look easy to mount and, of course, has plenty of torque.
In the video, it looks like there is a little runout, but that isn’t particularly surprising. It still looks useful for something thrown together from mostly spare parts.
You probably can’t use this lathe for anything heavy-duty. You could graduate to a cheap lathe and upgrade it. If you do attempt the build, you might look at a few other projects and mix and match the best parts.


It’s a very simple project, and thus there is not much to write about it, but the design looks useful, and it’s probably designed around parts that were already available, but still…
I’d prefer to use a hand drill instead of an angle grinder for the power source. First, most have a round neck that is designed to clamp the thing into a drill press, and it’s also already got the chuck on it, so that simplifies the design further. If you’re interested in this sort of thing, then you can also look at the drill stand from Wabeco. It is relatively expensive (around EUR 200), but you can get all sorts of attachments for it, including an XY table for coordinate drilling and light milling, and it has ways to use it as a wood lathe too. Even if you don’t want to buy it, you can use it as inspiration to make something similar.
Or go the other way, and simplify the above design even further. The thick plywood base seems adequate for a wood lathe. If you want to stay with wood, you can saw a big dovetail and glue it on top of the baseplate instead of the steel pipe.
An word of caution though:
The LDT-4000W speed controller is a cheap and unsafe Chinese product. I bought a few, just because I was curious what’s in it, and the metal box on itself is (almost) worth the cost of the thing. If you buy this, then make a bunch of modifications. It really got an amazing amount of safety concerns.
1. The PCB inside is very close to the housing. It does not meet a 3mm (6mm) distance safety standard.
2. The PCB is just flapping in the breeze, Mount it to something sturdy (it can easily bent because of the relatively heavy heatsink on it.
3. The power cord has no earthing wire, so replace the power cord and connect earth.
4. The power cable has no strain relief, so add that too if you replace the cord.
The potentiometer (WTH118-2W B470k) itself has a metal axle and looks sturdy, but I’m not sure if it meets western safety standards for 230Vac. The plastic knob does provide isolation, but it’s not something you can really trust on. Connecting an earth wire to the metal case would also mitigate most of the problems here though.
The lathe in this article is a much better design than trying to directly use a hand drill as your headstock bearing. Most drills have horrible runout, and your lathe headstock bearing would be the drill’s motor bearing. Having a steel shaft running through two holes, even with a plain bearing in plywood, is a much better design for taking up the forces in a lathe.
You can probably get away with tossing your hand drill in a bench vice or whatever for a one off, but you are much better off using that drill as designed — to make holes in some kind of a real head stock. Drills aren’t expensive tools, but neither do they need to be disposable. They provide long service lives if you don’t abuse that motor bearing.
Replacing the plywood with aluminum plate and pressing in even the cheapest of skateboard bearings would be even better, and probably last a lifetime for a light user, while still being constructable with a basic wood working hand drill. Cost would be comparable.
More importantly, drill chucks are NOT designed for radial load, whether in a press or a hand drill. The friction fit of the chuck to the arbor will eventually come loose. This applies to that X/Y table as well — that is fine for precision hole positioning, but if you are chucking up an end mill you are really asking for trouble.
If you are doing any kind of milling with that X/Y table you’d be much better off spending $10 on some plates and bearings as described above.
Yes, using a decent quality drill with ball bearings on the chuck axle would be needed for the drill to take abuse like this and still have a decent lifetime. The Wabeco drill stand I mentioned is often combined with the “higher end” drills from Bosch, Metabo, Hikoki, etc. If you pay EUR150 for a hand drill, you get quite a lot more and better hardware then for an EUR 50 drill.
There are plenty of other cheap and possibly unsafe chinese products available – a lot of $10-20 “router” speed controllers work the same way and support enough current for an angle grinder – they look like this. (https://www.harborfreight.com/router-variable-speed-control-dial-59386.html) Also, a variac should work better particularly as far as maintaining lower speeds goes.
But refraining from using a complete drill and instead just using a separate chuck driven by a pulley or a sprocket seems to me like it’s the better option. Especially if you end up wanting multiple speed ratios, instead of just variable speeds.
“Try to construct a rudimentary lathe!”
https://youtu.be/QQzg1vpxnnY?si=14SmheCa88-04paN
“Get off the line, Guy!”
haha
I was reminded of the Fonly Lathe (“I could do so much ‘f’only I had a lathe…”) https://www.2mm.org.uk/articles/fonly/fonlypt1b.htm. Much smaller and requires more attention to detail…but it will machine small metal parts.
Some good closeups:
http://www.lathes.co.uk/fonly/
and interesting take on ‘fonly idea:
https://www.youtube.com/watch?v=sWLQJLkP_yk
One could even go crazy and use a pulley cassette for a range of speeds and torque. Perhaps even parts from a 10-speed bike…
Improvised gears made of circular saw blades.
Will make it safer! (Like gluing shrapnel/bedazzling your cars steering wheel airbag cover.)
Nobody will let their wang or tits swing into that mess.
Wear appropriate protective gear! Put your junk away in the shop.
I have a wonderful set of the “Popular Mechanics Do-it-Yourself Encyclopedia” from 1953. It has plans for building many tools, from bandsaws to milling machines and more. I have built a few, and modernized the builds. This is a wonderful starting place for hoe-building your own workshop.
…
Hoe-building? That’s a new one to me 😂
You can build all kind of hoes. The simple ones are simple manual tools, while both back and front hoes tend to involve hydraulics. When you search for hoe on youtube, you get a whole other kind of beast, which is not even in the dictionary (checked both Merriam Webster, and Cambridge), and I’m not sure how to build those. :)
Well, there are plenty of people who can make that kind of hoe, and it requires minimal skills. It takes about nine months, but it takes another 18 years or so for proper aging.
Nice! It reminds me of an article in (if I remember correctly) Military Modelling magazine, back in the late ’70s/early ’80s, where some guy made lathe for turning out small parts for scale models, using an electric motor from an old train set.