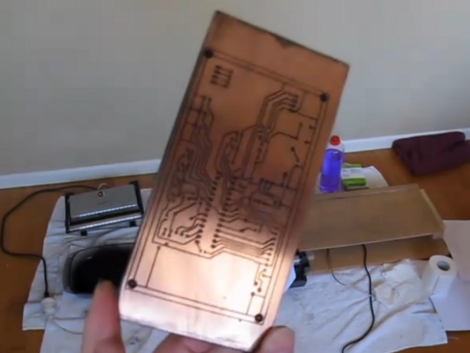
[Rhys Goodwin] has been working on a system to print resist onto copper clad using an inkjet printer. This is a toner transfer alternative as it still uses toner, just not quite as you’d expect. The first step is to modify an inkjet printer, separating the carriage from the feed rollers in order to increase the clearance for the substrate. Instead of printing with etch resistant ink, as we’ve seen before, [Rhys] prints with black ink and then covers the board (ink still wet) in laser toner. Once there’s good adhesion he blows off the excess and bakes the board in a sandwich press, with spacers to keep the iron from touching the surface of the copper clad. This cooks the resist into a hard plastic layer and the board is ready for the acid. Watch him walk you through the process after the break.
[Rhys] uses the same method for silk screen, printing in red and baking the ink onto the substrate without added toner. This produces a nice looking board but it’s still quite a bit of work. It certainly sheds more light on the process than that laser-printer method from back in May. We hope you’ve been inspired by this and come up with the next innovation that makes this process easier.
[youtube=http://www.youtube.com/watch?v=vHtiRCVfUPM&w=470]
[youtube=http://www.youtube.com/watch?v=vHbzrR5jD6M&w=470]


Why does he keep saying “we”?
Cool method. Takes forever though, it’s like a day job to run a quick PCB with all the preparations!
Eh, I still think it’d be cool to have a plotter style design drawing tool. Just use a good sharpie marker for the pen, I know from at least one case that sharpies work really well as long as you don’t leave the board in the acid tool long.
this isn’t really that great of an option. UV printing is still allot easier and is very inexpensive making it much better then this. on the plus side though i’d think that if you could print a protective coating over your pcb then that would be really neet and would make it look very professional
Alright, now I’m considering making a pcb laser printer… now to go find an old laser printer…
Nice job! Looks great for a very reasonable budget too.
Hmm,i thought toner was toxic??
Nice idea,but imho the classic toner transfer method is simpler.Did anyone got the name of the cad
software he uses?
i have a canon ip3500 and i have been doing the resistive ink method for a long time and works great as long as you dont smudge it but this method looks so much cheaper
I may be able to help out with a laser printer.. would a brother hl 2040 do the job?
CAD software is KiCad:
http://kicad.sourceforge.net/wiki/index.php/Main_Page
@colin; of course “we” is a figure of speech here.
Rhys should at the beginning of the first video should say his inability to get Ferric Chloride etchant in ZL is the reason for this he employed this complicated method of making PCBs. Rhys’ blog points to a wep page with content by Adam Seychell, the same page inspired this instructacle http://www.instructables.com/id/Stop-using-Ferric-Chloride-etchant!–A-better-etc/ . I’m no chemist I suspect using all the information available it could be possible to create a Cupric Chloride etchant solution that is not so aggressive to need the etch resist method Rys has devised.
IMO all this info should be archived by hackers, in the event Ferric Chloride for some reason becomes unavailable to the them.
Just check out MG Chemicals. They have a nice pre-sensitized board that exposes with regular florescent lamps. You can do double sided, don’t need special lamps or LEDs or anything, just a regular drop lamp.
Yes, this is a cool method he’s doing, but seems to be a lot of work, when MG Chemicals is so much easier.
Minimum trace width with this method?
To be honest I haven’t tested which I know is pretty lame. I will next time I do a board and put the results on the original post. The board on the post is 19mil from memory so not exactly impressive.
nice but WHY????
it is so simple to print on any transaprent film with any laser printer then to transfer to any pre-sensitised PCB with any UV lamp and develop in seconds with any NaOh available then etch in minutes with HCL+H2O2
I can do a complete 1 side pcb in less than 12 minutes !
laser print 30sec.
cut transparency and adjust on pcb 1min.
UV light 2min
Photoresist develop 1min
Rince 30sec
Etch 5min
Be very careful with laser toner. The average particle size of its dust gets down to the micron level where it doesn’t matter if it’s Carbon or Arsenic, it’ll still cause you harm. People forget about how dangerous small particles can get.
If you’re going to try something with laser toner, take some precautions beyond opening a window and using a mask as both probably won’t do much at that micron size. A humidifier, swamp cooler, low-micron HEPA filter or something else. Ionizers actually work well on toner dust but can take time to clear the air.
WHY? Well that is a good question. I guess sometimes we like to buy things off the shelf and use them. Other times we like to hack things up, like old inkjet printers and toner cartridges, things that cost us nothing. Just for fun. And when we do, we come to Hack a Day and share them. ‘We’, the ones who like to hack things. :)
@Rhys, I believe you completely missed the point of Tim’s question. Tim was simply pointing out the fact that there are better ways to DIY something like this, and I completely agree with him. I certainly wouldn’t try to use that dreadful toner dust without very good protection, and without an extremely good reason to do so.
The best method is the one you use.
I’m with rhys on this method, I have 3 epson r300s all sitting here, none of them need any adjustment at all to do what rhys is doing, they have a front feeding tray that prints to CD/DVD media. they come with an insert so that you can do business card sized boards, roughly 3.5″x2.5″x1/32″.
you can go one better than the ink/toner method and buy a pigment based ink from MIS http://www.inksupply.com/arcink_mispro.cfm
there is a nice couple of pages on massmind:
http://techref.massmind.org/techref/pcb/etch/directinkjetresist.htm
a 10 cart refill will cost you $18
and a dedicated yahoogroup:
http://tech.groups.yahoo.com/group/Inkjet_PCB_Construction/
just print, bake, etch.
If you hunt around there are methods for mixing your own conductive inks and printing the CIRCUIT directly to a blank substrate, I can’t see a laser doing that so easily.
oh and 12mil trace / 10mil gap is easily achievable but if you hunt around on the sites that I have provided I believe they’re down to 3/3 which is pretty tidy in anyones eyes.
Hey… after etching and cleaning, you could repeat the first steps of the process (printing/toner/baking) to print additional information on the component side, like component outlines, numbers, etc. Perhaps even yellow toner for this.
Most toner material is just polyester resin dust and dyes, nothing particularly nasty at all. Only really a hazard as any dust is if you breath enough of it for long enough. Check the MSDS.
oh good god, just buy the sheets of blue resist transfer sheets and call it done.. Why do you guys out there waste a week of tinkering to make a convoluted, rube goldberg process that ends up as costly as buying the blue transfer sheets?
Rhys made a good job! I dream with a conductive ink to use with one print like this… but recently, I have been used the fast pcb resin. It’s photosensitve and I use a simple fluorescent lamp (25W at 15cm above the board) to polymerize the resin. It takes me about 15 minutes. With UV lamp takes it’s more fast… I spread the resin with my finger (without spin the board, i.e., without centrifuge). The result is pretty good: http://www2.ele.ufes.br/~alexandre/pcb/quadrotorboards.html
The fast pcb here in Brazil can be order in this site:
http://circuitoimpressofacil.com.br/products/Mini-Kit-de-Tintas-Fastpcb-50.html (resin for etching, solder mask and silk)
I beliave that in another countries must have similars products like this…
Tutorial about fast pcb:
http://www.youtube.com/watch?v=J7T1cDK0oGY
Fast pcb resin for etching:
http://www.microtecnet.com.br/tinta-fotografica.html
Fast pcb resin for solder mask:
http://www.microtecnet.com.br/mascara-de-solda.html
Hey @Abbott..
I don’t think doing toner directly via laser printer (aka “xerography”) will work.. bc xerography relies on a localized static charge to hold the toner in place before/while it gets fused to the paper as it rotates around the drum.
1st problem.. you can rotate copper around the drum.. and #2, copper would totally dissipate the static charge and toner wold not form patterns on the surface.
Sorry man.. back to the blue iron on. :)
Tweeks
Follow up for @Abbot verifying my statements:
http://en.wikipedia.org/wiki/Xerography
Tweeks
“We hope you’ve been inspired by this and come up with the next innovation that makes this process easier.”
Uuuuuuugh… UV?
Interesting, but I think I’d be more impressed with a laser-printer version that prints directly to the board, seals the toner, and you’re done. Just feed the board in one side, and it comes out the other (hot).
But yeah, just use the transfer paper.
surplustronics in auckland/nz had ferric chloride last time i was in there.
Another project about direct to pcb inkjet printing:
http://techref.massmind.org/techref/pcb/etch/cx4200-vs.htm
amazing home tech , thanks
I mod a direct pcb printer in year 2012:
https://youtu.be/I_R72hQG0pA